
Apple’s App Store is a basic assistance on a superficial level. However there’s much more to it than basically signing in with your Apple ID and giving a Mastercard.
You can get to a gathering of settings to improve your App Store understanding. These range from essential, for example, seeing your buy history and reclaiming gift vouchers, to further developed, for example, changing installment data and memberships. How about we make a plunge.
Essential App Store Account Details
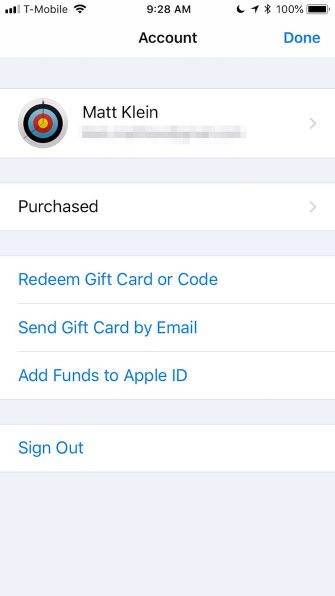
Whenever you need to get to your App Store account subtleties in the application, tap your profile symbol in the upper-right corner (the bullseye in the screen capture underneath).
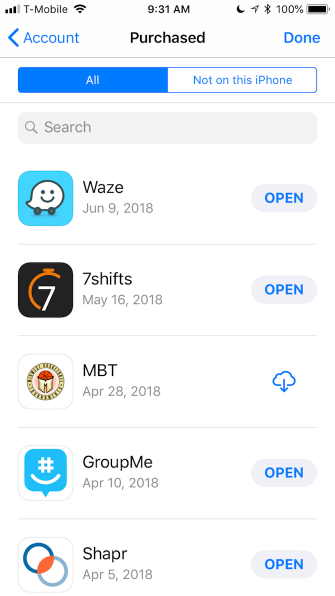
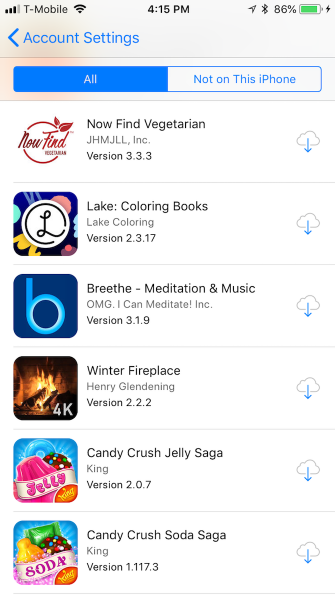
On the Account page, you can see all the applications you have Purchased, which incorporates both paid and free applications. Your buy history incorporates each application you’ve at any point added to your gadgets, regardless of whether it’s introduced or not.
In the event that you’re attempting to discover an application you introduced and, at that point uninstalled, you can limit it down a piece by picking Not on this iPhone.
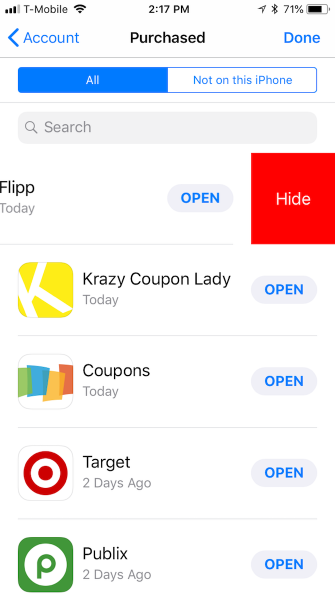
To shroud anything in your bought history, swipe left on it and you’ll see a red Hide button. When you conceal an application, you won’t have the option to see it in your buy history except if you unhide it in the App Store Settings.
he Account page will likewise let you effectively reclaim gift vouchers or codes, send gift vouchers to others by email, and add assets to your Apple ID so you can purchase applications, music, and the sky is the limit from there.
Understanding the App Store Account Settings
To get to the Account Settings, tap your name at the head of the App Store Account screen. You’ll have to enter your password or use Touch ID (or FaceID) to confirm.
Including, Editing, and Removing Payment Methods
On the off chance that you need to purchase anything through the App Store or iTunes, you’ll need an installment technique. You can include, alter, or evacuate a charge card or PayPal account through Payment Information.
Apple won’t charge your card until you really make a buy; it’s simply securely put away in the event that you need it. In the event that you need to expel your installment technique, you can choose None.
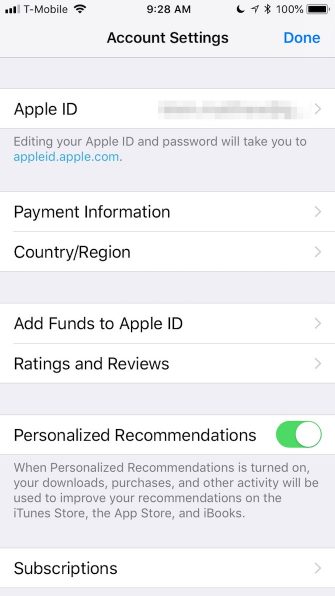
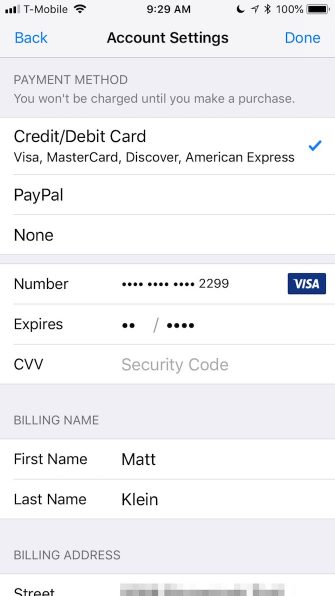
Beneath the installment data, you can change your App Store nation or locale. In the event that you move to another area or district, you will require it to coordinate your location.
Expelling App Reviews and Managing Subscriptions
Have you left evaluations and surveys on certain applications? Assuming this is the case, you can evacuate that rating or audit later. For instance, if a to an application update has discolored your assessment of it or you don’t utilize it any longer, you can erase the rating.
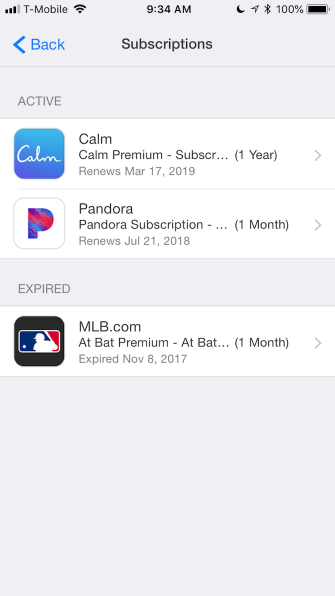
To deal with your application memberships, tap Subscriptions on the Account Settings page. Here you can check both dynamic and terminated memberships and change them varying.

Review Purchase History and Unhiding Apps
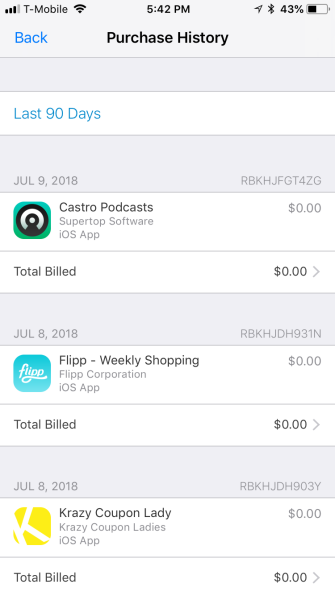
Prior we called attention to that you can see your App Store buys from your Account page. On the off chance that you need progressively nitty gritty breakdown of your buys, you should look at your Purchase History on the Account Settings page. Here you can see full data in the event that you have to present a screen capture for confirmation of procurement.
In the event that you need to sort your applications by date, you can tap Last 90 Days for a full breakdown by year.
Next in the Account Settings is Hidden Purchases, where you can evidently “[u]nhide buys that you have recently covered up.” It doesn’t show up as direct as that, however. There’s no unmistakable path on the best way to really unhide a covered up application. You can positively download it again on the off chance that you need, yet it will in any case stay covered up.
Balancing the App Store settings are three things. You can expel your gadget from programmed downloads, (for example, applications, updates, and music) or recently downloaded content on different gadgets related with your Apple ID.
On the off chance that you need to add cash to your iTunes Pass (so you can purchase motion pictures and other media), essentially show the QR code to a clerk at a taking an interest retailer. At last, you can oversee iTunes bulletins and unique offers.
Other App Store Settings You Should Know About
Head over to the iPhone Settings app, tap your name, and select iTunes & App Store.
These settings are pretty basic. Automatic Downloads determines what downloads to your device, even if it’s purchased on another. If you’re on a limited data plan with your mobile carrier, you’ll probably want to turn off Use Cellular Data.

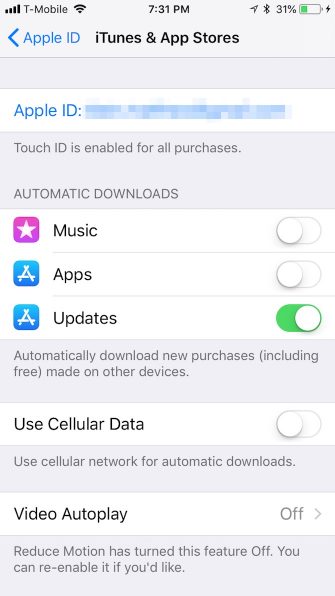
On the off chance that you need to see recordings in the App Store, you can turn Video Autoplay on, off, or just on Wi-Fi.
Have you at any point been irritated by an application requesting that you audit it? Provided that this is true, at that point In-App Rating and Reviews is something you’ll need to kill.
At long last, on the off chance that you need to spare space on your iPhone, the Offload Unused Apps highlight can help. On the off chance that you have applications you don’t utilize, iOS will expel them naturally. Any archives or information related with the application will stay. Notwithstanding, you’ll have to reinstall the application once more (if it is as yet accessible).
Ace the iPhone App Store for a Better Experience
While the settings we’ve examined in fact fall under the Apple ID umbrella, they have a greater amount of an effect on how you utilize the App Store (and iTunes, to some degree). Accordingly, it unquestionably pays to recognize what you can do and where.
For more assistance, look at our tips for getting progressively out of the patched up App Store