
Fragment UI,An Activity website hosting a Fragment can send statistics to and receive facts from the Fragment. A Fragment can not communicate immediately with every other Fragment, even in the equal Activity. The host Activity need to be used as an intermediary.
This practical demonstrates the way to use an Activity to speak with a Fragment. It also indicates a way to use a Fragment to enforce a -pane master/detail format. A master/element format is a layout that lets in users to view a listing of objects (the master view) and drill down into each item for greater details (the element view).
Fragment UI,What you should already KNOW
You ought to be capable of:
- Create a Fragment with an interactive UI.
- Add a static Fragment to the UI format of an Activity.
- Add, update, and get rid of a dynamic Fragment even as an Activity is walking.
Fragment UI,What you will LEARN
You will learn how to:
- Send information to a Fragment.
- Retrieve statistics from a Fragment.
- Implement a grasp/element layout for extensive displays.
Fragment UI,What you will DO
- Use an argument Bundle to send information to a Fragment.
- Define a listener interface with a callback approach in a Fragment.
- Implement the listener for the Fragment and a callback to retrieve records from the Fragment.
- Move Activity code to a Fragment for a master/detail layout.
Fragment UI,Apps overview
Fragment UI,In FragmentExample2, the app from the lesson on the usage of a Fragment, a person can faucet the Open button to show the Fragment, faucet a radio button for a “Yes” or “No” preference, and faucet Close to shut the Fragment. If the person opens the Fragment again, the previous desire isn’t always retained.
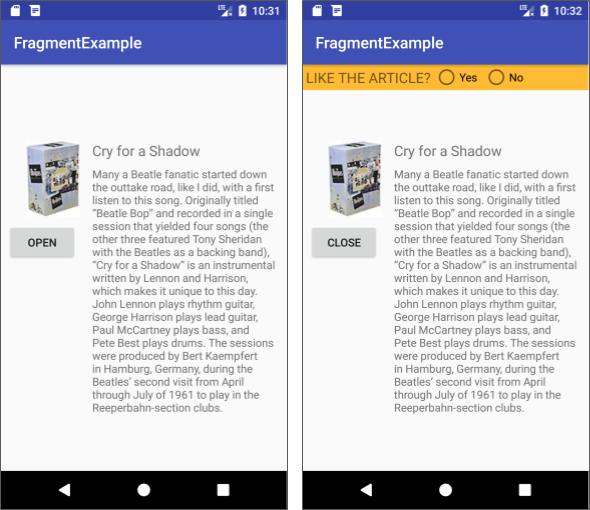
In this lesson you modify the code in the FragmentExample2 app to ship the person’s choice again to the host Activity. When the Activity opens a new Fragment, the Activity can ship the person’s preceding choice to the new Fragment. As a end result, whilst the consumer faucets Open once more, the app suggests the previously decided on preference.
The second app, SongDetail, demonstrates how you can:
- Use a Fragment to reveal a master/detail layout on drugs.
- Provide the Fragment with the facts it desires to carry out responsibilities.
On a cell phone display screen, the SongDetail app seems like the subsequent determine:

On a tablet in horizontal orientation, the SongDetail app displays a master/detail layout:
Fragment UI,Communicating with a fragment
Fragment UI,You will modify the FragmentExample2 app from the lesson on growing a Fragment with a UI, in order that the Fragment can inform the host Activity which preference (“Yes” or “No”) the user made. You will:
- Define a listener interface within the Fragment with a callback approach to get the person’s preference.
- Implement the interface and callback in the host Activity to retrieve the user’s choice.
- Use the newInstance() manufacturing unit method to offer the consumer’s preference lower back to the Fragment whilst growing the following Fragment instance.
Define a listener interface with a callback
To define a listener interface in the Fragment:
- Copy the FragmentExample2 task for you to hold it as an intermediate step. Open the brand new replica in Android Studio, and refactor and rename the brand new task to FragmentCommunicate. (For assist with copying initiatives and refactoring and renaming, see Copy and rename a venture.)
- Open SimpleFragment, and upload another steady within the SimpleFragment class to represent the 1/3 country of the radio button preference, that’s 2 if the consumer has not but made a desire:
private static final int NONE = 2;Add a variable for the radio button choice:
public int mRadioButtonChoice = NONE;
- Define a listener interface referred to as OnFragmentInteractionListener. In it, specify a callback approach that you’ll create, called onRadioButtonChoice():
interface OnFragmentInteractionListener {
     void onRadioButtonChoice(int choice);
}- Define a variable for the listener at the pinnacle of the SimpleFragment elegance. You will use this variable in onAttach() in the subsequent step:
OnFragmentInteractionListener mListener;- Override the onAttach() lifecycle technique in SimpleFragment to seize the host Activity interface implementation:
@Override
 public void onAttach(Context context) {
     super.onAttach(context);
     if (context instanceof OnFragmentInteractionListener) {
         mListener = (OnFragmentInteractionListener) context;
     } else {
         throw new ClassCastException(context.toString()
            + getResources().getString(R.string.exception_message));
     }
 }
The onAttach() approach is referred to as as quickly as the Fragment is associated with the Activity. The code makes positive that the host Activity has implemented the callback interface. If not, it throws an exception.
The string aid exception_message is covered within the starter app for the text “ought to put in force OnFragmentInteractionListener”.
- In onCreateView(), get the mRadioButtonChoice with the aid of adding code to each case of the switch case block for the radio buttons:
case YES: // User chose "Yes."
     textView.setText(R.string.yes_message);
     mRadioButtonChoice = YES;
     mListener.onRadioButtonChoice(YES);
     break;
 case NO: // User chose "No."
     textView.setText(R.string.no_message);
     mRadioButtonChoice = NO;
     mListener.onRadioButtonChoice(NO);
     break;
 default: // No choice made.
     mRadioButtonChoice = NONE;
     mListener.onRadioButtonChoice(NONE);
     break;
Implement the callback in the Activity
To put in force the callback:
- Open MainActivity and implement OnFragmentInteractionListener with a view to acquire the statistics from the Fragment:
public class MainActivity extends AppCompatActivity
implements SimpleFragment.OnFragmentInteractionListener {- In Android Studio, the above code is underlined in crimson, and a crimson bulb appears in the left margin. Click the bulb and pick Implement methods. Choose onRadioButtonChoice(preference:int):void, and click on OK. An empty onRadioButtonChoice() method seems in MainActivity.
- Add a member variable in MainActivity for the choice the person makes with the radio buttons, and set it to the default value:
private int mRadioButtonChoice = 2; // The default (no choice).- Add code to the brand new onRadioButtonChoice() method to assign the consumer’s radio button desire from the Fragment to mRadioButtonChoice. a Toast to show that the Activity has obtained the facts from the Fragment:
 @Override
 public void onRadioButtonChoice(int choice) {
     // Keep the radio button choice to pass it back to the fragment.
     mRadioButtonChoice = choice;
     Toast.makeText(this, "Choice is " + Integer.toString(choice),
                                        Toast.LENGTH_SHORT).show();
 }
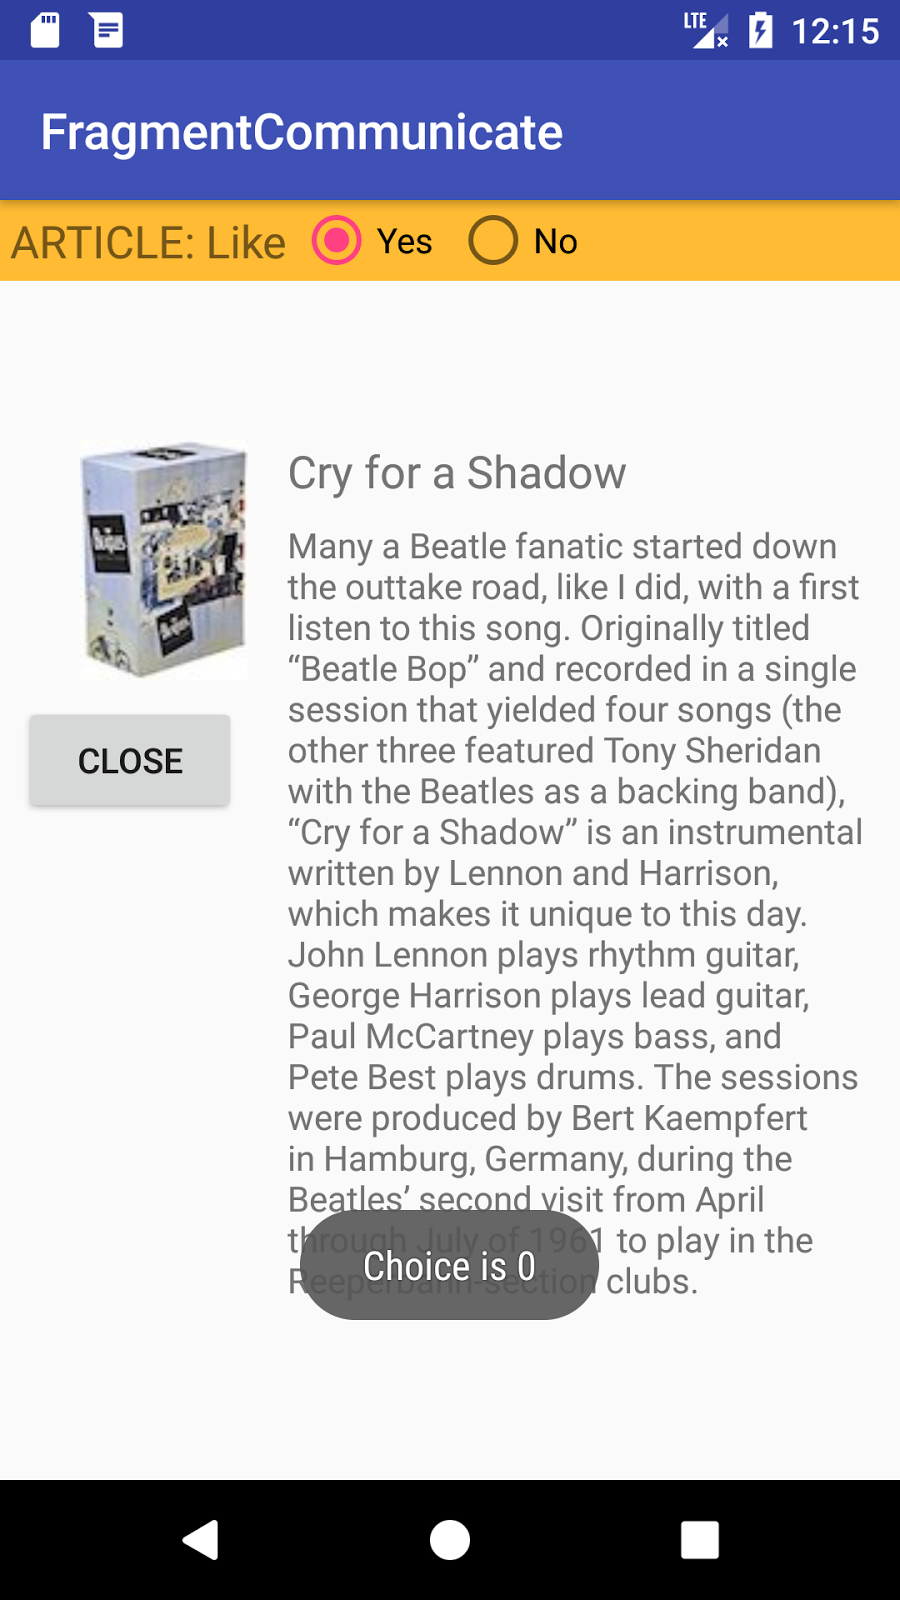
- Run the app, faucet Open, and make a desire. The Activity indicates the Toast message with the selection as an integer (zero is “Yes” and 1 is “No”).
Provide the user’s choice to the fragment
To offer the consumer’s previous “Yes” or “No” preference from the host Activity to the Fragment, bypass the choice to the newInstance() technique in SimpleFragment when instantiating SimpleFragment. You can set a Bundle and use the Fragment.SetArguments(Bundle) technique to deliver the development arguments for the Fragment.
Follow these steps:
- Open MainActivity, and exchange the newInstance() assertion in displayFragment() to the following:
SimpleFragment fragment = SimpleFragment.newInstance(mRadioButtonChoice);- Open SimpleFragment and add the following regular, that is the important thing to locating the facts in the Bundle:
private static final String CHOICE = "choice";- In SimpleFragment, exchange the newInstance() method to the following, which makes use of a Bundle and the setArguments(Bundle) technique to set the arguments before returning the Fragment:
public static SimpleFragment newInstance(int choice) {
         SimpleFragment fragment = new SimpleFragment();
         Bundle arguments = new Bundle();
         arguments.putInt(CHOICE, choice);
         fragment.setArguments(arguments);
         return fragment;
}- Now that a Bundle of arguments is available inside the SimpleFragment, you may upload code to the onCreateView() technique in SimpleFragment to get the selection from the Bundle. Right earlier than the assertion that units the radioGroup onCheckedChanged listener, add the subsequent code to retrieve the radio button desire (if a desire was made), and pre-choose the radio button.
 if (getArguments().containsKey(CHOICE)) {
     // A choice was made, so get the choice.
     mRadioButtonChoice = getArguments().getInt(CHOICE);
     // Check the radio button choice.
     if (mRadioButtonChoice != NONE) {
         radioGroup.check
                  (radioGroup.getChildAt(mRadioButtonChoice).getId());
     }
}- Run the app. At first, the app does not display the Fragment (see the left side of the subsequent parent).
- Tap Open and make a choice consisting of “Yes” (see the middle of the parent under). The desire you made appears in a Toast.
- Tap Close to close the Fragment.
- Tap Open to reopen the Fragment. The Fragment seems with the selection already made (see the right facet of the discern). Your app has communicated the selection from the Fragment to the Activity, after which again to the Fragment.

Changing an app to a master/detail layout
This undertaking demonstrates how you may use a Fragment to put into effect a -pane master/detail format for a horizontal pill display. It additionally suggests a way to take code from an Activity and encapsulate it within a Fragment, thereby simplifying the Activity.
In this task you use a starter app referred to as SongDetail_start that presentations track titles that the user can faucet to peer tune details.
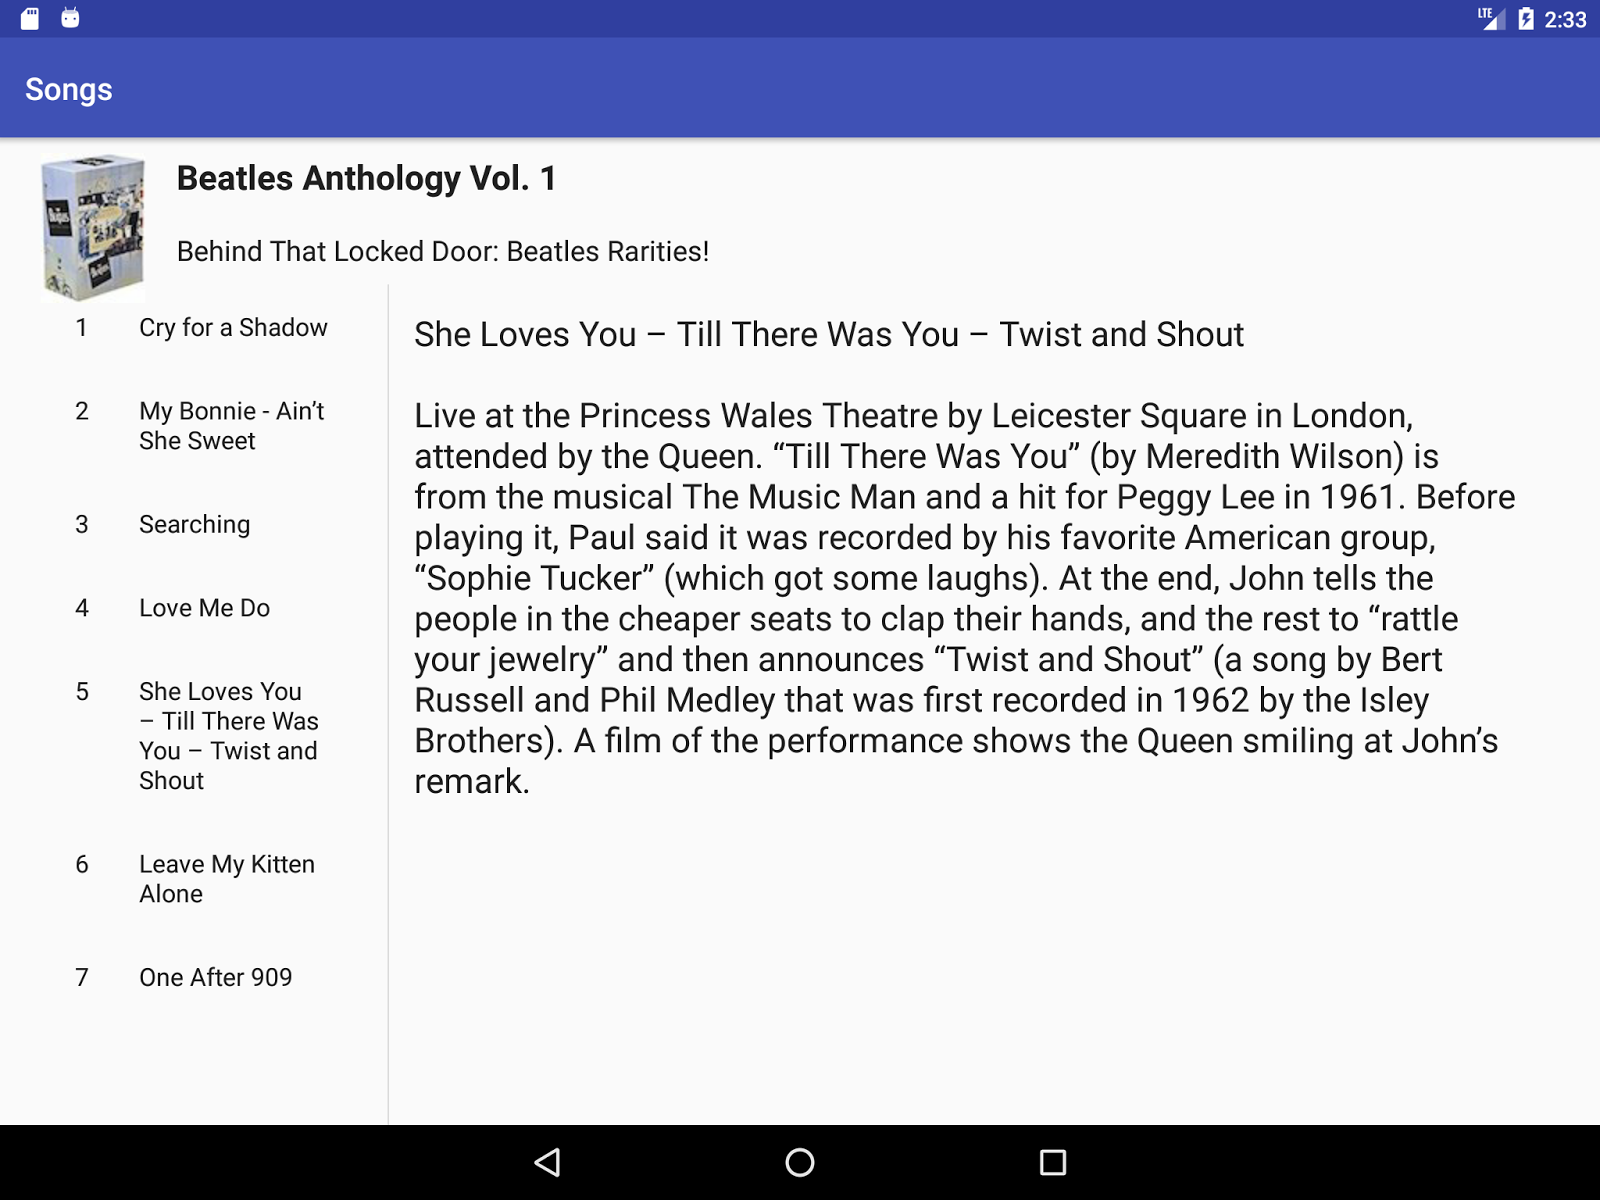
On a tablet, the app doesn’t take advantage of the full screen size, as shown in the following figure:
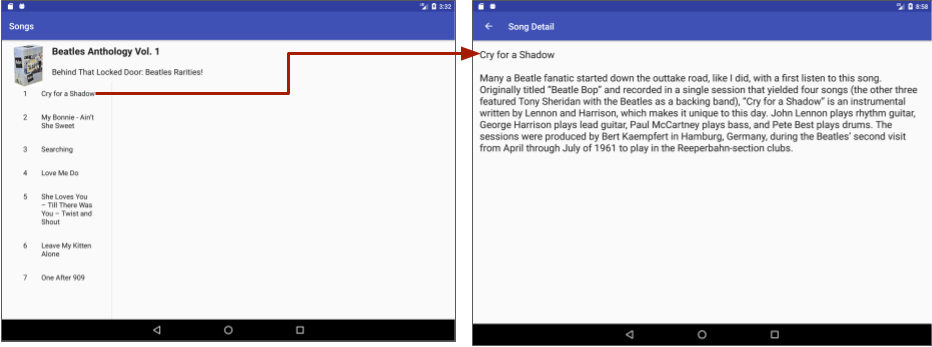
When set to a horizontal orientation, a tablet device is extensive enough to expose records in a grasp/detail format. You will alter the app to expose a grasp/element layout if the device is wide enough, with the tune list because the master, and the Fragment because the element, as shown within the following discern.

The following diagram indicates the difference within the code for the SongDetail starter app (1), and the very last version of the app for each cell cellphone and wide capsules (2-three).
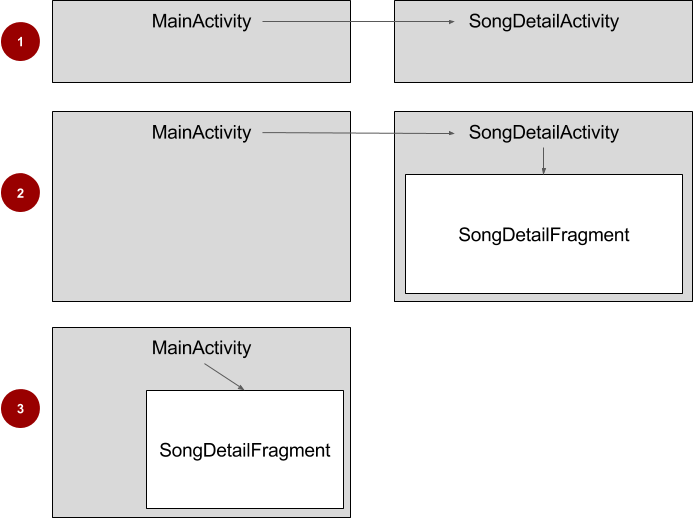
In the above parent:
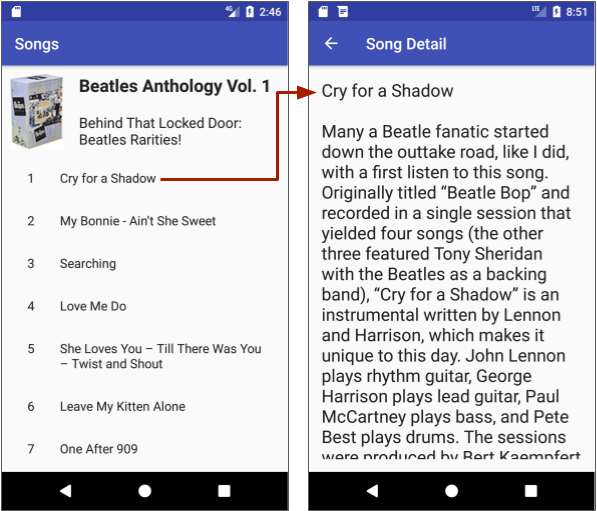
- Phone or tablet: The SongDetail_start app displays the track details in a vertical format in SongDetailActivity, which is called from MainActivity.
- Phone or small screen: The final version of SongDetail displays the song details in SongDetailFragment. MainActivity calls SongDetailActivity, which then hosts the Fragment in a vertical layout.
- Tablet or large display screen in horizontal orientation: If the display is huge enough for the master/detail layout, the very last model of SongDetail shows the music details in SongDetailFragment. MainActivity hosts the Fragment at once.
Examine the starter app layout
To store time, download the SongDetail_start starter app, which has been organized with information, layouts, and a RecyclerView.
- Open the SongDetail_start app in Android Studio, and rename and refactor the mission to SongDetail (for assist with copying initiatives and refactoring and renaming, see “Copy and rename a mission”).
- Run the app on a tablet or a tablet emulator in horizontal orientation. For instructions on using the emulator, see Run Apps at the Android Emulator. The starter app makes use of the identical format for drugs and cell phones—it doesn’t take benefit of a huge display.

- Examine the layouts. Although you don’t need to trade them, you’ll reference the android:identification values for your code.
The song_list.Xml format is covered within activity_song_list.Xml to outline the layout of the music list. You can make bigger it to expose:
song_list.xml as the default for any screen size.
song_list.xml (w900dp) for devices with screens that have a width of 900dp or larger. It differs from song_list.xml because it includes a FrameLayout with an id of song_detail_container for displaying the Fragment on a wide screen.
The activity_song_detail.Xml format for SongDetailActivity includes song_detail.Xml. Provided is a FrameLayout with the identical identification of song_detail_container for showing the Fragment on a display that isn’t huge.
The following layouts are also supplied, which you do not need to exchange:
song_detail.xml: Included within activity_song_detail.xml to define the layout of the TextView for the detailed song information.
activity_song_list.xml: Layout for MainActivity. This layout includes song_list.xml.
song_list_content.xml: Item layout for the RecyclerView adapter.
Examine the starter app code
Open SongDetailActivity and discover the code within the onCreate() technique that displays the tune detail:
// ...
// This activity displays the detail. In a real-world scenario,
// get the data from a content repository.
mSong = SongUtils.SONG_ITEMS.get
                (getIntent().getIntExtra(SongUtils.SONG_ID_KEY, 0));

// Show the detail information in a TextView.
if (mSong != null) {
    ((TextView) findViewById(R.id.song_detail))
                    .setText(mSong.details);
}
// ...
In the next step you’ll add a new Fragment, and replica the if (mSong != null) block with setText() to the new Fragment, in order that the Fragment controls how the tune detail is displayed.
The SongUtils.Java magnificence within the content folder creates an array of fixed entries for the song title and track element statistics. You can adjust this class to refer to unique sorts of data. However, in a real-international manufacturing app, you will most probable get statistics from a repository or server, rather than hardcoding it inside the app.
Add the fragment
Add a brand new blank Fragment, and circulate code from SongDetailActivity to the Fragment, so that the Fragment can take over the task of displaying the track detail.
- Select the app package name within java within the Project: Android view, upload a new Fragment (Blank), and name the Fragment SongDetailFragment. Uncheck the Include fragment manufacturing unit techniques and Include interface callbacks alternatives.
- Open SongDetailActivity, and Edit > Cut the mSong variable assertion from the Activity. Some of the code in SongDetailActivity that is based on it is going to be underlined in crimson, but you will replace that code in next steps.
public SongUtils.Song mSong;
- Open SongDetailFragment, and Edit > Paste the above statement on the top of the elegance.
- In SongDetailFragment, get rid of all code within the onCreateView() technique and alternate it to inflate the song_detail.Xml layout:
 @Override
 public View onCreateView(LayoutInflater inflater, ViewGroup container,
                              Bundle savedInstanceState) {
     View rootView =
             inflater.inflate(R.layout.song_detail, container, false);
     // TODO: Show the detail information in a TextView.
     return rootView;
}- To use the tune element in the Fragment, replace the TODO comment with the if (mSong != null) block from SongDetailActivity, which includes the setText() approach to expose the detail records inside the song_detail TextView. You need to add rootView to use the findViewById() technique; otherwise, the block is the same as the only previously used in SongDetailActivity:
 if (mSong != null) {
             ((TextView) rootView.findViewById(R.id.song_detail))
                     .setText(mSong.details);
 }
Check if the screen is wide enough for a two-pane layout
MainActivity in the starter app presents the information to a 2nd Activity (SongDetailActivity) to show the song detail on a separate Activity display. To alternate the app to provide records for the Fragment, you will change the code that displays the song element.
- If the display is wide sufficient for a -pane layout, MainActivity will host the Fragment, and send the position of the selected music within the list at once to the Fragment.
- If the display isn’t always wide sufficient for a two-pane layout, MainActivity will use an purpose with more information—the position of the chosen music—to start SongDetailActivity. SongDetailActivity will then host the Fragment, and send the position of the selected tune to the Fragment.
In other phrases, the Fragment will take over the task of displaying the track detail. Therefore, your code wishes to host the Fragment in MainActivity if the display screen is extensive enough for a -pane show, or in SongDetailActivity if the display screen is not extensive sufficient.
Open MainActivity, and comply with these steps:
- To serve as a check for the scale of the display screen, upload a non-public boolean to the MainActivity elegance referred to as mTwoPane:
private boolean mTwoPane = false;- Add the subsequent to the stop of the MainActivity onCreate() method:
 if (findViewById(R.id.song_detail_container) != null) {
     mTwoPane = true;
 }
The above code checks for the display size and orientation. The song_detail_container view for MainActivity might be present simplest if the display screen’s width is 900dp or large, due to the fact it’s miles described only within the song_list.Xml (w900dp) format, now not in the default song_list.Xml layout for smaller display sizes. If this view is present, then the Activity need to be in two-pane mode. If a pill is set to portrait orientation, its width will most in all likelihood be decrease than 900dp, and so it will now not show a two-pane layout. the tablet is about to horizontal orientation and its width is 900dp or large, it will display a two-pane format.
Use the fragment to show song detail
The Fragment needs to realize which music name the person decided on. To use the equal exceptional practice for growing an example of a Fragment, as within the previous sports, create a newInstance() factory technique within the Fragment.
In the newInstance() method you may set a Bundle and use the Fragment.SetArguments(Bundle) technique to supply the construction arguments for the Fragment. In a following step, you may use the Fragment.GetArguments() method inside the Fragment to get the arguments provided through setArguments(Bundle).
- Open
SongDetailFragment, and add the following method to it:
 public static SongDetailFragment newInstance (int selectedSong) {
     SongDetailFragment fragment = new SongDetailFragment();
     // Set the bundle arguments for the fragment.
     Bundle arguments = new Bundle();
     arguments.putInt(SongUtils.SONG_ID_KEY, selectedSong);
     fragment.setArguments(arguments);
     return fragment;
 }
The above method receives the selectedSong (the integer position of the song name in the list), and creates the arguments Bundle with SONG_ID_KEY and selectedSong. It then makes use of setArguments(arguments) to set the arguments for the Fragment, and returns the Fragment.
- Open MainActivity, and locate the onBindViewHolder() technique that implements a listener with setOnClickListener(). When the user faucets a music identify, the starter app code starts SongDetailActivity the usage of an reason with greater records (the position of the chosen track within the list):
holder.mView.setOnClickListener(new View.OnClickListener() {
     @Override
     public void onClick(View v) {
         Context context = v.getContext();
         Intent intent = new Intent(context, SongDetailActivity.class);
         intent.putExtra(SongUtils.SONG_ID_KEY,
                                 holder.getAdapterPosition());
         context.startActivity(intent);
     }
 });
This code sends the more statistics—SongUtils.SONG_ID_KEY and holder.GetAdapterPosition())—that SongDetailActivity makes use of to expose an appropriate element for the tapped tune name. You will have to send this records to the new Fragment.
- Change the code in the onClick() method to create a brand new example of the Fragment for 2-pane display, or to apply the purpose (as before) to release the second Activity if not a two-pane display.
if (mTwoPane) {
     int selectedSong = holder.getAdapterPosition();
     SongDetailFragment fragment =
                           SongDetailFragment.newInstance(selectedSong);
     getSupportFragmentManager().beginTransaction()
                          .replace(R.id.song_detail_container, fragment)
                          .addToBackStack(null)
                          .commit();
 } else {
     Context context = v.getContext();
     Intent intent = new Intent(context, SongDetailActivity.class);
     intent.putExtra(SongUtils.SONG_ID_KEY,
                                 holder.getAdapterPosition());
     context.startActivity(intent);
 }
If mTwoPane is proper, the code receives the chosen tune position (selectedSong) within the music title listing, and passes it to the brand new instance of SongDetailFragment using the newInstance() technique inside the Fragment. It then makes use of getSupportFragmentManager() with a update transaction to show a new edition of the Fragment.
The transaction code for coping with a Fragment should be familiar, as you executed such operations in a preceding lesson. By replacing the Fragment, you can refresh with new facts a Fragment that is already running.
If mTwoPane is fake, the code does exactly the same element it did inside the starter app: it starts offevolved SongDetailActivity with an cause and SONG_ID_KEY and holder.GetAdapterPosition() as extra information.
- Open SongDetailActivity, and find the code in the onCreate() method that no longer works due to the removal of the mSong statement. In the subsequent step you’ll replace it.
 // This activity displays the detail. In a real-world scenario,
 // get the data from a content repository.
 mSong = SongUtils.SONG_ITEMS.get
                 (getIntent().getIntExtra(SongUtils.SONG_ID_KEY, 0));
 // Show the detail information in a TextView.
 if (mSong != null) {
     ((TextView) findViewById(R.id.song_detail))
                     .setText(mSong.details);
 }
Previously you chop the if (mSong != null) block that observed the above code and pasted it into the Fragment, in order that the Fragment should display the track detail. You can now update the above code inside the subsequent step in order that SongDetailActivity will use the Fragment to display the song detail.
- Replace the above code in onCreate() with the subsequent code. It first checks if savedInstanceState is null, because of this the Activity started out however its nation was not saved. If it’s miles null, it creates an instance of the Fragment, passing it the selectedSong. (If savedInstanceState isn’t null, the Activity kingdom has been saved—inclusive of while the screen is rotated. In such instances, you do not want to feature the Fragment.)
if (savedInstanceState == null) {
     int selectedSong =
                     getIntent().getIntExtra(SongUtils.SONG_ID_KEY, 0);
     SongDetailFragment fragment =
                     SongDetailFragment.newInstance(selectedSong);
     getSupportFragmentManager().beginTransaction()
                     .add(R.id.song_detail_container, fragment)
                     .commit();
 }
The code first gets the chosen music name function from the rationale greater records. It then creates an instance of the Fragment and adds it to the Activity the usage of a Fragment transaction. SongDetailActivity will now use the SongDetailFragment to display the element.
- To installation the records in the Fragment, open SongDetailFragment and upload the whole onCreate() method earlier than the onCreateView() approach. The getArguments() technique in the onCreate() approach gets the arguments supplied to the Fragment the usage of setArguments(Bundle).
 @Override
 public void onCreate(Bundle savedInstanceState) {
     super.onCreate(savedInstanceState);
     if (getArguments().containsKey(SongUtils.SONG_ID_KEY)) {
         // Load the content specified by the fragment arguments.
         mSong = SongUtils.SONG_ITEMS.get(getArguments()
                     .getInt(SongUtils.SONG_ID_KEY));
     }
}- Run the app on a cellular cellphone or cellphone emulator. It should look the same as it did before. (Refer to the determine at the beginning of this project.)
- Run the app on a pill or tablet emulator in horizontal orientation. It must show the grasp/detail layout as proven in the following parent.

Summary
Adding a Fragment dynamically:
- When adding a Fragment dynamically to an Activity, the excellent practice for representing the Fragment for example in the Activity is to create the example with a newinstance() manufacturing facility technique inside the Fragment.
- The newinstance() method can set a Bundle and use setArguments(Bundle) to supply the development arguments for the Fragment.
- Call the newinstance() method from the Activity to create a new example, and skip the precise facts you want for this Bundle.
Fragment lifecycle:
- The system calls onAttach() while a Fragment is first associated with an Activity. Use onAttach() to initialize essential components of the Fragment, which includes a listener.
- The device calls onCreate() when creating a Fragment. Use onCreate() to initialize components of the Fragment which you need to maintain when the Fragment is paused or stopped, then resumed.
- The gadget calls onCreateView() to draw a Fragment UI for the first time. To draw a UI for your Fragment, you need to return the root View of your Fragment layout from this technique. You can return null if the Fragment does no longer provide a UI.
- When a Fragment is inside the lively or resumed nation, it is able to access the host Activity instance with getActivity()and without difficulty perform duties which include finding a View within the Activity layout.
Calling Fragment methods and saving its state:
- The host Activity can name methods in a Fragment by way of acquiring a connection with the Fragment from FragmentManager, the use of findFragmentById().
- Save the Fragment state during the onSaveInstanceState() callback and repair it for the duration of either onCreate(), onCreateView(), or onActivityCreated().
To communicate from the host Activity to a Fragment, use a Bundle and the following:
- SetArguments(Bundle): Supply the construction arguments for a Fragment. The arguments are retained throughout the Fragment lifecycle.
- GetArguments(): Return the arguments provided to setArguments(Bundle), if any.
To have a Fragment communicate to its host Activity, declare an interface in the Fragment, and implement it in the Activity.
- The interface inside the Fragment defines a callback approach to communicate to its host Activity.
- The host Activity implements the callback method.