
In android, TextClock is a UI manage. Which is used to expose the cutting-edge date or time as a formatted string.
Android TextClock, The TextClock provides a date / time in codecs. One is to show the date / time in 24 Hour layout and every other one is to expose. The date / time in 12 hour layout.
By using is24HourModeEnabled() method. We can without difficulty understand that whether the machine. The use of TextClock in 24 Hours format or 12 Hours format.
Following is the pictorial illustration of the use of a TextClock in android packages.

Now we will see how to define and use TextClock control in android applications.
Create Android TextClock in XML Layout File
In android, we can create TextClock in XML layout file using <TextClock> element with different attributes like as shown below.
<TextClock
    android:id="@+id/textClock"
    android:layout_width="wrap_content"
    android:layout_height="wrap_content"
    android:format12Hour="hh:mm:ss a" />
If you observe above code snippet. We used android:format12Hour attribute to set the 12 Hours time format based on our requirements.
Android TextClock Control Attributes
Following are the some of commonly used attributes related to TextClock control in android applications.
| Attribute | Description |
|---|---|
| android:id | It is used to uniquely identify the control |
| android:format12Hour | It is used to specify the formatting pattern to show the time in 12 hour mode. |
| android:format24Hour | It is used to specify the formatting pattern to show the time in 24 hours mode. |
| android:gravity | It is used to specify how to align the text like left, right, center, top, etc. |
| android:textColor | It is used to change the color of text. |
| android:textSize | It is used to specify the size of text. |
| android:textStyle | It is used to change the style (bold, italic, bolditalic) of text. |
| android:background | It is used to set the background color for textclock control. |
| android:padding | It is used to set the padding from left, right, top and bottom. |
Android TextClock Control Example
Following is the example of defining a two TextClock controls, one Button control and one TextView control in RelativeLayout to get the time from TextClock on Button click.
Create a new android application the use of android studio and give names as TextClockExample. In case if you are not aware about developing an app in android studio check this newsletter Android Hello World App.
Now open an activity_main.Xml file from reslayout direction and write the code like as proven under
activity_main.xml
<?xml version="1.0" encoding="utf-8"?>
<RelativeLayout xmlns:android="http://schemas.android.com/apk/res/android"
    android:layout_width="match_parent" android:layout_height="match_parent">
    <TextClock
        android:id="@+id/textClock1"
        android:layout_width="wrap_content"
        android:layout_height="wrap_content"
        android:layout_marginTop="100dp"
        android:layout_marginLeft="70dp"
        android:format12Hour="hh:mm:ss a"
        android:textColor="#F1511B"
        android:textSize="45dp"
        android:textStyle="bold" />
    <TextClock
        android:id="@+id/textClock2"
        android:layout_width="wrap_content"
        android:layout_height="wrap_content"
        android:layout_marginTop="30dp"
        android:layout_marginLeft="100dp"
        android:layout_below="@+id/textClock1"
        android:textColor="#80CC28"
        android:textSize="45dp"
        android:textStyle="bold" />
    <Button
        android:id="@+id/btnGet"
        android:layout_width="wrap_content"
        android:layout_height="wrap_content"
        android:layout_alignLeft="@+id/textClock2"
        android:layout_below="@+id/textClock2"
        android:layout_marginTop="30dp"
        android:layout_marginLeft="40dp"
        android:text="Get Time"/>
    <TextView
        android:id="@+id/textview1"
        android:layout_width="wrap_content"
        android:layout_height="wrap_content"
        android:layout_alignLeft="@+id/btnGet"
        android:layout_below="@+id/btnGet"
        android:layout_marginTop="20dp"
        android:layout_marginLeft="-30dp"
        android:textSize="20dp"
        android:textStyle="bold"/>
</RelativeLayout>
If you have a look at above code we created a two TextClock controls, one Button and one TextView manipulate in XML Layout record.
The android TextClock has been introduced in API Level 17 so if we use TextClock in our app then it requires a minimum API Level 17. In case in case your app SDK version much less than 17 then TextClock will throw an errors like “View Required API Level 17”.
To fix this mistake we need to replace SDK version of our app for that simply double click on build.Gradle(Module: app) record in utility Gradle Scripts segment like as shown beneath.
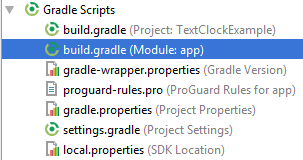
Once you open build.gradle(Module: app) file update minSDKVersion to 17 or more and click SyncNow like as shown below.
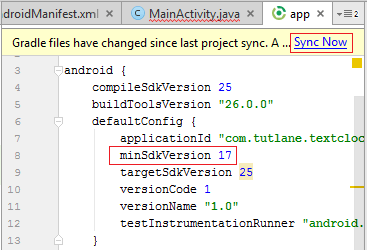
Once you replace SDK version then “View Required API Level 17” hassle will get solved routinely.
Now we need to load the XML format aid from our activity onCreate() callback technique, for that open primary activity file MainActivity.Java from javacom.Tutlane.Textclockexample path and write the code like as proven underneath.
MainActivity.java
package com.tutlane.textclockexample;
import android.support.v7.app.AppCompatActivity;
import android.os.Bundle;
import android.view.View;
import android.widget.Button;
import android.widget.TextClock;
import android.widget.TextView;

public class MainActivity extends AppCompatActivity {
    private TextClock tClock;
    private TextView tView;
    private Button btn;
    @Override
    protected void onCreate(Bundle savedInstanceState) {
        super.onCreate(savedInstanceState);
        setContentView(R.layout.activity_main);
        tClock = (TextClock) findViewById(R.id.textClock1);
        tView = (TextView) findViewById(R.id.textview1);
        btn = (Button)findViewById(R.id.btnGet);
        btn.setOnClickListener(new View.OnClickListener() {
            @Override
            public void onClick(View v) {
                tView.setText("Time: "+tClock.getText());
            }
        });
    }
}
If you observe above code we are calling our format the use of setContentView technique in the shape of R.Layout.Layout_file_name in our interest report. Here our xml document call is activity_main.Xml so we used document name activity_main and we’re seeking to get the time from TextClock manipulate on button click.
Generally, at some point of the release of our interest, onCreate() callback approach can be referred to as by means of android framework to get the required layout for an activity.
Output of Android TextClock Example
When we run above example using android virtual device (AVD) we will get a result like as shown below.
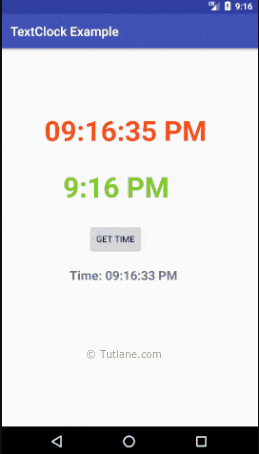
If you observe above result, we are able to get the time from TextClock control when we click on on Button in android utility.
This is how we are able to use TextClock control in android applications to show the time primarily based on our requirements.