
WooCommerce on Amazon,WooCommerce, a powerful ecommerce plugin for WordPress, can be an excellent basis for an online save. What’s extra, whilst you run that web page on Amazon Web Services, you could have a cost powerful host.
Although there are several steps worried in growing an Amazon Elastic Compute Cloud (EC2) instance, putting in the net server, and installing WordPress and WooCommerce, the task is something that can be performed with handiest a little technical revel in.
What follows are the fundamental steps to get WooCommerce up and going for walks on EC2.
WooCommerce on Amazon,Log into the AWS Console
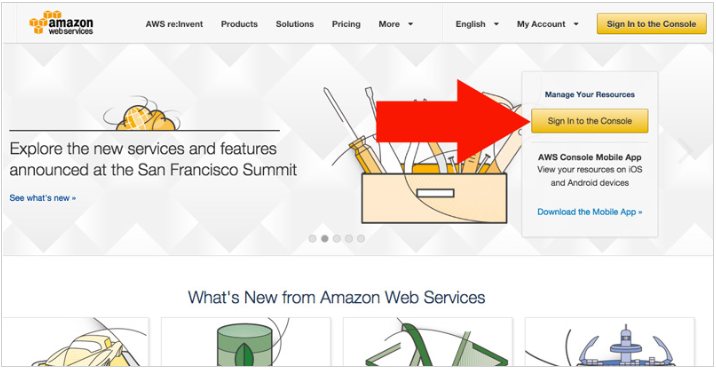
WooCommerce on Amazon,To use Amazon Web Services, you’ll need Amazon credentials. Interestingly, these may be the very equal person call and password you operate to shop on Amazon. To access the AWS console, truly visit aws.Amazon.Com, click at the “Sign In to the Console” button, and enter your credentials. Once you’ve got reached the console, click the hyperlink for EC2 — at the time of writing, this link became within the upper left beneath the subhead “Compute.”
WooCommerce on Amazon,Create and Configure a New EC2 Instance
WooCommerce on Amazon,Once you’ve decided on the EC2 link, you should locate yourself viewing the EC2 dashboard. In the center of the page, there’s a blue “Launch” button used for creating a new EC2 example. You can think of an EC2 example as a digital server on which you’ll run your WooCommerce shop.

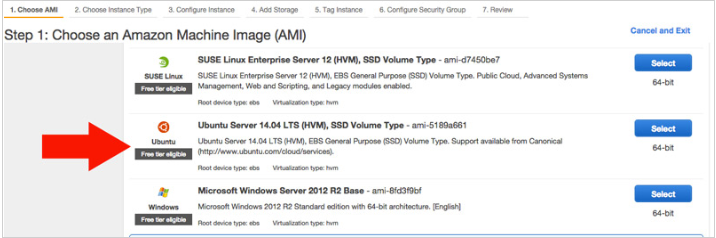
Amazon has a number of quick-start EC2 options. For our purposes, use Ubuntu Server 14.04 LTS. You may have to scroll down to see the Ubuntu option.
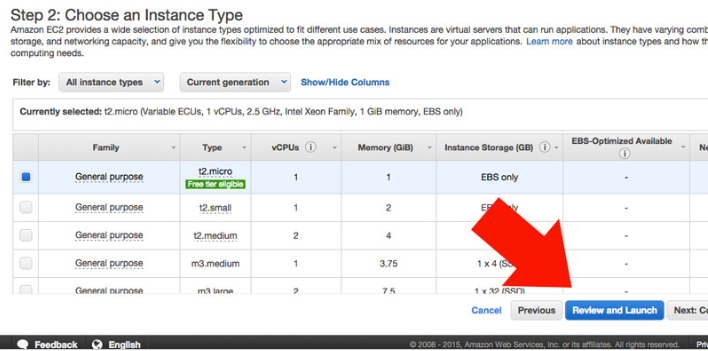
WooCommerce on Amazon ,Next, Amazon will ask you to pick an instance type. This describes how your server can be geared up, which include its reminiscence and computing competencies. Amazon offers an outline of those example types in the EC2 documentation. For the purposes of this newsletter, I am selecting a t2.Micro instance, which is eligible for a unfastened tier on AWS.
AWS lets in for in addition instance configuration, however in our case, simply click the blue “Review and Launch” button.
Amazon will show a launch web page; make certain that SSH is enabled under the safety organizations section and click on “Launch.”
You can be requested to create a key pair. This is critical considering the fact that you may want this pair key to access the EC2 example thru SSH. Download the new key pair and release the instance.
Amazon will load a web page telling you that it’s miles launching the brand new example. At the decrease proper of this web page, you may discover a hyperlink to view instances.
When the instance is launched, it’s going to not have a call. Hover over the call area and also you need to see a pencil icon. Clicking the icon, will permit you to name the instance.
WooCommerce on Amazon ,SSH to Your EC2 Instance
WooCommerce on Amazon ,Secure shell — “SSH” — is an encrypted network protocol. It will can help you securely hook up with your EC2 server. If you are the use of an Apple laptop or a laptop jogging a Linux working system like Ubuntu, connecting is reasonably clean. Connecting from a Windows device takes a few extra steps.
From an Apple or Linux system, open a terminal window.
From the terminal window, you may want to navigate to the key you downloaded inside the last step. On a Mac, this could probably be in the Downloads directory, so out of your terminal you would alternate directories with the aid of typing the subsequent into the command line.
cd DownloadsThe key file, with a purpose to have a .Pem extension, requires a few specific permissions, so as soon as you have got placed it, you may need to exchange the record permissions with the subsequent code. In the instance below, “wooDev.Pem” is the name of the report downloaded from Amazon, when the EC2 instance turned into created. For clarity, that is a command that you run in the terminal.
chmod 400 wooDev.pemWith the report permission updated, you are geared up to connect to the EC2 example. Take a have a look at the whole command required, and then we will have a look at it piece by means of piece.
ssh -i wooDev.pem [email protected]The first a part of the command is “ssh.” It tells the computer which you need to make an SSH connection. The “-i” tells your computer that you will be using a key. The direction to the key’s what you kind subsequent. If the command is being accomplished from within the equal folder as the key, you can simply placed the call of the important thing report, as visible in the example.
ssh -i wooDev.pemIf you had been running this command out of your root listing, you would possibly include the downloads directory inside the report route.
ssh -i Downloads/wooDev.pemNext, you need to offer the consumer name you’ll use to connect to your EC2 server. For the Ubuntu 14.04 server you created, that person call is in reality “ubuntu.” The @ symbol separates the consumer call from the public DNS for the EC2 example. So, if you have been building the command as you read, you will have the subsequent.
ssh -i wooDev.pem ubuntu@The ultimate bit is the general public DNS for the EC2 example. Look on the EC2 view instances page you had open from Step 2, above. Click the field to the left of your instance call, and statistics approximately the example will appear in the decrease section of the page. You will see the public DNS listed there. Add that public DNS after the @ and you’ve got the finished command.

ssh -i wooDev.pem [email protected]Press input or return for your computer, and your device will connect to your far flung EC2 server. You may also need to tell your laptop that it is secure to consider your EC2 example the primary time that you join.
Once you’ve got linked, your terminal represents that EC2 server, not your nearby pc. Try pressing ~ observed by . To go out the consultation on a Mac.
LAMP Stack
On Windows, you will need an extra little bit of software program, like PuTTY, on the way to get admission to your EC2 example. PuTTY does not guide the .Pem key record which you downloaded from Amazon, but it has a device called PuTTYgen with the intention to convert the important thing for you. Amazon has a report explaining how to do the conversion. Once you have got PuTTY up and walking with the transformed key, you may connect with the EC2 example.
Install the LAMP Stack
WordPress, and in flip WooCommerce, calls for a LAMP stack. This stands for Linux, Apache2, MySQL, and PHP. Using your terminal and SSH connection, you need only to kind some commands as a way to use a feature called the Advanced Packaging Tool (APT) to install the LAMP stack.
The first command guarantees that APT is up to date.
sudo apt-get updateThis ought to take some seconds to run. The final line of the replace will study, “Reading package lists… Done.”
Next run the command to install the stack. Note that there’s a caret (^) on the stop of the line.
sudo apt-get install lamp-server^As the set up runs, you’ll be requested to allot extra disk space. Type “Y” to verify.
You will then be requested to create a password for the foundation MySQL database consumer. This password need to be very relaxed. You can also be requested to confirm this password a 2d time.
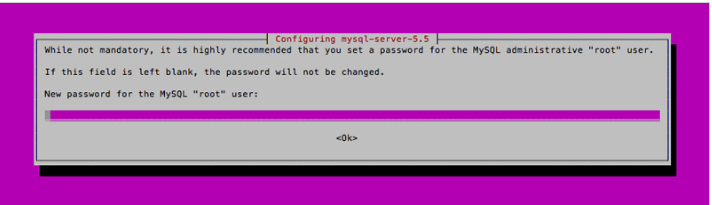
Unless you see an error message, you will have a purposeful LAMP stack once the technique is finished.
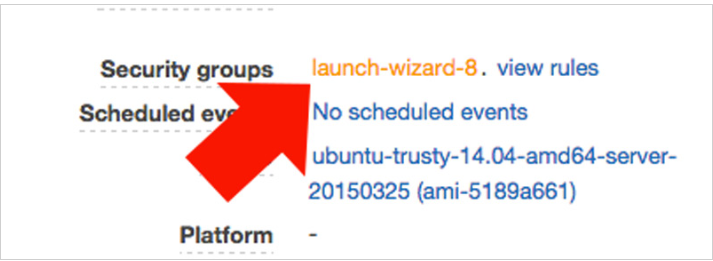
You will need to open port eighty at the EC2 instance to verify in case your web server is operating. To try this, return to the EC2 times page. If it isn’t always already checked, click on the box to the left of the call of your example. Details approximately the example will seem in the lower portion of the display screen. Look for the security groups and click on the call of the modern group. It can be something like “release-organization.”
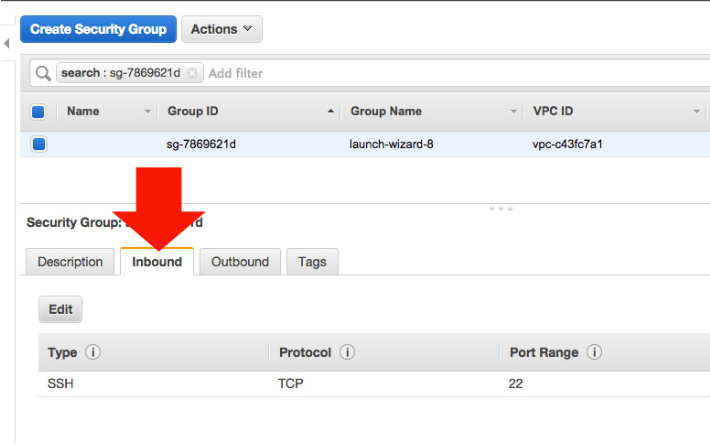
When the security group page loads, click on the “Inbound” tab and then click “Edit.”
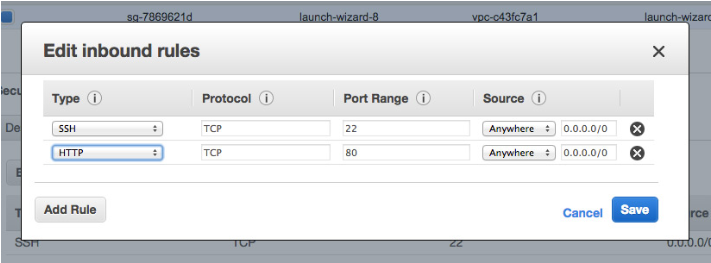
From the edit dialog, click add “Add Rule” and use the drop down menu to choose “HTTP.” Repeat this step, adding “HTTPS” too.
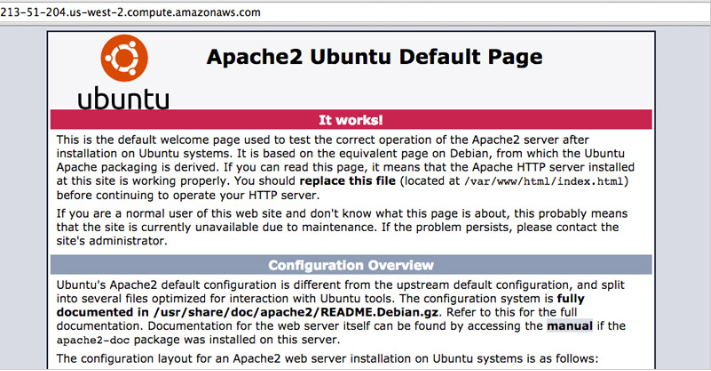
Using the navigation on the left facet of the screen, click on “Instances” to again see a listing of your instances and find the general public DNS for your EC2 instance. Copy the general public DNS and paste it into a browser’s deal with bar. When you open the page, you must see the Apache2 default web page.
Prepare the WordPress Database
You could use your root MySQL person in your WordPress-powered WooCommerce store. But most of the people will create a selected WordPress user for the WordPress database. To do that, return to your terminal and type this command.
mysql -u root -pThe server will ask you on your MySQL password for the foundation user. You created this password in Step four, above.
The command spark off must now say “mysql”.
You will, next, create a new database the usage of the command shown under. In this case, the database can be known as wp_woo, however you may name it anything you need.
CREATE DATABASE wp_woo;You need to get a message telling you that your query was “OK.”
Next, you’ll create a brand new user for your new database. In the example, the person is wp_woo_usr.
CREATE USER wp_woo_usr@localhost IDENTIFIED BY ‘password_goes_here’;Your new person will need permission to make changes to the wp_woo database. The following line of code, achieved inside the terminal, will grant that permission. Notice that we use the call of the database, wp_woo, followed by way of a celebrity (*), to suggest that the person may also exchange any desk inside the database. This is crucial on account that WordPress will create several tables.
GRANT ALL PRIVILEGES ON wp_woo.* TO wp_woo_usr@localhost;To entire the database practise, you have to run the FLUSH PRIVILEGES command to ensure that MySQL acknowledges the modifications you have got simply made.
FLUSH PRIVILEGES;The exit command will take you out of MySQL and go back you in your EC2 server’s regular command line. MySQL will also say “bye.”
exit;Install WordPress
From the command line you may want to change directories. Use the command underneath to place you within the right place, if you will.
cd /var/www/From right here, we can quickly alternate the permissions for the Apache file root listing to allow for including the WordPress documents. Change this lower back to something like 644 later.
sudo chmod 777 html
Next, we will change to the html directory.
cd htmlInside of the html listing, we will upload the WordPress documents. Here is the command to apply to get the most present day model of WordPress.
wget http://wordpress.org/latest.tar.gzIf you type “ls” you’ll see a list of documents presently in the html listing to your EC2 server. This will consist of a record named contemporary.Tar.Gz and the index.Html file this is the default for Apache2.
The subsequent command which you run will extract the WordPress documents and load them into a new directory referred to as wordpress.
tar xzvf latest.tar.gzYou will probably want your WordPress instance at the root level, so you’re going to move all of those files up one level, if you will, with the command below.
mv wordpress/* .It can also be a good idea to rename the Apache index.html file.
mv index.html apache-index.htmlNext, change the ownership of the WordPress files and folders to the web server.
sudo chown -R www-data:www-data ../html/Basic WordPress Configuration
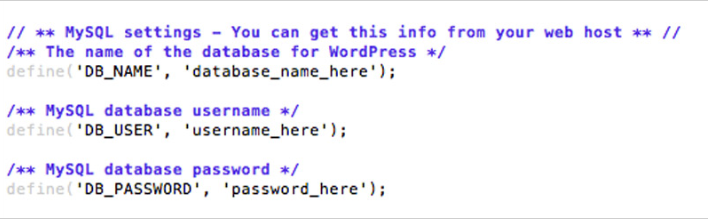
All of the WordPress files are in region; you absolutely want to configure the website. The documents mounted on the server encompass a wp-config-pattern.Hypertext Preprocessor report. Copy that report inside the terminal, renaming it wp-config.Hypertext Preprocessor with the command underneath.
cp wp-config-sample.php wp-config.phpNext, open the configuration file in a text editor, using the command you see below.
sudo nano wp-config.phpWhen the report opens, you will not be able to pass around with your mouse — you can have already noticed that the mouse does now not work within the terminal — so that you will need to transport around along with your arrow keys.
In the file, there is a section for the database name, database consumer, and database password created in Step five, above. Type these into the file after which press the manage key and the X key in your pc. You can be requested to verify twice.
At this point, open the EC2 instance’s public DNS in a browser window. You should now see the WordPress installation wizard.
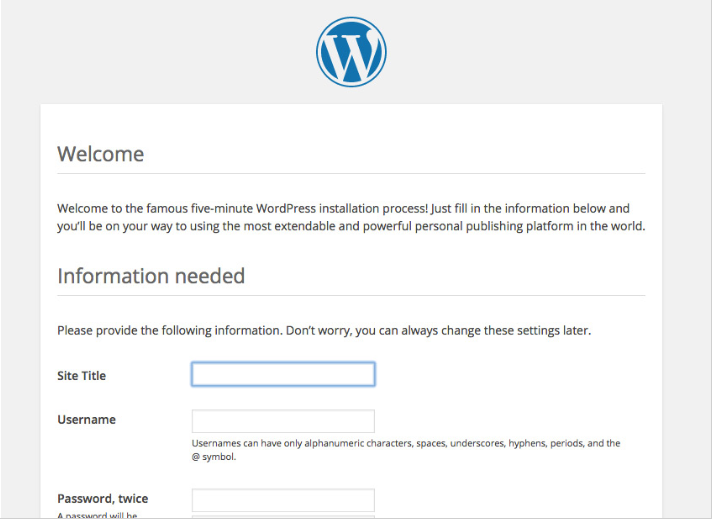
Complete the wizard. The password asked might be the password that you use to get entry to WordPress and, ultimately, your WooCommerce store.
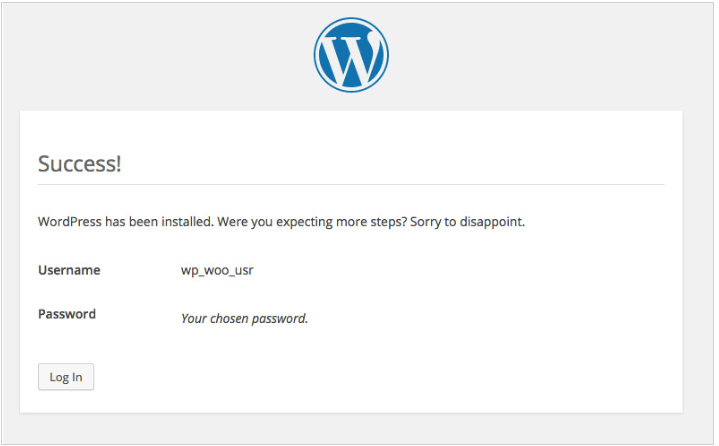
Press the “Install WordPress” button at the lowest of the page. And WordPress have to now be set up. Use the “Log In” button to access the administration panel on your WordPress web site.
Install WooCommerce
Add WooCommerce on your WordPress set up and you may have the inspiration for your ecommerce site.
From the WordPress management dashboard, that you logged into on the end of Step 7, above, navigate to “Plugins” and “Add New.”
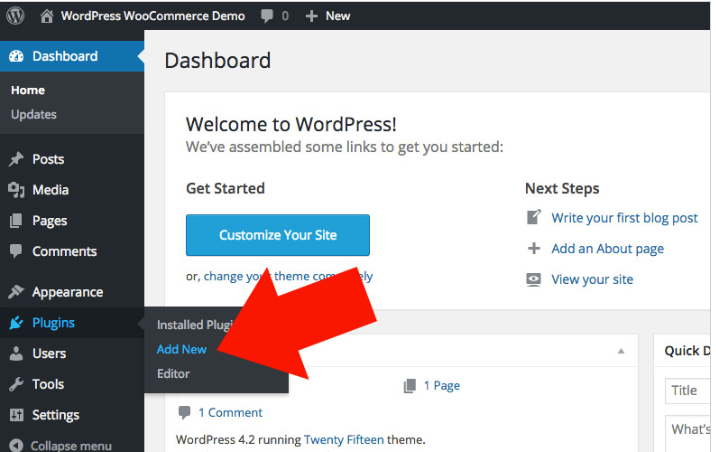
When the Add Plugins page hundreds, use the hunt area at the left of the page to search for “woocommerce.” When the quest effects load, locate WooCommerce by way of WooThemes and click on the “Install Now” button. Finally, click on to prompt the plugin.
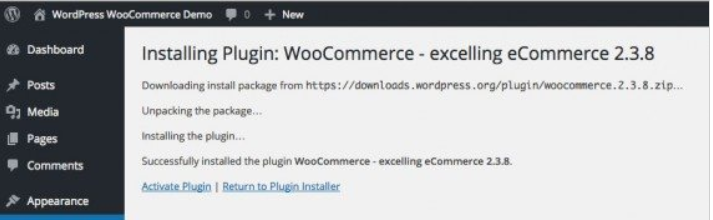
With that, you now have a WordPress-powered, WooCommerce store running on Amazon Web Services. There is still a fair bit of set up work, but the foundation is in place.