Last month, our website crossed 10k pageviews/each day. Now, this is an excessive amount of traffic for a weblog hosted on shared hosting. Right? So I commenced looking for a higher hosting plan. And happily this black Friday, I were given a sweet eighty% OFF deal on Hostgator and subsequently upgraded to their VPS hosting.
Private Name Server
Now through the years, I actually have tried shared hosting from various hosting companies. And they all appearance the identical, as soon as you operate their control panel. But this not the case with VPS web hosting. It’s special. For instance, not like shared web hosting, the manipulate panel is exceptional and you get complete root access with none type or restrict.
The migration part turned into easy. I used the free internet site transfer provider from Hostgator to move my documents from old shared web hosting account to new VPS website hosting. Everything went smoothly. Next step was to update the nameserver. But that turned into little elaborate.
What is a NameServer?

Say you acquire your area and website hosting from special dealers. Now how will your domain know where to point? How will you link each of them?
Well, nameserver remedy this problem.
When you purchase any website hosting plan, you get 2 name server within the welcome e-mail. You should upload those facts below your area nameserver settings. This way, your area will understand where the website is hosted.
Similarly, if you trade your host, you need to replace the name server as properly. But the trouble is, the procedure of updating name server in shared web hosting and VPS hosting is a piece specific. For example–
Generic vs Private name server
In shared website hosting, we use generic call server i.E. With it makes use of your website hosting provider domain call. Like ns123.Hostgator.Com and ns124.Hostgator.Com.
But if you improve to VPS or dedicated hosting package deal then you will get a personal nameservers i.E. Together with your area name in it. Like ns1.Receivetipstricks.Com and ns2.Receivetipstricks.Com. It additionally has 2 IP deal with associated with every nameserver.
How to Add Name Server
Generic Nameserver
The steps are unique for every domain registrar however here is a simple evaluate.
To update a generic call server, log in for your domain registrar website. Find the domain > look for a manager DNS alternative > then look for call server alternative > and enter the two name server which you get to your welcome email.
However, in case you upload your personal nameserver the use of the traditional way, you may get an mistakes. This is due to the fact you’ll should first map your name server with the 2 IP deal with you get with it. This is performed underneath hostname.
Again, the steps to add non-public nameserver are one-of-a-kind for every registrar, but if you the usage of GoDaddy, here is a way to do it.
Private Nameserver
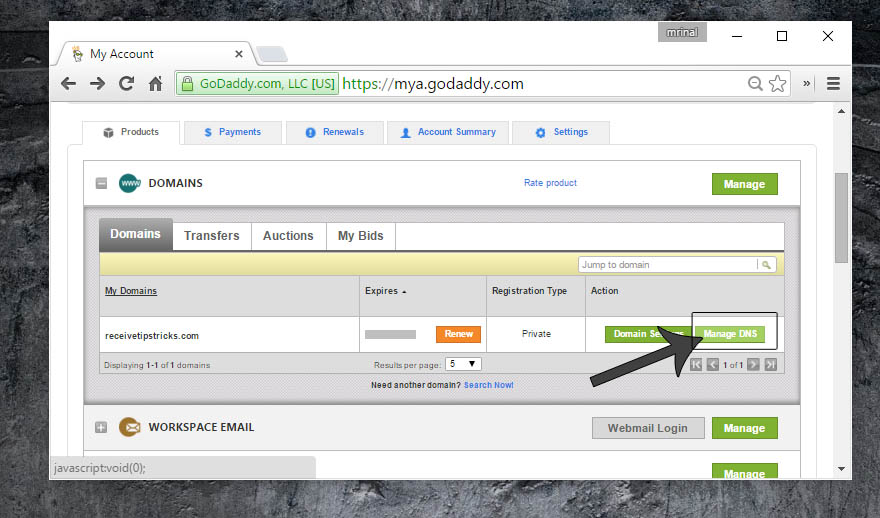
Log into your GoDaddy Account. Next to Domains, click the Manage DNS option.
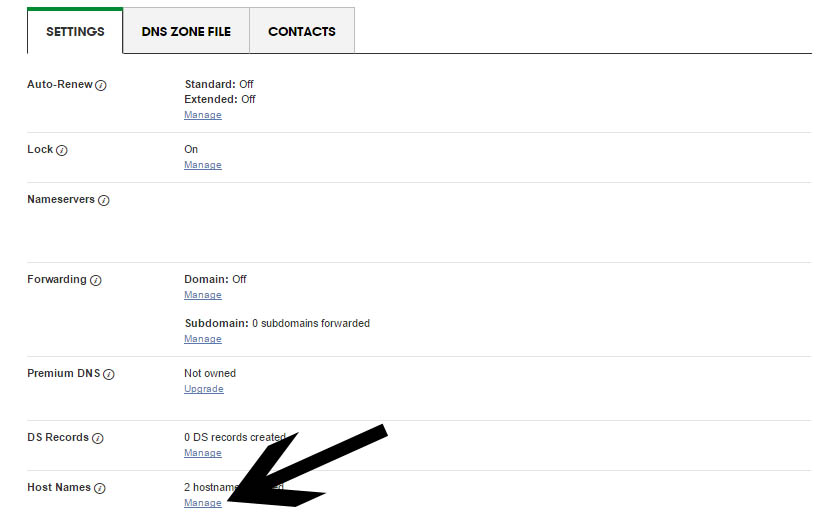
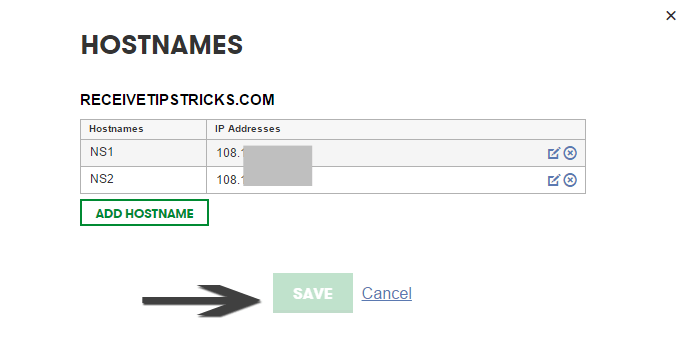
A new windows will open, click on settings > hostname > manage.
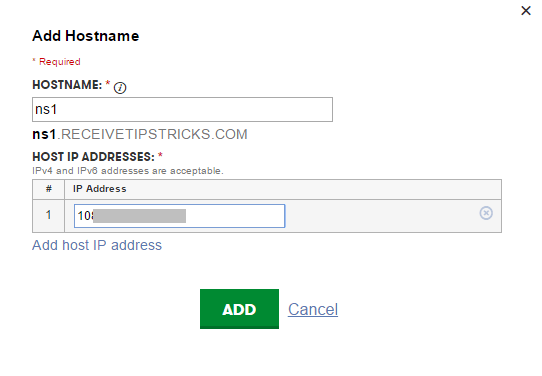
A popup will open. Click on add hostname. Under hostname tab kind in ns1 in the hostname area (you don’t need to type your area name because it’s already supplied) after which under IP deal with area type inside the equivalent host IP deal with.
Repeat the identical manner for the second hostname i.E. Click on on upload hostname > type ns2 and it’s equivalent IP address. Once performed, shop modifications and your hostname gets registered.
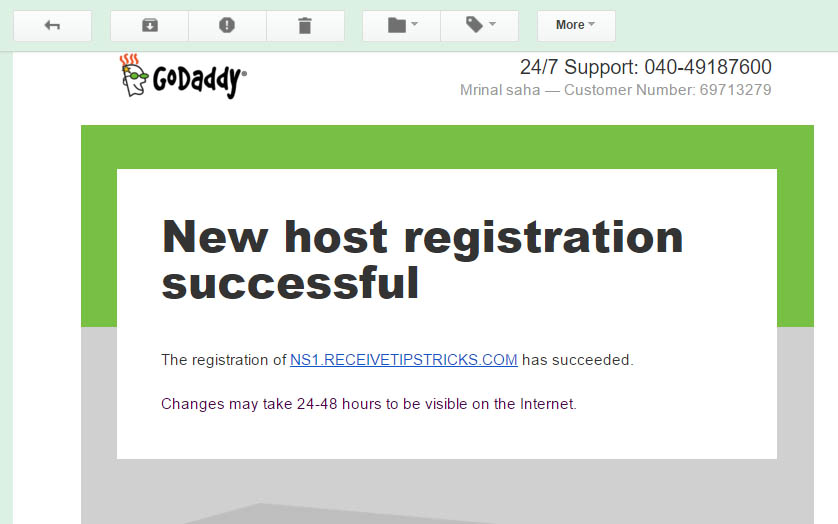
You gets a confirmation e mail from Godaddy without delay. However, every now and then it could take up to 2-3 hours to check in a hostname, so be patient.
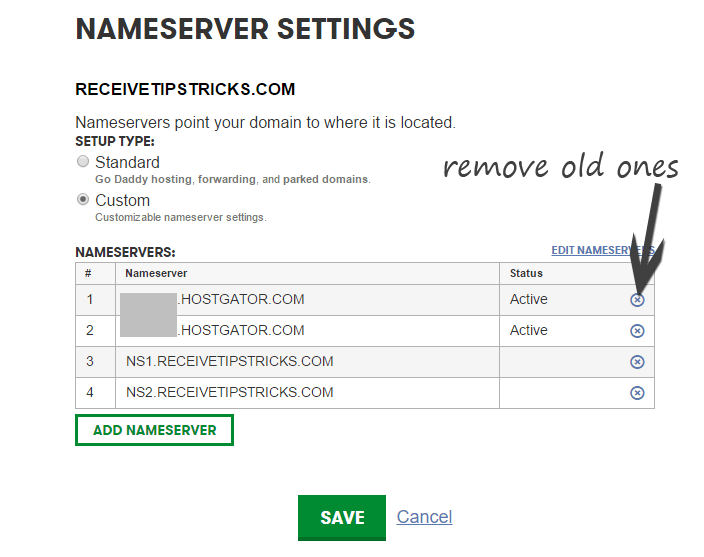
Now go to name server > manage > add your private name server. And remove the old name server. See the screenshot below.
And that’s it. Now all you have to do is wait. The name server propagation can soak up to 48 hours. But you can see the outcomes inside an hour or so.
Also, don’t cancel your vintage host till your certain, your nameserver propagation is a success, Or some of your visitors can also face problem
How to make sure you update the name server successfully?
There is no reliable way to do it. However, there are few workarounds.
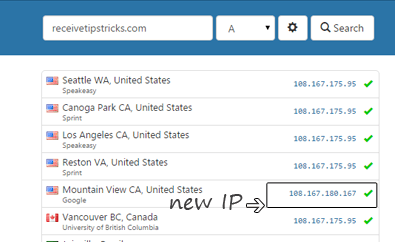
Since you’ve got changed your hosting, your website can have a brand new IP address right. Now, if you understand your vintage and new IP cope with (both mention within the welcome email for website hosting company) then ping your web sites.
If you spot a brand new IP address it means the call server has up to date effectively, else you need to both wait or you probably did something wrong.
To ping your website from all over the global, use DNS checker internet site. If you ping your website without delay after upgrading your call server, chances are you may see each your old and new IP address of your internet site. Like inside the screenshot beneath.