
Security Preference Pane The Security desire pane lets in you to control the security degree of the consumer bills for your Mac.
In addition, the Security choice pane is where you configure your Mac’s firewall, as well as turn information encryption on or off for your user account.
Security Preference Pane The Security choice pane is split into three sections.
General: Controls password utilization, especially,
whether or not passwords are required for certain activities. Controls automated log-out of a user account.
Lets you specify whether area-based services have get admission to on your Mac’s area records.
Vile Vault: Controls records encryption for your home folder, and all of your user information.
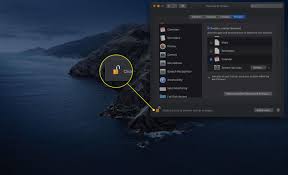
01 . Security Preference Pane
- Click the System Preferences icon in the Dock or select ‘System Preferences’ from the Apple menu.
- Click the S icon in the Personal section of the System Preferences window.
The Mac has three tabs along the top of the window. Select the General tab to get started with configuring your Mac’s general security settings.
The General section of the controls a number of basic but important settings for your Mac. In this guide,
we will show you what each setting does, and how to make changes to the settings. You can then decide if you need the enhancements available from the
If you share your Mac with others, or your Mac is located in a place where others can easily gain access to it, you may wish to make some changes to these settings.
General Mac Security Settings
Security Preference Pane Before you may begin making changes, you should first authenticate your identity with your Mac.
Click the lock icon within the bottom left-hand nook of the Security desire pane.
You will be induced for an administrator username and password. Provide the asked facts, and then click OK.
Security Preference Pane The lock icon will alternate to an unlocked nation. You’re now ready to make any modifications you wish.
Require password: If you vicinity a checkmark here, then you definitely (or everyone who attempts to apply your Mac) can be required to offer the password for the contemporary account so that it will exit sleep or an energetic screen saver.
This is a great basic safety degree that may hold prying eyes from seeing what you’re currently operating on, or accessing your person account facts.
Security Preference Pane If you select this feature, you could then use the drop-down menu to choose a time c language before the password is needed.
I recommend deciding on an c language long enough that you could go out a sleep or screen saver consultation that starts all of sudden, without having to offer a password.
Five seconds or 1 minute are suitable alternatives.
Disable computerized login: This option calls for users to authenticate their identification with their password each time they go online.
Require a password to free up every System Preferences pane: With this option decided on, customers ought to offer their account ID and password every time they try and make a exchange to any cozy machine preference.
Normally, the first authentication unlocks all secure gadget choices.
Log out after xx minutes of in activeness:
This option lets you choose a fixed amount of idle time after which the presently logged-in account will be automatically logged out.
Use at ease digital memory: Selecting this option will pressure any RAM information written on your hard power to be first encrypted.
This applies to both digital memory utilization and
Sleep mode whilst the contents of RAM are written to your hard pressure.
Disable Location Services: Selecting this option will prevent your Mac from providing region facts to any application that requests the statistics.
Security Preference Pane Click the Reset Warnings button to do away with location statistics already in use by means of programs.
Disable remote manipulate infrared receiver:
If your Mac is equipped with an IR receiver,
this feature will turn the receiver off, stopping any IR tool from sending commands for your Mac.
03. Using the Mac Security Preference Pane – File Vault Settings
Security Preference Pane File Vault uses a 128-bit (AS-128) encryption scheme to guard your person records from prying eyes.
Encrypting your own home folder makes it nearly not possible for anyone to access any consumer statistics to your Mac without your account name and password.Security Preference Pane
File Vault can be very reachable for people with transportable Macs who’re involved about loss or robbery.
When File Vault is enabled, your home folder
Security Preference Pane becomes an encrypted disk photograph that is installed for access once you log in.
the home folder photo is unmounted and is no longer to be had.
Security Preference Pane When you log out, shut down, or sleep,
When you first allow File Vault,
Security Preference Pane you could discover the encryption system
Security Preference Pane can take a completely long time. Your Mac is changing all of your home folder information into the encrypted disk picture.
Once the encryption system is complete, your Mac will encrypt and decrypt character files as needed, on the fly.
This outcomes in most effective a totally slight overall performance penalty, one that you will not often note except whilst having access to very huge documents.
Security Preference Pane To alternate FileVault’s settings, pick the FileVault tab within the Security Preferences pane.
Configuring FileVault
Security Preference Pane Before you could start making changes, you should first authenticate your identity together with your Mac.
Click the lock icon within the backside left-hand nook of the Security preference pane.
Security Preference Pane You could be brought about for an administrator username and password. Provide the asked records, after which click OK.
Security Preference Pane The lock icon will exchange to an unlocked kingdom. You’re now ready to make any changes you wish.
Set Master Password: The master password is a fail-safe. It allows you to reset your user password in the event you forget your login information.
However, if you forget both your user account password and the master password, you will not be able to access your user data.
Turn On FileVault: This will enable the FileVault encryption system for your user account. You will be asked for your account password and then given the following options:
Use secure erase: This option overwrites the data when you empty the trash. This ensures that the trashed data is not easily recoverable.
Use secure virtual memory: Selecting this option will force any RAM data written to your hard drive to be first encrypted.
Security Preference Pane When you switch File Vault on, you may be logged out whilst your Mac encrypts your home folder’s statistics. This can take pretty a while, depending on the dimensions of your own home folder.
Security Preference Pane Once the encryption method is complete, your Mac will display the login display screen, wherein you could provide your account password to log in.
04.Using the Mac Security Preference Pane – Configuring Your Mac’s Firewall
Security Preference Pane Your Mac consists of a non-public firewall you can use to save you network or Internet connections. The Mac’s firewall is primarily based on a general UNIX firewall called ipfw. This is a superb, although simple, packet-filtering firewall. To this primary firewall, Apple provides a socket-filtering system, also referred to as an software firewall. The utility firewall makes it less complicated to configure the firewall settings. Instead of wanting to realize which ports and protocols are essential, you may simply specify which applications have the right to make incoming or outgoing connections.
To begin, select the Firewall tab inside the Security desire pane.
Configuring the Mac’s Firewall
Before you could start making changes, you need to first authenticate your identity with your Mac.
Click the lock icon inside the backside left-hand nook of the Security preference pane.
You can be triggered for an administrator username and password. Provide the requested information, and then click OK.
Security Preference Pane The lock icon will trade to an unlocked country. You’re now geared up to make any adjustments you wish.
Start: This button will start Mac’s firewall. Once the firewall has been started, the Start button will alternate to a Stop button.
Advanced: Security Preference Pane ,Clicking this button will allow you to set the options for Mac’s firewall. The Advanced button is handiest enabled when the firewall is grew to become on.
Advanced Options
Block all incoming connections: Selecting this option will cause the firewall to prevent any incoming connections to non-important services. Essential services as defined by means of Apple are:
Configd: Allows DHCP and different community configuration services to arise.
Security Preference Pane MDNSResponder: Allows the Bonjour protocol to function.
Raccoon: Allows IPSec (Internet Protocol Security) to characteristic.
Security Preference Pane If you pick to dam all incoming connections, then most report, display, and print sharing offerings will not feature.
Automatically allow signed software program to get hold of incoming connections: When decided on, this selection will routinely upload securely signed software program packages to the list of packages which can be allowed to accept connections from an outside community, such as the Internet.
Security Preference Pane You can manually add applications to the firewall’s application clear out list the use of the plus (+) button. Likewise, you could do away with applications from the list using the minus (-) button.
Enable stealth mode: Security Preference Pane , When enabled, this putting will prevent your Mac from responding to site visitors queries from the community. This will make your Mac seem like non-existent on a community.