
Manage and Create LVM Using vgcreate Commands Because of the changes within the LFCS examination requirements powerful Feb. 2, 2016, we are including the essential topics to the LFCS series published here. To put together for this exam, your are extraordinarily recommended to apply the LFCE collection as nicely.
One of the most critical choices even as putting in a Linux machine the amount of garage area to be allotted for device documents, home directories, and others. If you make mistake at that factor growing a partition that has run out of area may be burdensome extremely volatile.
Logical Volumes Management (also called LVM), which have end up a default for the installation of maximum (if no longer all) Linux distributions, have severa benefits over conventional partitioning management. Perhaps the maximum distinguishing feature of LVM is that it lets in logical divisions to be resized (reduced or elevated) at will without a lot hassle.
The structure of the LVM consists of:
- One or extra entire difficult disks or partitions are configured as bodily volumes (PVs).
- A quantity institution (VG) is created using one or greater physical volumes. You can think of a extent organization as a unmarried garage unit.
- Multiple logical volumes can then be created in a volume institution. Each logical quantity is somewhat equivalent to traditional partition – with advantage that could be resized at will as mentioned earlier.
In this text we will use three disks of 8 GB every to create three bodily volumes. You can either create the PVs directly on top of the tool, or partition it first.
Although we’ve chosen to go with the first method, if you decide to go with the second (as explained in Part four – Create Partitions and File Systems in Linux of this collection) make certain to configure every partition as kind 8e.
Manage and Create LVM Using vgcreate Creating Physical Volumes, Volume Groups, and Logical Volumes
To create physical volumes on top of /dev/sdb, /dev/sdc, and /dev/sdd, do:
# pvcreate /dev/sdb /dev/sdc /dev/sddYou can list the newly created PVs with:
# pvsand get detailed information about each PV with
# pvdisplay /dev/sdX(where X is b, c, or d)
If you miss /dev/sdX as parameter, you may get data about all the PVs.
To create a extent group named vg00 the use of /dev/sdb and /dev/sdc (we will store /dev/sdd for later to illustrate the opportunity of adding different gadgets to expand storage ability while needed):
# vgcreate vg00 /dev/sdb /dev/sdc
As it was the case with physical volumes, you can also view information about this volume group by issuing:
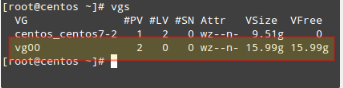
# vgdisplay vg00Since vg00 is formed with two 8 GB disks, it will appear as a single 16 GB drive:
When it involves developing logical volumes, the distribution of space need to take into consideration both current and future desires. It is considered excellent practice to name each logical volume in line with its meant use.
For instance, allow’s create two LVs named vol_projects (10 GB) and vol_backups (closing area), which we will use later to shop mission documentation and device backups, respectively.
The -n option is used to signify a name for the LV, while -L units a set size and -l (lowercase L) is used to indicate a percent of the final area inside the container VG.
# lvcreate -n vol_projects -L 10G vg00
# lvcreate -n vol_backups -l 100%FREE vg00
As before, you can view the list of LVs and basic information with:
# lvsand detailed information with
# lvdisplay
To view information about a single LV, use lvdisplay with the VG and LV as parameters, as follows:
# lvdisplay vg00/vol_projects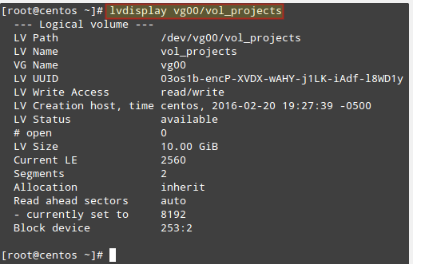
In the image above we are able to see that the LVs have been created as garage gadgets (check with the LV Path line). Before every logical quantity may be used, we need to create a filesystem on pinnacle of it.
We’ll use ext4 as an instance right here because it allows us both to increase and reduce the size of every LV (rather than xfs that best allows to boom the scale):
# mkfs.ext4 /dev/vg00/vol_projects
# mkfs.ext4 /dev/vg00/vol_backups
In the next section we will explain how to resize logical volumes and add extra physical storage space when the need arises to do so.
Manage and Create LVM Using vgcreate Resizing Logical Volumes and Extending Volume Groups
Now picture the following state of affairs. You are starting to run out of area in vol_backups, while you’ve got masses of area available in vol_projects. Due to the character of LVM, we will easily reduce the size of the latter (say 2.5 GB) and allocate it for the previous, whilst resizing every filesystem at the equal time.
Fortunately, that is as smooth as doing:
# lvreduce -L -2.5G -r /dev/vg00/vol_projects
# lvextend -l +100%FREE -r /dev/vg00/vol_backups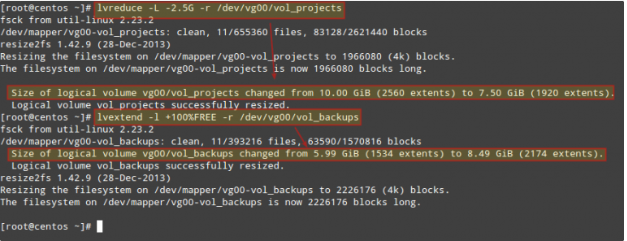
It is important to encompass the minus (-) or plus (+) signs even as resizing a logical quantity. Otherwise, you’re placing a set length for the LV as opposed to resizing it.
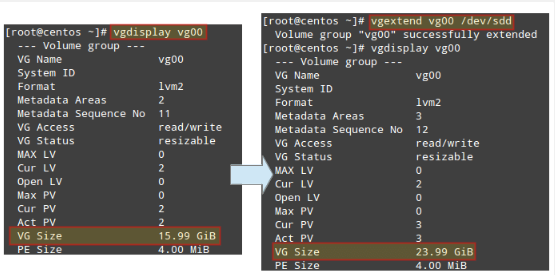
It can show up which you arrive at a point whilst resizing logical volumes cannot resolve your storage needs anymore and you need to shop for a further garage tool. Keeping it easy, you’ll need some other disk. We are going to simulate this situation via adding the remaining PV from our preliminary setup (/dev/sdd).
To upload /dev/sdd to vg00, do
# vgextend vg00 /dev/sddIf you run vgdisplay vg00 earlier than and after preceding command, you may see the boom inside the size of the VG:
# vgdisplay vg00
Now you can use newly added space to resize the existing LVs according your needs, or create additional ones needed
Mounting Logical Volumes on Boot and on Demand
Of path there would be no point in creating logical volumes if we are not going to definitely use them! To higher pick out a logical extent we can want to find out what its UUID is.
To do this, use blkid observed by the direction to every tool
# blkid /dev/vg00/vol_projects
# blkid /dev/vg00/vol_backups
Create mount points for each LV:
# mkdir /home/projects
# mkdir /home/backups
and insert the corresponding entries in /etc/fstab (make sure to use the UUIDs obtained before):
UUID=b85df913-580f-461c-844f-546d8cde4646 /home/projects	ext4 defaults 0 0
UUID=e1929239-5087-44b1-9396-53e09db6eb9e /home/backups ext4	defaults 0 0
Then save the changes and mount the LVs:
# mount -a
# mount | grep home
When it involves absolutely usage of LVs, you may need assign right ugo+rwx permissions defined in Part eight – Manage Users and Groups in Linux series.
Summary
In this newsletter we’ve got delivered Logical Volume Management, a flexible tool to control garage gadgets that offers scalability. When blended with RAID, you may revel in not simplest scalability but also redundancy.
This sort setup will commonly find LVM on pinnacle RAID, configure first and then configure LVM on top of it.
If you have questions this newsletter or tips to improve it feel loose to reach using the comment shape under.