
01 of 02 Migration Assistant Can Move Your PC Data to Your Mac
Mac Migration Assistant Can Move Windows Now which you’ve switched to a Mac as your new computing platform, you may wonder how you’re going to transport all your stuff out of your PC to the Mac. Well, you’re in success; making the pass to the Mac would not require tossing out all your Windows information and documents. For the maximum component, all your Windows person information, consisting of documents, photos, tune, and videos, could make the adventure to the Mac with out an excessive amount of hassle.
Your Windows applications, however, will should live at the back of. They rely upon a Windows working gadget, and might not run immediately on a Mac. But do not worry; if there may be an software that you simply cannot stay with out or that doesn’t have a Mac equal, there are approaches to run a Windows surroundings on a Mac. You’ll need to either dual-boot your Mac among Windows and the Mac OS, or run 0.33-party digital machine software program. You can locate an define of a way to run Windows the usage of your Mac inside the guide:
For now, permit’s consciousness on transferring your consumer records to your new Mac, so that you can get back to paintings or have a chunk of fun.
Using the Apple Retail Store to Transfer Data
There are numerous options for moving Windows data, relying at the model of OS X or macOS that came together with your Mac. The easiest method is to have an Apple retail shop flow your Windows statistics for you. If you purchase your Mac at an Apple retail keep, and also you appear to reveal up together with your PC, store body of workers will move the information for you, as a part of the Mac setup method. Of path, for this method to work, you want to plot in advance. You need to have your Windows device with you while you purchase a Mac, and you should be inclined to attend. Depending on how busy the shop is, the wait could be as low as an hour, or so long as an afternoon or greater.
You can speed things up with the aid of calling beforehand and making an appointment to buy a Mac. Be certain to say that you also need to transfer your facts out of your Windows machine. Apple keep personnel will installation a time, and give you an estimate of ways long the process will take.
Mac Migration Assistant Can Move WindowsUsing the Mac’s Migration Assistant
If you are now not properly at planning in advance or striking round an Apple retail shop doesn’t enchantment to you, there are more than one do-it-your self options for migrating your PC records to your Mac.
Your new Mac will encompass a Migration Assistant that became at first designed to make it easier to improve from one Mac version to any other. You join Macs the use of a FireWire or Thunderbolt cable or a network connection after which use the Migration Assistant to copy consumer records, programs, and device settings to the new Mac.
With the advent of OS X Lion (10.7.X), the Migration Assistant received the ability to replicate person records from PCs jogging Windows XP, Windows Vista, or Windows 7. With subsequent variations of OS X had been released, the Migration Assistant picked up the potential to work with Windows 8. Windows 10 and later. The Migration Assistant can reproduction your Windows consumer bills even though it cannot copy your passwords, so make certain your person account password earlier than you’re making the switch. The Migration Assistant also can replica your files, in addition to emails, contacts, and calendars from Microsoft Outlook (2003 and later), Outlook Express, Windows Mail, and Windows Live Mail.
02 of 02 Using the Migration Assistant
The Mac Migration Assistant calls for that the Mac and the PC be related to the identical nearby network. You do not need to fear approximately setting up any kind of record sharing on either computer; they simply need to be at the identical network.
The switch process involves strolling a copy of the Migration Assistant in your Mac and a replica for your PC. Since you will be running with two exceptional computers, and programs which have the equal call, we’ll preface every step in this manual to the usage of the Migration Assistant with either PC or Mac, to make it clean which utility the commands talk over with.
Installing the Mac Migration Assistant
Mac Migration Assistant Can Move Windows Your Mac includes the main Migration Assistant application, but you may additionally want to put in a helper utility on your PC.
Mac Migration Assistant Can Move Windows Using the Mac Migration Assistant PC:
- Before proceeding with the migration manner, flip off the automatic Windows Update. There’s a remote possibility that if the Windows Update begins putting in new applications, the Migration Assistant might be interrupted, and may not be able to complete the system.
- Once you download it to your PC, launch the Windows Migration Assistant installer and comply with the onscreen instructions to complete the set up.
- When the set up is complete, the Migration Assistant will auto-begin.
- When the Migration Assistant launches on your PC, click through the welcome display, until you are requested to begin the Migration Assistant on your Mac.
Mac:
- Launch the Migration Assistant, which is placed at /Applications/Utilities, or from the Go menu, pick Utilities.
- The Migration Assistant may additionally ask you to enter the call and password of a person with an administrator account. Click Continue, enter an admin call and password, and click on OK.
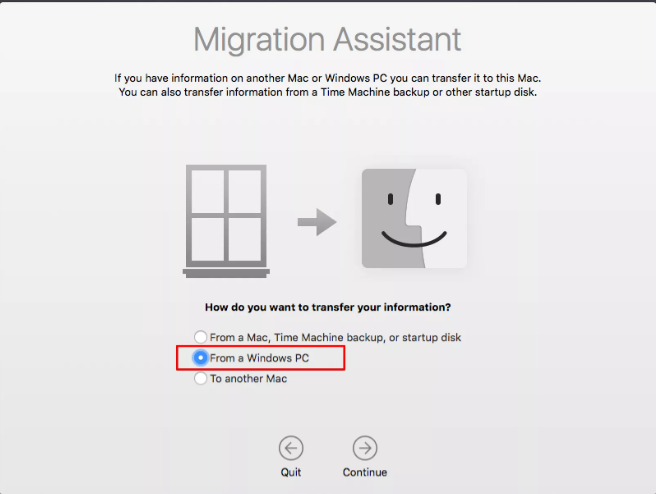
- The Migration Assistant will display alternatives for the supply of statistics to copy to your Mac. Depending on the specific version of the Migrations Assistant you are the use of, you should see either an choice to select: From every other Mac, PC, Time Machine backup, or other disk, or an option to pick out From a Windows PC make the best selection and click on Continue.
- The Migration Assistant will display additional source options. Select From any other Mac or PC, and click Continue.
- In order for the Migration Assistant to preserve, it ought to near any other packages which can be strolling on your Mac. Click Continue to close any open apps and continue with the migration process.
- The Migration Assistant will experiment your local community for any PC or Mac this is jogging the Migration Assistant utility. Your PC’s icon and name have to display in the Migration Assistant window. When it does, click Continue.
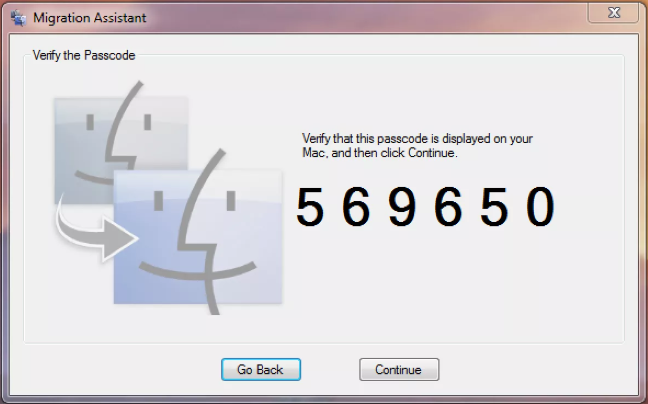
- The display will now show you a multi-digit passcode. Write this wide variety down, and take it on your PC.
PC:
- The Migration Assistant will display a passcode. It need to match the only that became shown on your Mac. If the passcode suits, click on Continue after which return to your Mac.
Mac:
- The Migration Assistant will show a list of gadgets you could migrate for your Mac. The list will encompass the PC’s presently logged-in user account, and all related records, which include Music, Pictures, Movies, Desktop items, Downloads, Documents, Contacts, Bookmarks, and User Settings. The Migration Assistant also can replica extra files, including shared files, logs, and other documents and documents it reveals on your PC.
- Select the items you want to copy, and click on Continue.
PC & Mac:
- Both Migration Assistants will show the ongoing progress of the replica operation. Once the copying procedure is whole, you can quit the Migration Assistant software on each machines.
The Migration Assistant can simplest reproduction the consumer data from the account this is currently logged in at the PC. If there are a couple of consumer money owed which you wish to duplicate for your Mac, you may need to log off of your PC, login with the following account, and then repeat the migration process.