

Manage Remote Connections Like other remote connection apps, open-supply mRemoteNG simplifies the far flung connection system by gathering almost all far flung connection protocols within one software. This consists of maximum popular connection kinds and some of the greater difficult to understand ones.
Manage Remote Connections Supported Connection Protocols
The full list of mRemoteNG-supported connection protocols is:
- RDP (Remote Desktop/Windows Terminal Server)
- VNC (Virtual Network Computing)
- ICA (Citrix Independent Computing Architecture)
- SSH (Secure Shell)
- Telnet (Telecommunication Network)
- HTTP/HTTPS (Hypertext Transfer Protocol)
- rlogin (UNIX remote login tool over TCP)
- Raw Socket Connections (unextracted packets)
This listing covers just about each protocol you would possibly use to hook up with a community-linked PC, so mRemoteNG can be your one-stop shop for far flung laptop connectivity.
Manage Remote Connections What Are Remote Connections?
If you’re now not familiar with remote connections, the time period may be vague. A remote connection is a type of network connection that permits one PC to access the records on some other PC. Just like you connect to a internet site to get admission to information, faraway connections permit you to connect with a PC to get right of entry to programs and statistics on that machine.
For the standard person, faraway connections can be handy. You can use remote connections to connect with your property PC from your office or vice versa. If you have an constantly-on server, you can hook up with that device from any machine. You can also connect with gadgets in the local community so that you can share documents and programs with pals and family on your home Wi-Fi.
For big corporations, remote computing device connections may be crucial to middle functionality. In a few businesses, all facts and packages are accessed from a critical server that requires a specific sort of connection. Depending on the technological rules of the enterprise, customers won’t even shop statistics on their machines. IT aid in groups like this desires an easy-to-use, fast tool for plugging into far off connections to diagnose and fix issues.
MRemoteNG is tremendous for each use cases. Whether you are a non-public consumer trying to share motion pictures over your Wi-FI or an IT technician working to maintain vital structures operational, mRemoteNG can meet your needs.
Setting Up for Remote Connections
Before you may connect with a pc through mRemoteNG or some other remote connection device, you need to put together the target gadget.
ENABLE REMOTE CONNECTIONS IN WINDOWS 10, 8, AND 7
01.Open the Start menu and kind faraway settings into the quest container.
02.Select Allow far off get entry to for your laptop inside the search results.
03.On Windows 10, select the radio button subsequent to Allow faraway connections to this computer.
04.On Windows 7 or eight, select the radio button subsequent to Allow connections from computer systems walking any model of Remote Desktop.
05.If you are on Windows 10, uncheck Allow remote connections most effective from computers strolling Remote Desktop with Network Level Authentication.
ENABLE REMOTE CONNECTIONS IN MACOS
01.Open System Preferences > Sharing to view far flung connection alternatives.
02.Check the bins for Remote Login and Remote Management.
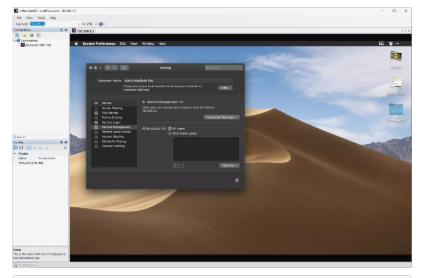
03.Click Computer Settings and test VNC visitors can also manage display with password. In the textual content container, type the password you want VNC connections to apply and then click OK.
INSTALLING MREMOTENG
Once your goal pc is well configured, open mRemoteNG for your host laptop.
01.Download the ZIP document containing mRemoteNG from the mRemoteNG internet site.
02.Extract the ZIP document to any location.
03.Open the extracted folder and double-click on the mRemoteNG utility to release the program.
Opening a Remote Connection With mRemoteNG
Connections may be set up with mRemoteNG fast from the toolbar. Select within the textual content field within the toolbar and kind the IP deal with or hostname of your target laptop.
You need the neighborhood IP address of the goal laptop.
- Windows 10: Go to Settings > Network & Internet and select your community interface (typically Wi-Fi or Ethernet).
- Windows 7: Select the community connection icon in the taskbar and pick out Open Network and Sharing Center. Choose your energetic community interface and choose Details in the Connections placing.
- MacOS: Open System Preferences > Sharing > Remote Management.
01.In mRemoteNG, select the connection protocol from the drop-down menu next to the textual content container. By default, Remote Desktop (RDP) is chosen.
02.To change the protocol, pick out the drop-down and then pick out the favored protocol from the list.
03.Select the green arrow subsequent to the protocol drop-down to open the connection.
04.To close the relationship, choose the X inside the top right nook to close the relationship’s tab. Take care no longer to close the application itself.
SAVING CONNECTION DETAILS
If you connect to the equal system often, you could keep the configuration for brief get right of entry to.
01.Choose File > New Connection or press Ctrl+N.
02.In the Config pane inside the lower left nook, input the IP address or hostname, username, and password under Connection.
03.Select the hidden drop-down container subsequent to Protocol to pick out the precise connection protocol. You can also consist of a useful name inside the Display portion.
04.To hook up with a saved connection, right-click the relationship within the Connections pane and pick Connect. The connection opens in a new tab.