
MySQL on Debian 9 With the release of Debian nine Stretch MySQL, the world’s most popular open supply relational database control device is no longer available inside the Debian’s repositories and MariaDB has end up the default database machine. MariaDB is a backward like minded, binary drop-in substitute of MySQL.
In this educational, we are able to show you a way to install and comfy MySQL on a Debian 9 system from the MySQL Apt Repository. If your application does no longer have any specific requirements, you need to stick with MariaDB, the default database machine in Debian 9.
MySQL on Debian 9 Prerequisites
Before persevering with with this educational, ensure you are logged in as a consumer with sudo privileges.
Step 1: MySQL on Debian 9,Configuring MySQL Repository
To upload the MySQL APT repository for your machine go to the repository down load page and down load the brand new release package deal the use of the subsequent wget command:
wget http://repo.mysql.com/mysql-apt-config_0.8.10-1_all.debOnce the down load is completed deploy the discharge bundle with the following command:
sudo dpkg -i mysql-apt-config_0.8.10-1_all.debYou will be presented with the configuration menu where you can select the MySQL version you want to install.
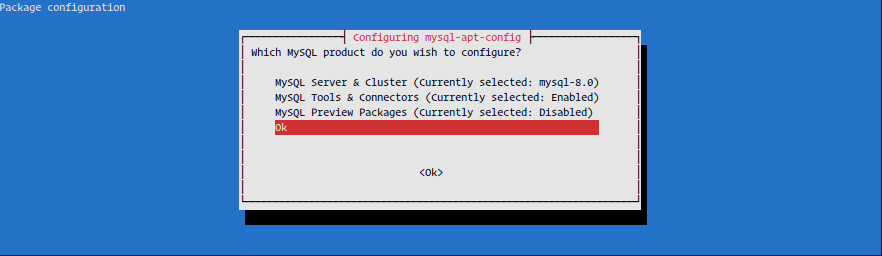
MySQL eight.0 is pre-selected, if you want to install another version of MySQL, choose MySQL Server & Cluster (Currently selected: mysql-eight.0) and choose your selected MySQL model We’re going to install MySQL version 8.0. Select the last alternative OK and press Enter (as shown at the photograph above) to shop the configuration.
At the time of writing this newsletter, the brand new model of MySQL is version eight.0. If you are not certain which model to pick, consult the documentation of the application you’re going to set up in your server.
Step 2: MySQL on Debian 9,Installing MySQL
Before installing MySQL in your Debian nine server first replace the bundle listing with:
sudo apt updateOnce the programs listing is up to date run the following command to put in MySQL to your Debian server:
sudo apt install mysql-serverThe installer will ask you to set the MySQL root password. Do not set the password now (leave it blank), we will do that in the subsequent section.
Next, you may be presented with a message informing you about the brand new MySQL 8 authentication. Before deciding on the default MySQL eight authentication plugin make certain it’s miles supported by way of your application.

Step 3: MySQL on Debian 9,Verifying MySQL installation
Once the installation is completed, the MySQL provider will begin routinely.
We can test the MySQL provider status via typing:
sudo systemctl status mysql● mysql.service - MySQL Community Server
Loaded: loaded (/lib/systemd/system/mysql.service; enabled; vendor preset:
Active: active (running) since Thu 2018-08-02 17:22:18 UTC; 18s ago
Docs: man:mysqld(8)
http://dev.mysql.com/doc/refman/en/using-systemd.html
Process: 14797 ExecStartPre=/usr/share/mysql-8.0/mysql-systemd-start pre (co
Main PID: 14832 (mysqld)
Status: "SERVER_OPERATING"
Tasks: 37 (limit: 4915)
CGroup: /system.slice/mysql.service
└─14832 /usr/sbin/mysqldYou will be asked to configure the VALIDATE PASSWORD PLUGIN that is used to test the energy of the MySQL users passwords. There are 3 ranges of password validation policy, low, medium and strong. Press ENTER in case you don’t need to set up the validate password plugin.
Please set the password for root here.

New password:

Re-enter new password:
On the subsequent spark off, you may be asked to set a password for the MySQL root person.
By default, a MySQL installation has an anonymous user,
allowing anyone to log into MySQL without having to have
a user account created for them. This is intended only for
testing, and to make the installation go a bit smoother.
You should remove them before moving into a production
environment.

Remove anonymous users? (Press y|Y for Yes, any other key for No) : y
Success.


Normally, root should only be allowed to connect from
'localhost'. This ensures that someone cannot guess at
the root password from the network.

Disallow root login remotely? (Press y|Y for Yes, any other key for No) : y
Success.

By default, MySQL comes with a database named 'test' that
anyone can access. This is also intended only for testing,
and should be removed before moving into a production
environment.


Remove test database and access to it? (Press y|Y for Yes, any other key for No) : y
 - Dropping test database...
Success.

 - Removing privileges on test database...
Success.

Reloading the privilege tables will ensure that all changes
made so far will take effect immediately.

Reload privilege tables now? (Press y|Y for Yes, any other key for No) : y
Success.

All done!
Once you place the root password the script will even ask you to remove the anonymous consumer, restrict root consumer get right of entry to to the neighborhood machine and cast off the test database. You should answer “Y” (yes) to all questions.
Step 5: MySQL on Debian 9,Connect to MySQL from the command line
To engage with MySQL via the terminal we will use the MySQL customer which is hooked up as a dependency of the MySQL server bundle. To log in to the MySQL server as the root consumer type:
mysql -u root -pYou may be triggered to go into the root password you’ve got formerly set while the mysql_secure_installation script become run.
Once you input the password you will be presented with the MySQL shell as proven below:
Welcome to the MySQL monitor.  Commands end with ; or \g.
Your MySQL connection id is 10
Server version: 8.0.12 MySQL Community Server - GPL

Copyright (c) 2000, 2018, Oracle and/or its affiliates. All rights reserved.

Oracle is a registered trademark of Oracle Corporation and/or its
affiliates. Other names may be trademarks of their respective
owners.

Type 'help;' or '\h' for help. Type '\c' to clear the current input statement.

mysql>
Create a Database
Once you’re linked to the MySQL shell, you can create a brand new database via typing the subsequent command:
CREATE DATABASE new_database;Query OK, 1 row affected (0.00 sec)Create Tables
Now that we have created a database we are able to create a desk to keep a few statistics.
Before walking the SQL statements for developing a table we want to hook up with the database:
use new_database;In this example we will create a simple table named contacts with three fields, id, name and email:
CREATE TABLE contacts (
  id INT PRIMARY KEY,
  name VARCHAR(30),
  email VARCHAR(30)
);
Query OK, 1 row affected (0.00 sec)Conclusion
In this tutorial, we’ve proven you a way to set up and cozy a MySQL server on a Debian nine server. We have also proven you ways to connect with the MySQL shell and a way to create a brand new database and table.
Now that your MySQL server is up and running and you understand how to connect to the MySQL server from the command line, you may want to test the following courses:
- How to manage MySQL person debts and databases
- How to reset a MySQL root password
- How to Create a MySQL Database
- How to Create MySQL Users Accounts and Grant Privileges
- How to Show MySQL Users
- How to Back Up and Restore MySQL Databases with Mysqldump