
AWS EC2 Pricing
How to Install LAMP Under the Amazon Free-Tier, you could use an EC2 instance for a year, freed from value. After an year, the instance is charged hourly depending upon the sort of example.
How to Install LAMP Working Environment for this Tutorial
How to Install LAMP This academic makes use of an Ubuntu system. The steps will work for all flavours of Linux, and additionally for Mac.
How to Install LAMP For Windows, the steps are almost the identical, the most effective difference being you need to apply PuTTY for SHH connection (in preference to command line on Linux systems). See Step 6 below for extra.
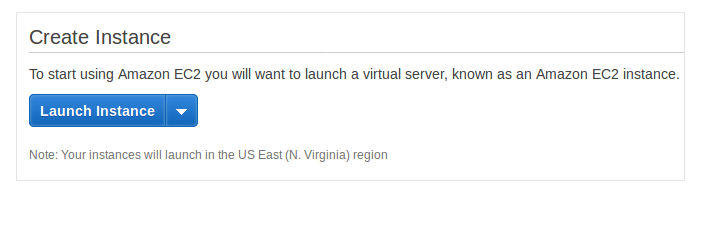
Step 1 – How to Install LAMP Launch an AWS EC2 Virtual Machine
Log into the AWS EC2 Management Console, and click on the button Launch Instance
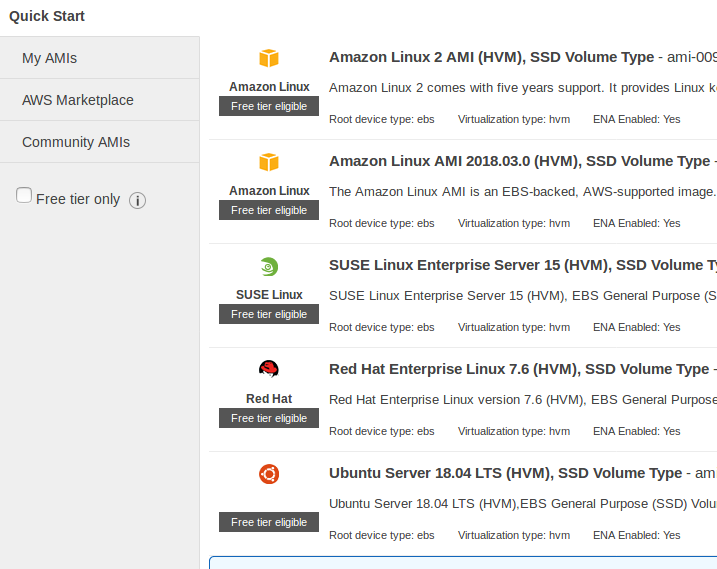
Step 2 – How to Install LAMP Choosing the OS and Hardware
Clicking on the option from Step 1 takes to the under web page. Here you get to pick the OS for the digital machine and additionally the opposite hardware. Select Ubuntu Server 18.04 LTS (HVM), SSD Volume Type.
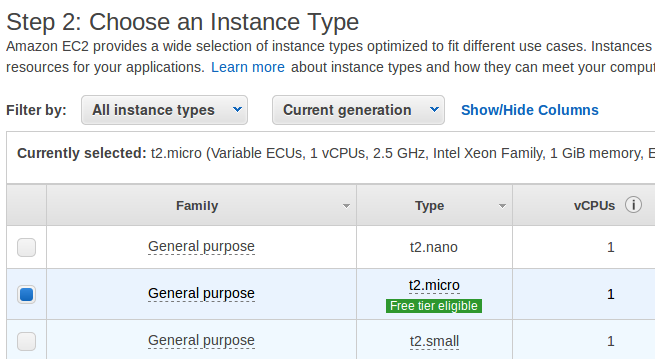
In the following display pick the instance type. In this academic, t2.Micro instance is selected as it’s miles free-tier eligible. Single processor core and 1 GB memory is good sufficient for wellknown functions.
Step 3 – Editing Some Basic Configurations
Go for the default settings for Configure Instance, Add Storage and Add Tags monitors.
However add 2 policies underneath Configure Security Group. They are SSH and HTTP.
SSH is needed to login to the digital system using command line. This is already added to the safety organization.
HTTP is for the internet server in an effort to be established shortly. To upload HTTP rule, click on on Add Rule & choose HTTP from the dropdown.
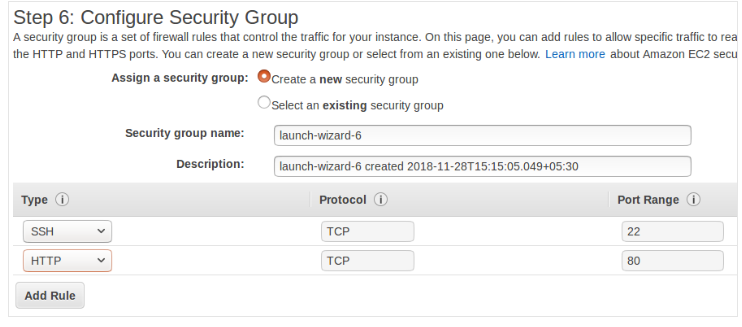
S in step with AWS documentation, security companies acts as a digital firewall. In quick you can installation the rules regarding IP addresses that may get admission to the brought protocols. For the educational, both the protocols are open to all IP addresses. But you could also restriction some IP addresses from having access to all protocols. This may be edited later additionally.
Clicking Review and Launch button on this page takes us to a web page in which you can assessment our example settings. Click on the Launch button.
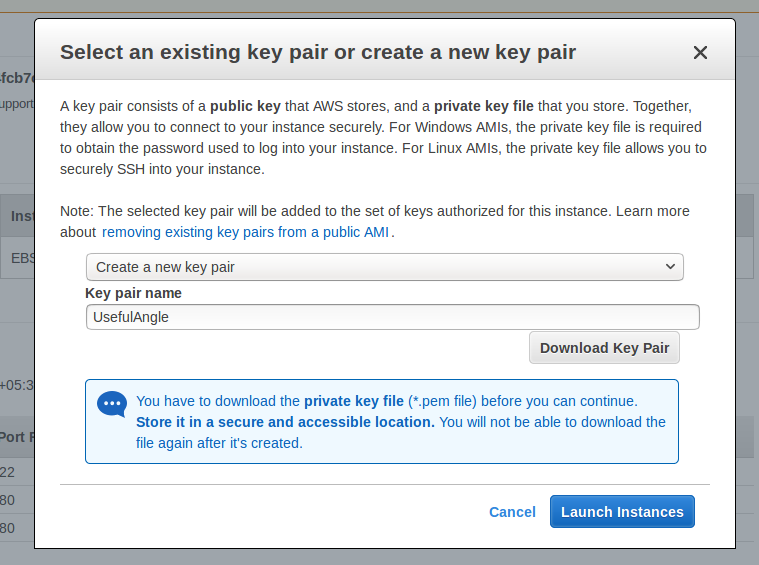
Step 4 – Creating a Key Pair
The next page will present with options for Key file. This key file is used to connect to the EC2 instance from your system.
Choose the option Create a new key pair and download the key file.
With the key document downloaded, the button for launching the instance have become active. And clicking that button is the ultimate step to release the instance in AWS.
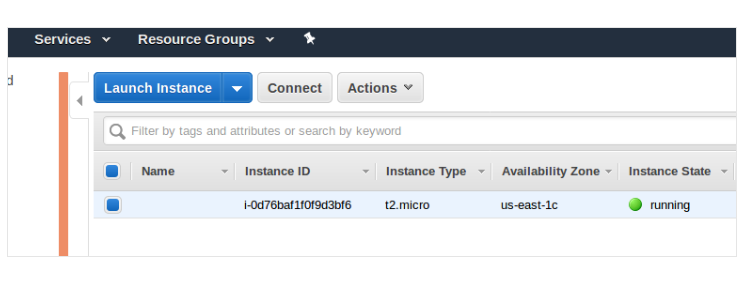
With the a hit release of the instance, you will be redirected to the page which gives a fulfillment message that example has been launched.

Click on the button View Instances and you will be redirected to the EC2 management console.
Step 5 – Locking the Key File
The permission for the downloaded key file needs to be changed so that it is not publicly viewable for SSH to work. It is achieved by :
sudo chmod 400 path/to/key/file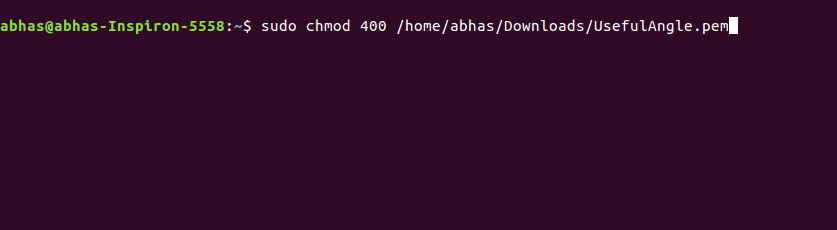
Step 6 – Connecting to Instance
In this newsletter step-by way of-step technique is mentioned to setup LAMP stack in AWS EC2. This will consist of :
Creating an EC2 example Connection to the instance out of your device Install Ubuntu 18.04 Install Apache 2.Four Install PHP 7.2 Install MySql 5.7 Install phpMyAdmin 4 Setting up FTP/SFTP get right of entry to AWS EC2 Pricing Under the Amazon Free-Tier, you can use an EC2 example for a 12 months, free of fee. After an yr, the example is charged hourly depending upon the form of example.
Working Environment for this Tutorial This tutorial makes use of an Ubuntu gadget. The steps will paintings for all flavours of Linux, and additionally for Mac.
For Windows, the steps are almost the identical, the only distinction being you want to use PuTTY for SHH connection (in place of command line on Linux systems). See Step 6 under for greater.
Step 1 – Launch an AWS EC2 Virtual Machine Log into the AWS EC2 Management Console, and click on the button Launch Instance
Step 2 – Choosing the OS and Hardware Clicking on the option from Step 1 takes to the under page. Here you get to choose the OS for the digital device and also the other hardware. Select Ubuntu Server 18.04 LTS (HVM), SSD Volume Type.
In the next display pick out the instance kind. In this tutorial, t2.Micro example is selected as it’s far loose-tier eligible. Single processor center and 1 GB reminiscence is right sufficient for general purposes.
Step 3 – Editing Some Basic Configurations Go for the default settings for Configure Instance, Add Storage and Add Tags displays.
However upload 2 regulations below Configure Security Group. They are SSH and HTTP.
SSH is needed to login to the virtual device using command line. This is already delivered to the security organization.
HTTP is for the internet server that will be established rapidly. To upload HTTP rule, click on on Add Rule & select HTTP from the dropdown.
As consistent with AWS documentation, security companies acts as a digital firewall. In quick you may set up the rules concerning IP addresses which could get entry to the brought protocols. For the academic, each the protocols are open to all IP addresses. But you could also restrict a few IP addresses from gaining access to all protocols. This can be edited later additionally.
Clicking Review and Launch button on this page takes us to a web page where you could evaluate our instance settings. Click on the Launch button.
Step four – Creating a Key Pair The subsequent web page will gift with alternatives for Key document. This key file is used to connect with the EC2 instance from your machine.
Choose the option Create a new key pair and down load the key record.
With the key report downloaded, the button for launching the instance have become lively. And clicking that button is the remaining step to release the example in AWS.
With the a success launch of the instance, you’ll be redirected to the page which gives a success message that instance has been released.
Click on the button View Instances and you will be redirected to the EC2 control console.
Step 5 – Locking the Key File The permission for the downloaded key record wishes to be modified so that it isn’t always publicly viewable for SSH to paintings. It is accomplished by using :
sudo chmod four hundred course/to/key/file
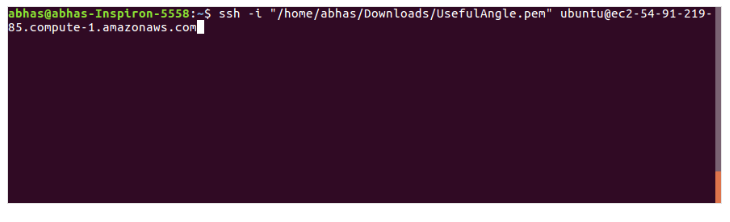
Step 6 – Connecting to Instance The key record that turned into downloaded will now be used to hook up with the EC2 instance from our machine through SSH. In this educational a Linux device is used, so we are using the Linux terminal for SSH get right of entry to.
(For SSH access with Windows see Connecting to Your Linux Instance from Windows Using PuTTY)
SSH to the instance using the key record and hostname. The hostname here is generated by means of combining the EC2 username (that’s ubuntu for Ubuntu 18.04) with the general public DNS Name with a @ man or woman.
Example: ubuntu@ec2-fifty four-ninety one-219-eighty five.Compute-1.Amazonaws.Com
The following command is used for SSH :
sudo ssh -i “direction/to/key/record” ec2-hostname Replace ec2-hostname with the hostname of the instance.
- Type yes if it gives a connection warning.
- Upon a successful connection, you will see the below screen :
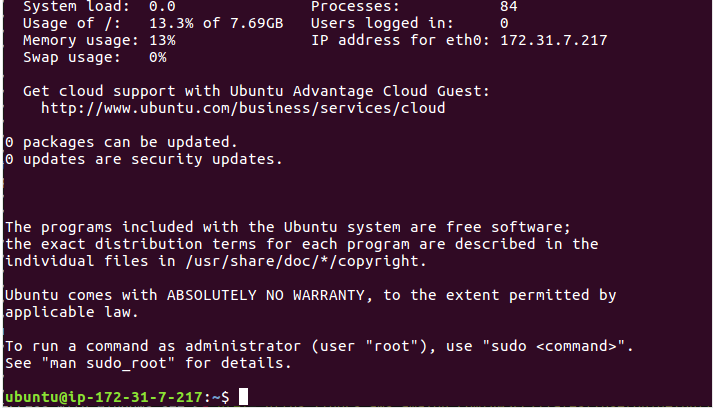
Now you can start installing the necessary software on this EC2 instance.
Step 7 – Installing Apache
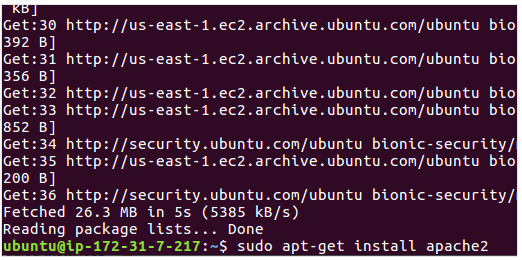
- Before installing Apache, you need to update the package list for upgrades and new packages.
sudo apt-get update - Now Apache can be installed.
sudo apt-get install apache2
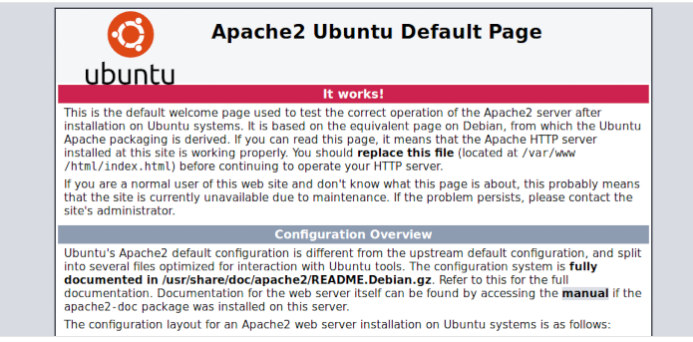
03.Following the set up of Apache, if you navigate to the general public IP of the example (that can be determined from the EC2 Console) from a browser, you’ll see the acquainted Apache Welcome Page. This implies Apache is strolling flawlessly.
Step 8 – Installing MySql
- Install MySql Server
sudo apt-get install mysql-server - After MySql has been installed, you will need to set the root password of the database and secure it using the following command :
sudo mysql_secure_installation
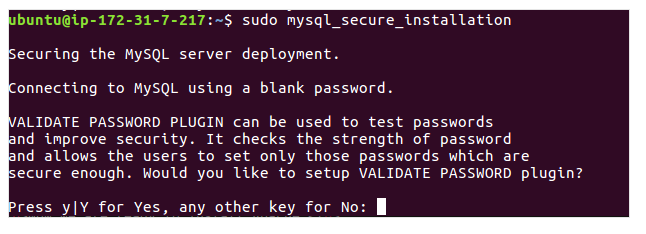
- You will be presented a screen where MySQL asks whether you would like to activate the VALIDATE PASSWORD PLUGIN. For now, keeping things simple, type no.
- In the next type the root password of your choice. Confirm it again.
- In the next screen MySql will ask whether to remove anonymous users. Type yes
- Disallow root login remotely? Type No
- Remove test database and access to it? Type Yes
- Reload privilege tables now? Type Yes
- After the password has been set you can check the whether MySQL is working correctly by logging into the database with the command :
sudo mysql -u root -pPassword is the same that was set in the previous step.If everything went smoothly, you will be welcomed by the mysql prompt.
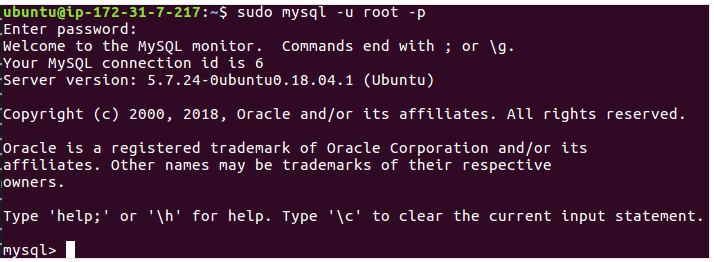
Type exit to get out of MySql
exit
Step 9 – Installing PHP with Common Extensions
Now install PHP and commonly used PHP extensions by using the following command :
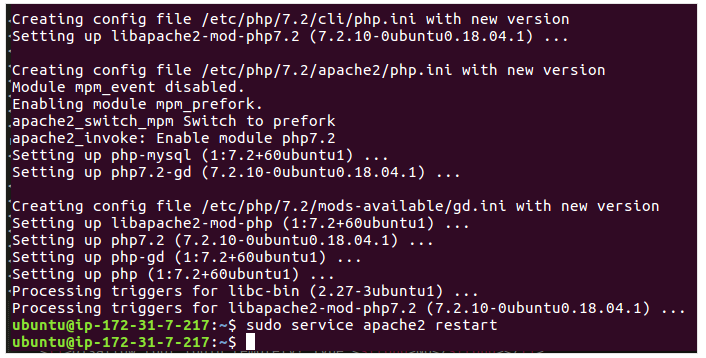
sudo apt-get install php libapache2-mod-php php-mysql php-curl php-gd php-json php-zip php-mbstring
After PHP has been installed, restart Apache.
sudo service apache2 restart
Step 10 – Installing phpMyAdmin
To install phpMyAdmin execute the following command :sudo apt install phpmyadmin
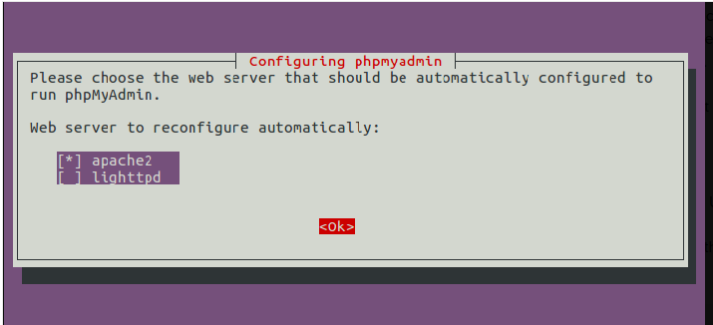
Following which you will be presented with options to configure phpmyadmin for the server :
- The first option is to select the proper web server. It is important to note here that although apache2 is highlighted it hasn’t been selected.
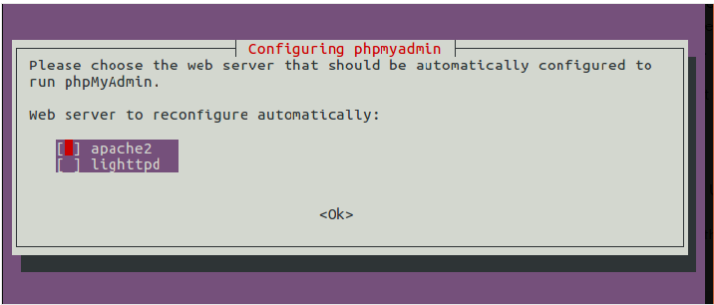
Select apache2 by pressing the space-bar. Then press Tab key that takes us to the Ok button. Now press enter.
Next option is to configure the database for phpmyadmin with dbconfig-common. Select the Yes choice here.
Then password is asked for login to phpmyadmin. By default the username is phpmyadmin. You are actually setting the password for this user (that is unique from the roor person).
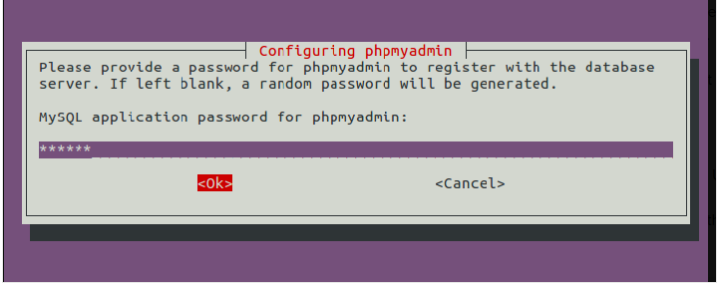
- Press Tab key to go the Ok button.
- Now phpMyAdmin can be accessed from the browser by navigating to
http://[SERVER_PUBLIC_IP]/phpmyadmin
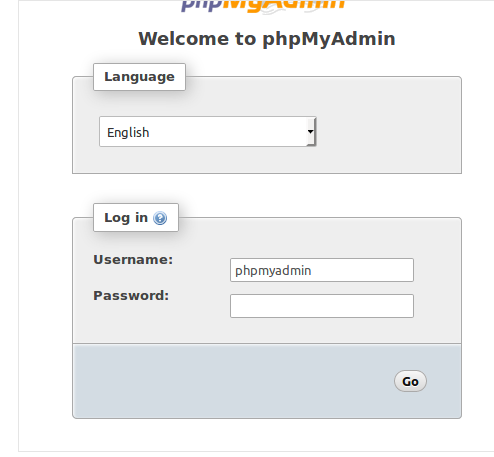
Enter the login credentials with user phpmyadmin and the associated password.
Step 11 – How to Install LAMP Allowing Mysql Root Login through phpMyAdmin
This step is optional.
By default you cannot login as root user through phpMyAdmin. To do this perform the below steps :
- Login to MySql root.
sudo mysql -u root -p - Enter the query to change root login authentication from socket to password.
ALTER USER 'root'@'localhost' IDENTIFIED WITH mysql_native_password BY 'password';Replace password by the root password you entered while installing MySql. - Enter the query to put the changes into effect.
FLUSH PRIVILEGES;
Now you can login as root from phpMyAdmin.
Step 12 – How to Install LAMP Connecting Instance with FTP Client
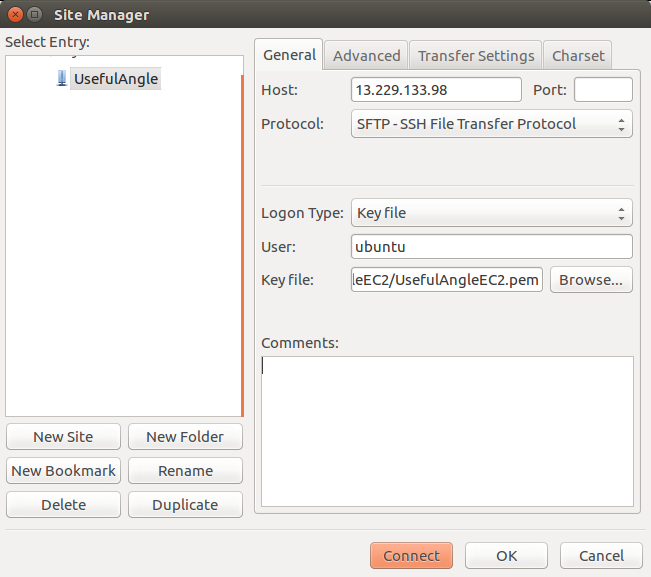
Very frequently you may need to apply an FTP patron to upload and edit codes to the instance. Filezilla is covered right here, however the process can be nearly comparable for some other FTP/SFTP customer.
Open Filezilla. Under File > Site Manager setup the credentials had to add files.
-
- Under Host, provide the Public IP Address of the instance.
- For Protocol, select SFTP.
- For Logon Type, select the option Key file.
- The User is ubuntu.
- For Key file, provide the path to the key file
- You will be taken to default directory – /home/ubuntu. You can enter /var/www/html to go to the web server directory.
- Now the the ownership and access modes of the server directory /var/www/html needs to be changed from root to ubuntu. Otherwise you will be unable to write files through FTP.
sudo chown -R ubuntu /var/www/html
sudo chmod -R 755 /var/www/html
Following these two commands you can create and upload files from FileZilla to our server directory in the instance. - For testing you can create an index.php file in the server directory and write a simple PHP code to test the installation.
<?php echo phpinfo(); ?>Now if you navigate to the public IP address, you should see the familiar page.
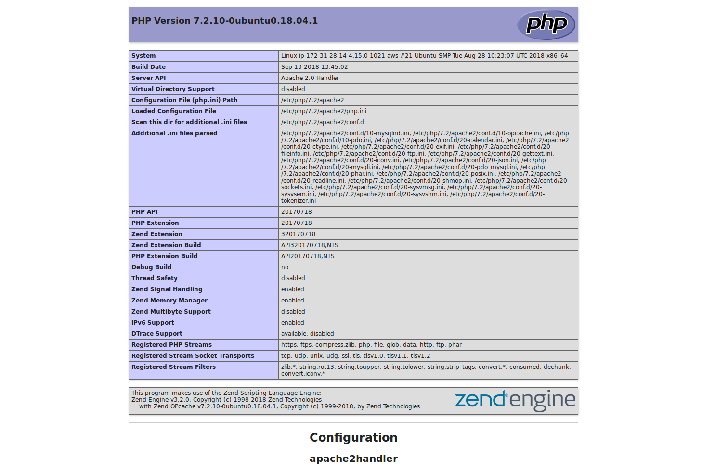
- This implies that the PHP installation is working perfectly.
Setup is Finished
Congratulations! You have a working EC2 instance with LAMP stack.
In case of any problems during installation, you can always terminate that instance and start a new one.
For any issues, you can comment it below. We will try to solve it.