
phpMyAdmin, is a unfastened, open supply PHP based application designed to simplify the administration of MySQL and MariaDB servers over a web-based totally interface.
PhpMyAdmin permits you to manipulate MySQL databases, consumer debts and privileges, execute SQL-statements, import and export facts in a extensive sort of records codecs and much greater.
This educational describes the stairs required to put in and secure phpMyAdmin on Debian 9 with Apache web server.
Prerequisites
Ensure that you have met the subsequent requirements in advance:
- Have LAMP (Linux, Apache, MySQL, and PHP) mounted to your Debian server.
- Logged in as a person with sudo privileges.
If your area isn’t already protected with the aid of an SSL you may comply with this guide and comfortable your Apache with Let’s Encrypt on Debian nine.
Installing phpMyAdmin
Perform the subsequent steps to install phpMyAdmin on Debian nine:
01. Update the package deal index and improve the system programs to the contemporary variations:
$ sudo apt update && sudo apt upgrade02. Install the phpMyAdmin package deal from the default Debian repositories by typing:
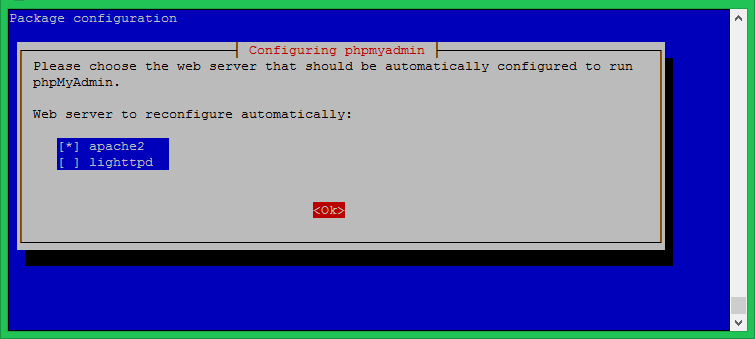
$ sudo apt install phpmyadminThe installer will ask you choose the web server that need to be routinely configured to run phpMyAdmin, select apache with the aid of urgent Space after which Enter.
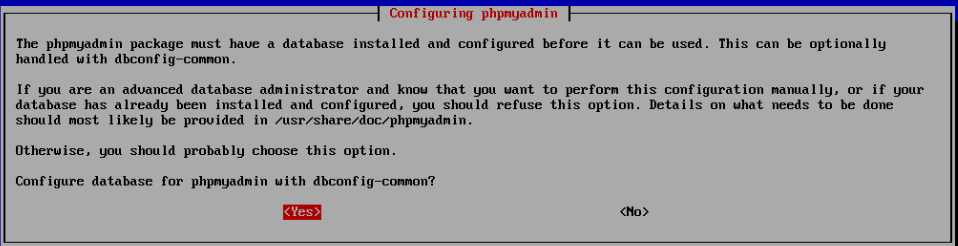
Next, you will be requested whether to apply dbconfig-common to set up the database, pick Yes and hit Enter.
Enter a password for phpMyAdmin to register with the database, pick OK and press Enter.
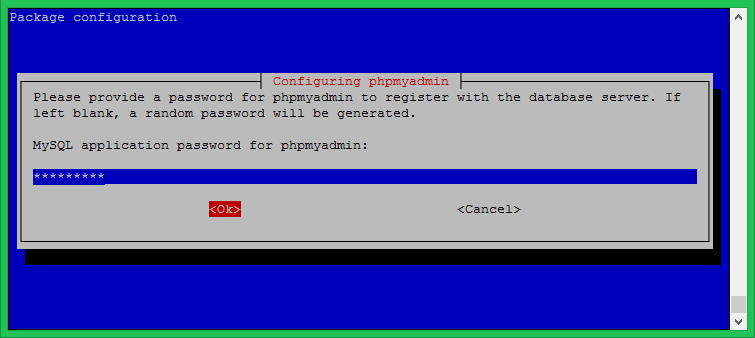
Confirm the password, select OK and press Enter.

03. Once the installation approach is completed, or restart Apache for adjustments to take impact:
sudo systemctl restart apache2Creating Administrative MySQL User
In Debian systems strolling MariaDB 10.1 (and later). The root user is set to apply the auth_socket authentication approach by means of default.
The auth_socket plugin authenticates customers that join from the localhost through the Unix socket record. This method that you can’t authenticate as a root by using imparting a password.
Instead of changing the authentication, approach for the MySQL customer root. We will create a new administrative MySQL user. This consumer may have the same privileges as the foundation user and will be set to apply the mysql_native_password authentication approach.
We will use this person to login to the phpMyAdmin dashboard and preform administrative duties on our MySQL or MariaDB server.
Start via log in to the MySQL server as the basis person:
sudo mysqlFrom inside the MySQL shell execute the subsequent instructions which will create a new administrative user and furnish appropriate permissions:
MYSQL> CREATE USER 'padmin'@'localhost' IDENTIFIED BY 'super-strong-password';
MYSQL> GRANT ALL PRIVILEGES ON *.* TO 'padmin'@'localhost' WITH GRANT OPTION;
We named the administrative user padmin. You can use any name you like, just be sure to set a strong password.
Accessing phpMyAdmin
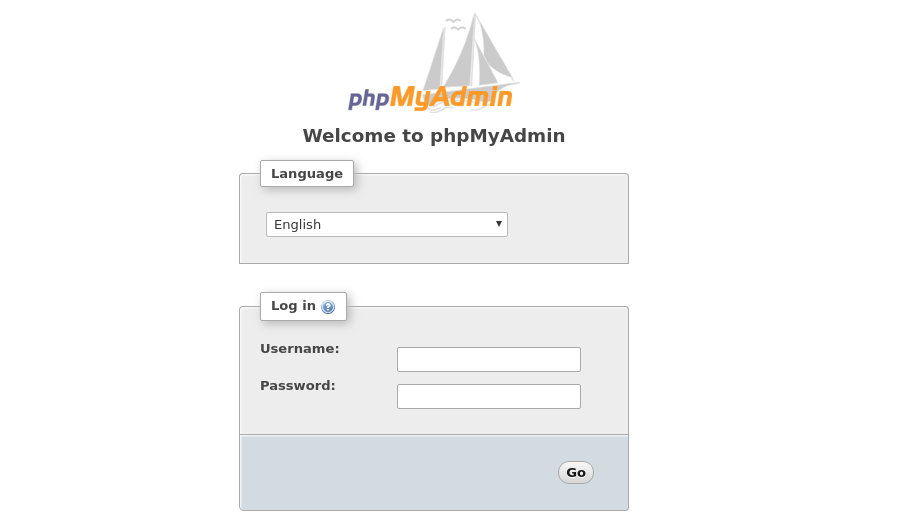
To access the phpMyAdmin interface open your favourite browser and kind your server’s area call or public IP deal with accompanied by /phpmyadmin:
https://your_domain_or_ip_address/phpmyadminEnter the administrative consumer login credentials you previously created and click on Go.
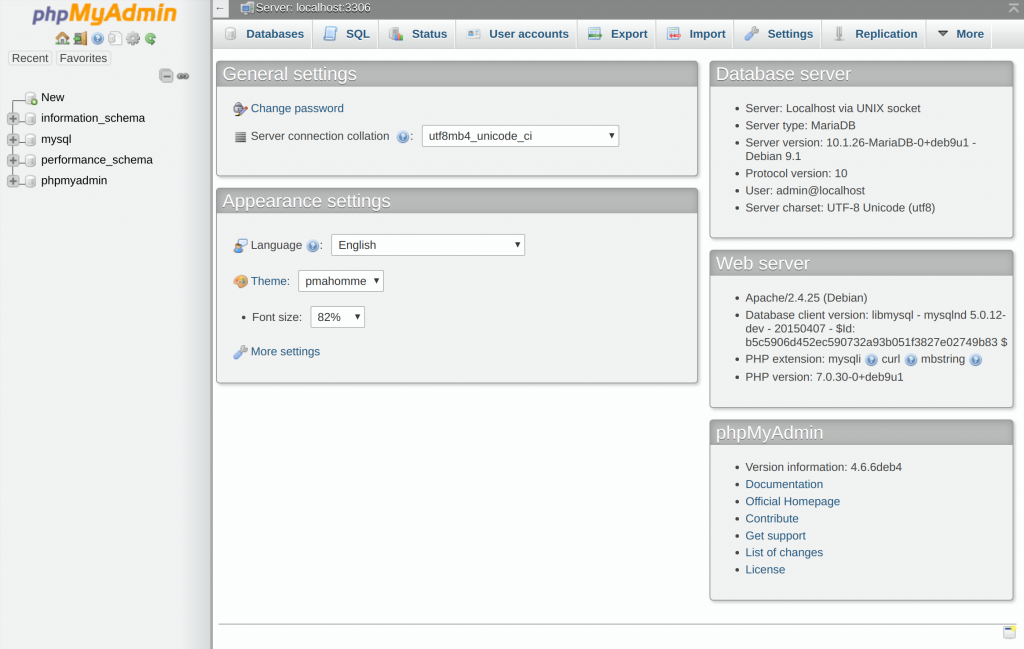
Once you log in, you’ll see the phpMyAdmin dashboard. In an effort to look some thing like this:
Securing phpMyAdmin
To upload an additional layer of security we will password guard the phpMyAdmin listing through setting up a basic authentication.
First we are able to create a password file with customers the usage of the htpasswd device that comes with the Apache bundle. We will store the .htpasswd record in /etc/phpmyadmin directory:
sudo htpasswd -c /etc/phpmyadmin/.htpasswd padminIn this example we are growing a user named padmin. You can select any username, it doesn’t have to be equal as the administrative MySQL user.
The command above will activate you to go into and verify the person’s password.
output

New password:
Re-type new password:
Adding password for user padmin
If you need to feature an extra person, you may use the identical command without the -c flag:
sudo htpasswd /etc/phpmyadmin/.htpasswd padmin2The next step is to configure Apache to password defend the phpMyAdmin listing and use the .htpasswd record.
To achieve this open the phpmyadmin.conf report which changed into robotically created in the course of the phpMyAdmin set up:
sudo nano /etc/apache2/conf-available/phpmyadmin.confAnd edit / insert the subsequent lines highlighted in yellow:
/etc/apache2/conf-available/phpmyadmin.conf

<Directory /usr/share/phpmyadmin>
    Options  +FollowSymLinks +Multiviews +Indexes  # edit this line
    DirectoryIndex index.php

    AllowOverride None
    AuthType basic
    AuthName "Authentication Required"
    AuthUserFile /etc/phpmyadmin/.htpasswd
    Require valid-user

    <IfModule mod_php5.c>
    ...
Save and close the file and restart Apache for modifications to take effect:
sudo systemctl restart apache2Now, even as getting access to your padmin. You may be brought about to go into the login. Credentials of the individual you previously created:
https://your_domain_or_ip_address/phpmyadmin
After entering the basic authentication, you’ll be taken to the phpMyAdmin login page wherein you want to go into your MySQL administrative user login credentials.
It is also a good idea to change the /phpmyadmin alias to something more unique and secure.
Conclusion
Congratulations, you have got successfully hooked up phpMyAdmin for your Debian nine server. You can now start growing MySQL databases, users and tables and perform diverse MySQL queries and operations