

install and Configure Gogs,Gogs is a self-hosted open source git server written in Go. It consists of a repository file editor, task issue monitoring, and a integrated wiki.
Gogs is a light-weight application and may be hooked up on low-powered structures. If you’re looking for an opportunity to Gitlab with tons smaller reminiscence footprint and you don’t want all of the bells and whistles that Gitlab offers you then ought to actually try Gogs.
This academic covers the steps to install and configure Gogs on Ubuntu 18.04. The equal instructions practice for Ubuntu 16.04 and another Ubuntu-based totally distribution.
nstall and Configure Gogs,Before You Begin
Gogs can use SQLite, PostgreSQL, or MySQL/MariaDB database to keep all its facts.
In this tutorial, we can use SQLite because the database of preference. If SQLite isn’t mounted to your gadget you could installation it with the aid of typing:
$sudo apt install sqlite3For a further layer of safety, it is encouraged to set up a basic firewall. You can observe the stairs in our How To Set Up a Firewall with UFW on Ubuntu 18.04 guide.
nstall and Configure Gogs,Installing Gogs
We will install Gogs from binary. The installation is a quite simple system.
nstall and Configure Gogs,Install Git
The first step is to install Git on your server. To achieve this, refresh the nearby package deal index and install the git package deal through running the following instructions as sudo user:
$ sudo apt update
$ sudo apt install git
Verify the installation by displaying the Git version:
$ git --versioncode
git version 2.17.1nstall and Configure Gogs,Create a Git user
Create a new system user to run the Gogs service by typing:
$ sudo adduser --system --group --disabled-password --shell /bin/bash --home /home/git --gecos 'Git Version Control' gitThe command will create the consumer and set the home listing to /home/git. The output will look something like underneath:
output

Adding system user `git' (UID 111) ...
Adding new group `git' (GID 116) ...
Adding new user `git' (UID 111) with group `git' ...
Creating home directory `/home/git' ...
Visit the Gogs Download web page and down load the modern day binary for your structure. At the time of writing, the modern-day model is 0.Eleven.86, if there’s a new edition available change the VERSION variable in the command below.
Download the Gogs archive within the /tmp listing the usage of the following wget command:
$ VERSION=0.11.86
$ wget https://dl.gogs.io/${VERSION}/gogs_${VERSION}_linux_amd64.tar.gz
 -P /tmp
Once the download is completed, extract the Gogs tar.Gz file and pass it to the /domestic/git directory:
$ sudo tar xf /tmp/gogs_*_linux_amd64.tar.gz -C /home/gitRun the subsequent command to change the possession of the Gogs set up directory to the person and organization git:
$ sudo chown -R git: /home/git/gogsCreate a systemd Unit File
Gogs comes with a Systemd unit document that is already configured to in shape our setup.
Copy the file to the /etc/systemd/system/ directory by typing:
$ sudo cp /home/git/gogs/scripts/systemd/gogs.service
 /etc/systemd/system/
Once done, start and enable the Gogs service:
$ sudo systemctl start gogs
$ sudo systemctl enable gogs
Verify that the service is started successfully:
output

* gogs.service - Gogs
   Loaded: loaded (/etc/systemd/system/gogs.service; enabled; vendor preset: enabled)
   Active: active (running) since Thu 2019-04-25 04:13:44 PDT; 9s ago
 Main PID: 14376 (gogs)
    Tasks: 8 (limit: 2319)
   CGroup: /system.slice/gogs.service
           `-14376 /home/git/gogs/gogs web
Install Gogs using the web installer
Now that Gogs is downloaded and running, it’s time to finalize the set up thru the web interface.
Open your browser, kind http://YOUR_DOMAIN_IR_IP:3000 and a display screen much like the following will seem:

Database Settings:
- Database Type: SQLite3
- Path: Use an absolute path,
/home/git/gogs/gogs.db
Application General Settings
- Application Name: Enter your organization name
- Repository Root Path: Leave the default
/home/git/gogs-repositories - Run User: git
- Domain: Enter your domain or server IP address.
- SSH Port: 22, change it if SSH is listening on other Port
- HTTP Port: 3000
- Application URL: Use http and your domain or server IP address.
- Log Path: Leave the default
/home/git/gogs/log
Later you can change the settings by editing the Gogs configuration file.
Once done hit the “Install Gogs” button. The installation is instantaneous and whilst finished you may be redirected to the login page.
Click at the “Sign up now” hyperlink.
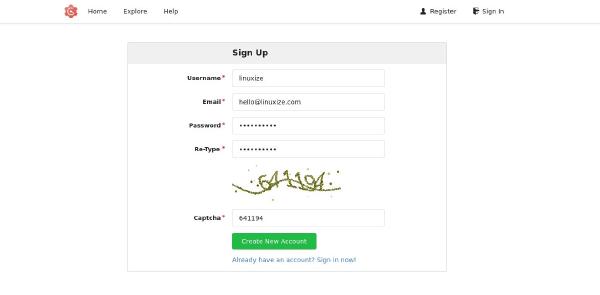
The first registered user is automatically added to the Admin group.
That’s it. Gogs has been installed on your Ubuntu machine.
Configuring Nginx as SSL Termination Proxy
This step is non-compulsory however it’s far especially advocated. To use Nginx as a opposite proxy you need to have a website or subdomain pointing for your server public IP. In this academic, we can use gogs.Instance.Com.
First, deploy Nginx and generate a loose Let’s Encrypt SSL certificates through following the publications underneath:
- How To Install Nginx on Ubuntu 18.04
- Secure Nginx with Let’s Encrypt on Ubuntu 18.04
Once finished, open your textual content editor and edit the domain server block file:
$ sudo nano /etc/nginx/sites-enabled/gogs.example.com” /etc/nginx/sites-enabled/gogs.example.com “
server {
    listen 80;
    server_name gogs.example.com;

    include snippets/letsencrypt.conf;
    return 301 https://gogs.example.com$request_uri;
}

server {
    listen 443 ssl http2;
    server_name gogs.example.com;

    proxy_read_timeout 720s;
    proxy_connect_timeout 720s;
    proxy_send_timeout 720s;

    client_max_body_size 50m;

    # Proxy headers
    proxy_set_header X-Forwarded-Host $host;
    proxy_set_header X-Forwarded-For $proxy_add_x_forwarded_for;
    proxy_set_header X-Forwarded-Proto $scheme;
    proxy_set_header X-Real-IP $remote_addr;

    # SSL parameters
    ssl_certificate /etc/letsencrypt/live/gogs.example.com/fullchain.pem;
    ssl_certificate_key /etc/letsencrypt/live/gogs.example.com/privkey.pem;
    ssl_trusted_certificate /etc/letsencrypt/live/gogs.example.com/chain.pem;
    include snippets/letsencrypt.conf;
    include snippets/ssl.conf;

    # log files
    access_log /var/log/nginx/gogs.example.com.access.log;
    error_log /var/log/nginx/gogs.example.com.error.log;

    # Handle / requests
    location / {
       proxy_redirect off;
       proxy_pass http://127.0.0.1:3000;
    }
Don’t overlook to update gogs.Instance.Com with your Gogs area and set the correct direction to the SSL certificates documents.
Restart the Nginx service for changes to take effect:
$ sudo systemctl restart nginxNext, we need to alternate the Gogs area and root url. To do so, open the configuration record and edit the following traces:
$ sudo nano /home/git/gogs/custom/conf/app.ini” /home/git/gogs/custom/conf/app.ini “
[server]
DOMAIN           = gogs.example.com
ROOT_URL         = https://gogs.example.com/
Restart the Gogs service by typing:
$ sudo systemctl restart gogsConfiguring Email Notifications
In order for Gogs in order to ship notification emails, you may both deploy Postfix or use some transactional mail carrier which include SendGrid, MailChimp, MailGun or SES.
To allow electronic mail notifications, open the configuration document and edit the following lines:
$ sudo nano /home/git/gogs/custom/conf/app.ini” /home/git/gogs/custom/conf/app.ini “
[mailer]
ENABLED = true
HOST    = SMTP_SERVER:SMTP_PORT
FROM    = SENDER_EMAIL
USER    = SMTP_USER
PASSWD  = YOUR_SMTP_PASSWORD
Make certain you positioned the precise SMTP server facts.
Restart the Gogs provider for changes to take impact:
$ sudo systemctl restart gogsGogs also permits you to connect with Slack by means of creating web webhook and send notifications in your Slack channels.
Upgrading Gogs
To upgrade Gogs, several manual steps are required.
- First stop the Gogs service:
$ sudo systemctl stop gogs2. Rename the Gogs installation directory.
$ sudo mv /home/git/gogs{,_old}3. Download the latest Gogs version and move it to the /home/gitdirectory:
$ VERSION=<THE_LATEST_GOGS_VERSION>
$ wget https://dl.gogs.io/${VERSION}/gogs_${VERSION}_linux_amd64.tar.gz -P /tmp
$ sudo tar xf /tmp/gogs_*_linux_amd64.tar.gz -C /home/git
Make sure you change VERSION with the actual Gogs release version.
4.Copy custom, statistics, log directories to the extracted directory using the subsequent rsync command:
$ sudo rsync -a /home/git/gogs_old/{custom,data,log} /home/git/gogs/5. Finally, start the Gogs service:
$ sudo systemctl restart gogsThat’s it.
Conclusion
Copy custom, statistics, log directories to the extracted directory using the subsequent rsync command: