
Create and Delete User Accounts in Windows 10, Whenever a new version of Windows comes alongside it usually makes some adjustments to how you perform easy movements to your PC.
Windows 10 is no exception to this, and you can assume greater to alternate inside the future as Microsoft slowly movements capability from the classic Control Panel to the new Settings app.
One modern-day alternate—mainly in case you’re coming from Windows 7—is a way to manage and control consumer money owed in Windows 10.
01 Create and Delete User Accounts,Windows 10 Changes How User Accounts Work
Microsoft’s state-of-the-art model of Windows makes a few predominant modifications.
Guest bills are gone, most accounts are tied to your on-line Microsoft account, and Windows 10 gives new permissions you could use with man or woman money owed.
02 Create and Delete User Accounts,Setting Up a Basic Account
Create and Delete User Accounts in Windows 10, Let’s start with the fundamentals: how to upload a fashionable new consumer account to an activated PC.
For the purposes of this text, we’re going to anticipate you already have at least one account in your PC since you can’t finalize the installation of Windows 10 without doing so.
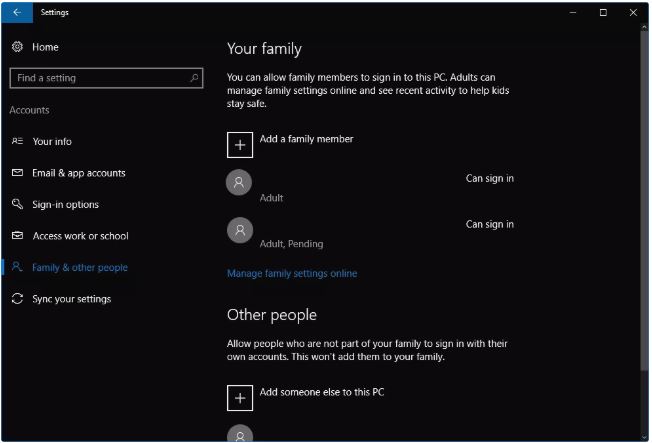
To start click on on Start > Settings > Accounts > Family & other people. This will convey you to the display screen in which you could add new customers.
The widespread new person can be part of your own family. If you and a roommate share a PC you can need to distinguish via listing your roommate’s account inside the “different humans” segment. We’ll cope with including non-family individuals to a PC later.
First, let’s add a member of the family. Under the sub-heading “Your circle of relatives” click on Add a family member.
03 Create and Delete User Accounts, Adult or Child User
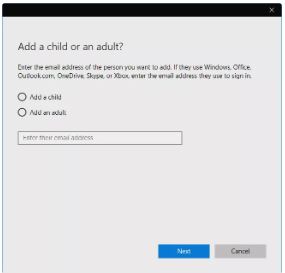
Create and Delete User Accounts in Windows 10, A pop-up window will seem asking if you are including a infant or an person.
Child bills can have privileges delivered or taken faraway from their account which include what apps they can use and how long they could spend on a PC. Adults handling a toddler account can also view all the toddler’s pastime on Windows via signing in to the Microsoft debts internet site.
If that appears immoderate or just undeniable creeps you out then a infant account may not be the excellent preference. Instead, you should don’t forget the usage of a local account in place of one tied to a Microsoft account.
Adult bills, then again, are just normal personal person accounts.
Again they may be tied to a Microsoft account (you may additionally create a nearby account for an person), but they have got ordinary privileges and get right of entry to to the whole variety of apps on a desktop PC.
Adult debts can manipulate child bills, however do no longer have administrator privileges for making changes on the PC. That may be brought later, however.
04 Create and Delete User Accounts, Finalizing the Account
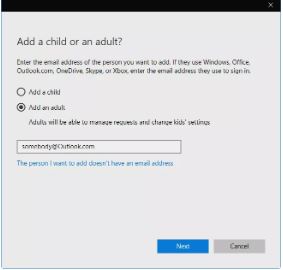
Once you’ve determined among a toddler or grownup account, type within the Hotmail or Outlook.Com account that man or woman uses.
If they do not have one, you can create one inside Windows with the aid of clicking the link categorized The individual I want to add does not have an e-mail deal with.
Once you’ve delivered the email address, click Next, and on the following display make certain you’ve entered the email cope with efficiently and click on Confirm.
05 Create and Delete User Accounts, Invite Sent
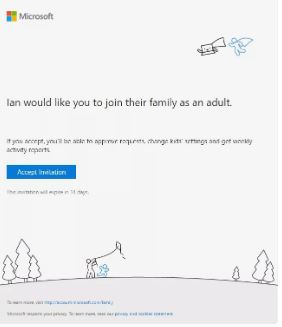
In this case, we created an person account.
After clicking Confirm our new adult consumer will obtain an e mail asking them to confirm they may be part of your “family.”
Once they accept that invitation they will be capable of manipulate infant accounts and examine interest reports on line.
They can, but, right away begin the use of the PC without accepting the invitation to join the circle of relatives.
06 Create and Delete User Accounts, Invite Sent
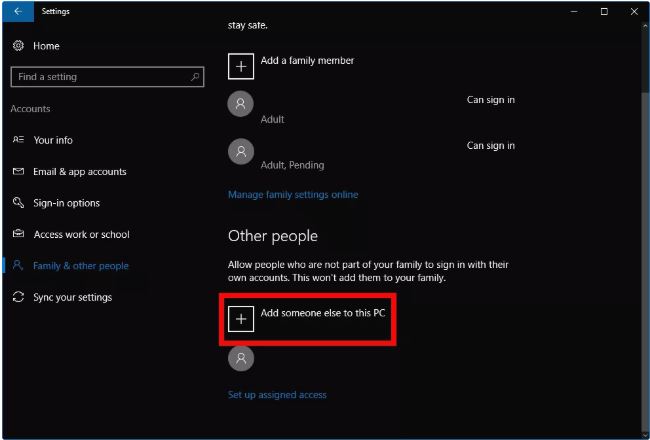
Now that we’ve got were given a member of the family all installed, what if we want to feature someone who’s no longer circle of relatives? This will be a roommate, a pal staying with you for a short time, or a loopy uncle who does not want to view your baby’s hobby reports.
Whatever the state of affairs is get started by going yet again to Start > Settings > Accounts > Family & different humans. Now, beneath the sub-heading “Other humans” click on Add someone else to this PC.
07 Create and Delete User Accounts,Same Process, Different Pop-Up
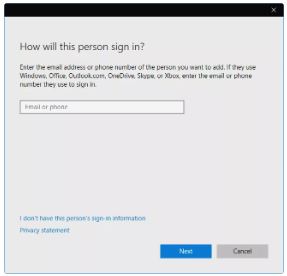
A pop-up window will appear just as with the sooner technique. Now, however, you’re now not being asked to distinguish between a infant or adult consumer. Instead, you simply enter the new person’s electronic mail deal with and click Next.
After that, you will be top to move. The new account is ready-up.
The one element to note is the first time this person signs and symptoms into the PC they’ll need to be linked to the Internet.
08 Create and Delete User Accounts, Assigned Access
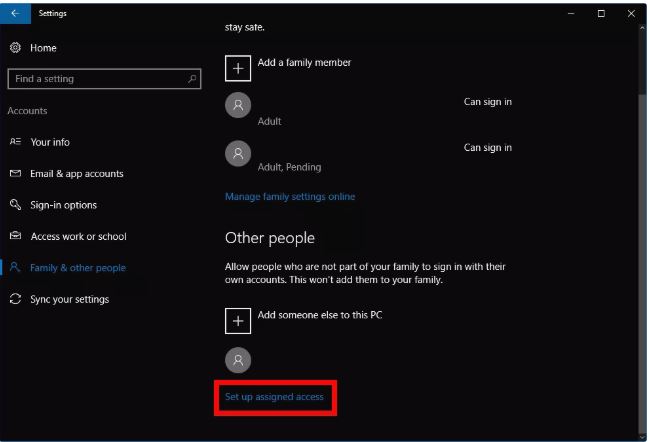
Once you have delivered non-circle of relatives participants for your PC under the Other humans heading, you can restriction their account using a feature called assigned get right of entry to.
When user debts are given this restriction they could only access a unmarried app while they are signed in, and the choice of apps they may be assigned is constrained.
To do that click Set up assigned get admission to at the bottom of the account control display at Start > Settings > Accounts > Family & other people.
09 Choose Account and App
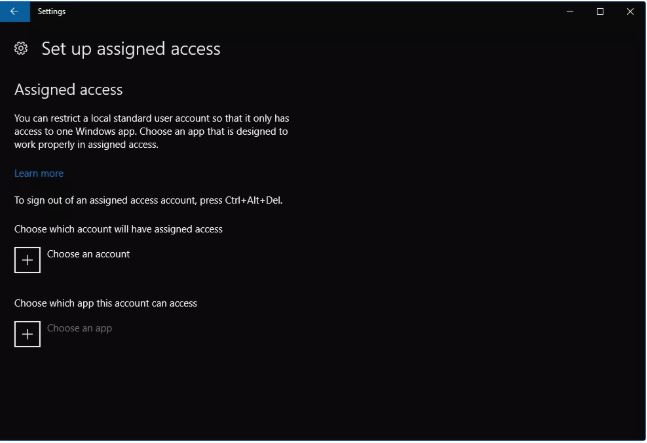
On the next display, click Choose an account to decide on the account on the way to be constrained, after which click on Choose an app to assign the only app they could get admission to.
Once it’s carried out, return to the previous screen or close the Settings app.
10 Why Assigned Access?
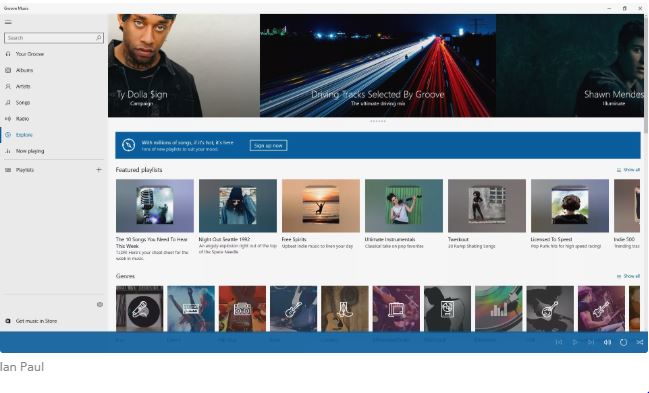
This feature is mainly designed for computers that act as public terminals, and for that reason typically best require get admission to to a unmarried app.
If you actually need to restrict someone to best the usage of e mail or a track player like Groove this feature can do that.
But that’s simply no longer useful for an real person who desires to use the PC.
One exception to that rule might be while you truly want your home PC to be a public terminal.
Let’s say, as an instance, you want visitors at your subsequent party a good way to select the tune gambling for your PC. But you are frightened approximately allowing anybody in attendance the chance to get entry to the personal documents to your PC.
Creating an assigned get entry to account that best uses Groove Music could provide a solution that prevents nosy human beings from poking round your PC, while still imparting loose get right of entry to in your Groove Music Pass subscription.
11 Turn Off Assigned Access
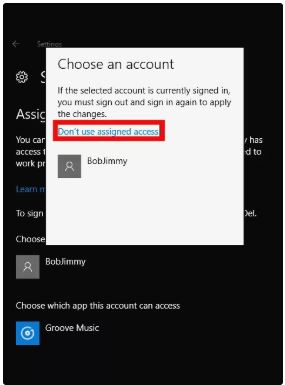
If you ever want to show off assigned get entry to for a selected user visit Start > Settings > Accounts > Family & other human beings > Set up assigned get right of entry to.
Then on the following display click the account precise for assigned access and click Don’t use assigned get admission to.
Tip: When you want to sign out of an assigned get entry to account use the keyboard shortcut Ctrl + Alt + Delete.
12 Administrator Access
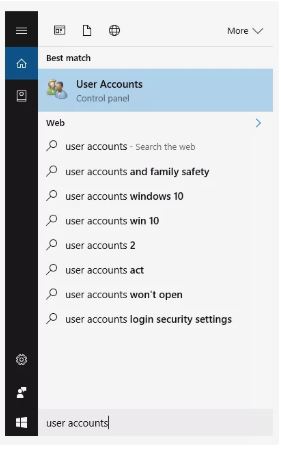
There’s one remaining placing you’ll want to realize about while creating person accounts. That’s a way to elevate an account from a normal consumer to an administrator.
Administrators are tool-specific account privileges that permit a user to make changes to a PC which includes including or deleting different money owed.
To raise a person in Windows 10, kind in User bills into the Cortana seek field. Then pick the Control Panel choice that looks on the pinnacle of the consequences.
13 Control Panel
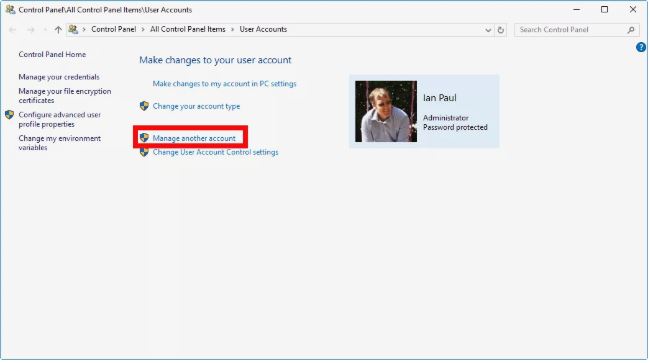
The Control Panel will now open to the User Accounts phase. From here click on at the link classified Manage any other account.
On the next display, you’ll see all the customers who have money owed for your PC. Click at the account you want to change.
14 Make Changes
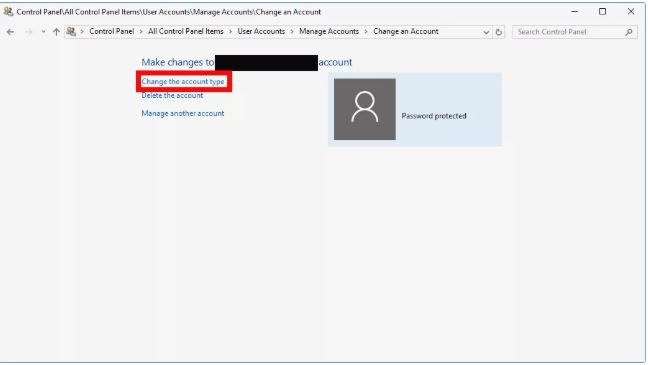
On the following display, click Change the account kind.
15 Make Administrator
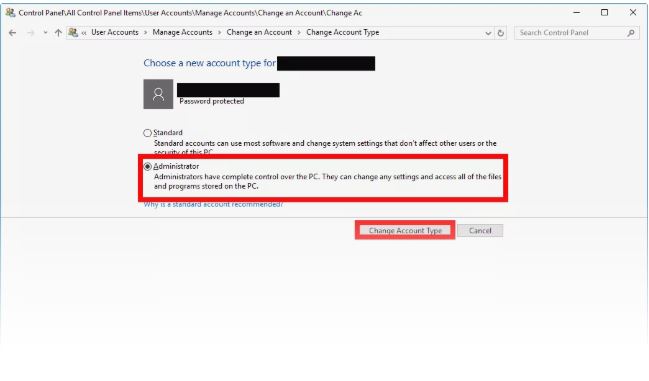
Now, you’ll be moved to the very last screen. Click the Administrator button after which click on Change Account Type. That’s it, the consumer is now an administrator.
16 Deleting a user account
Now, let’s examine the way to delete a person account.
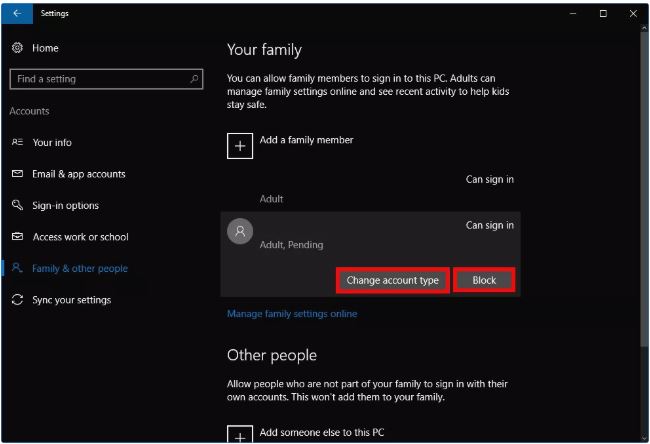
The easiest manner to delete an account is to visit Start > Settings > Accounts > Family & different human beings. Then select the person you need to cast off.
If the consumer is underneath the circle of relatives section you will see two buttons: Change account kind and Block. Choose Block.
The one aspect to keep in mind approximately the Block option for family is that you could quickly reinstate the account in your PC by choosing the user’s account.
Then click on Allow to allow that consumer to access the PC once more as part of the circle of relatives group.
17 Deleting “Other people”
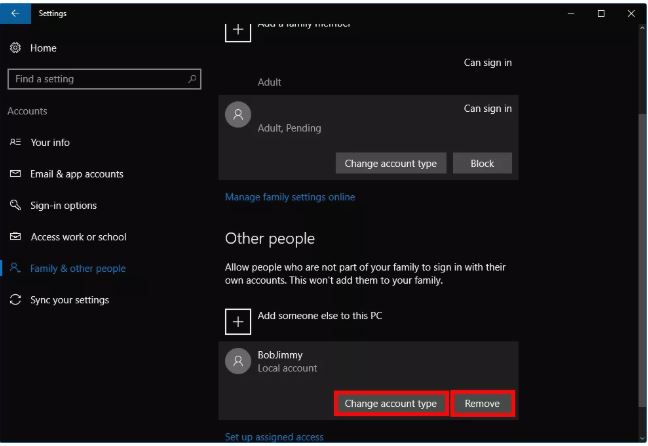
Under the Other human beings segment, the two buttons are a bit distinct. Instead of pronouncing Block the second one buttons says Remove.
When you pick to Remove, a pop-up window will appear warning you that deleting the account will dispose of this person’s non-public files which include files and photographs.
If you need to preserve this facts, it might be an excellent concept to lower back it up first to an external pressure before deleting the account.
Once you’re equipped to delete the account click Delete account and facts. That’s it. The account is now deleted.
18 The Control Panel Method

The second manner to delete an account from a Windows 10 PC is via the Control Panel.
Get commenced by typing “consumer accounts” into the Cortana search container inside the taskbar, and choose the user debts manipulate panel alternative as we saw earlier.
Once the Control Panel opens to the User Accounts section click Manage every other account, and then inside the next display select the consumer you want to do away with.
Now we’re at the display screen wherein you may manipulate the account in question. To the left of user account photo, you will see several options. The one we need to pick out is, you guessed it, Delete the account.
19 Warning Screen
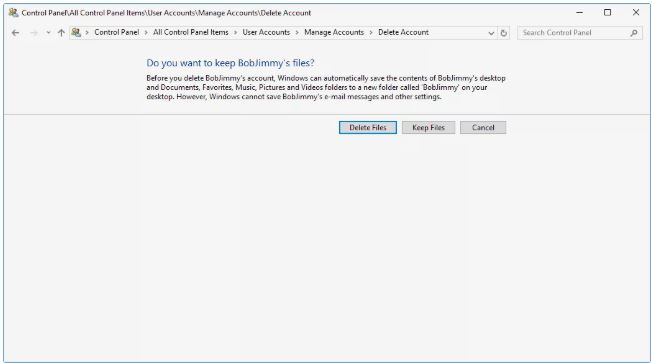
Similar to the Settings app method you may get a caution display screen. This time round, however, you have the option to clearly delete the user account whilst keeping the user’s documents intact. If it is some thing you want to do then click Keep Files. Otherwise, choose Delete Files.
Even if you do decide to keep the documents it is useful to returned the ones files up to an external difficult power earlier than deleting the account simply in case some thing goes incorrect.
20 Delete the Account
Whether you pick out to delete or keep the documents you will now land on a very last screen asking in case you’re positive you need to delete this account.
If you are positive then click Delete Account if not click on Cancel.
After you click on Delete Account you will be again to the consumer display screen in the Control Panel and you may see that your nearby account is no longer there.
21 Just the Basics
Those are the fundamental methods to set-up and delete debts in Windows 10.
Also, test out our educational on how to create a neighborhood account in Windows 10 that isn’t tied to an internet identity.