
Dynamic Web Pages,Open the database
Dynamic Web Pages,In our closing tutorial, we walked thru the process of making a static web web page from facts saved in an Access database. That easy approach of publishing internet pages become ok for environments where we want a “photograph” of a database which includes a month-to-month file or in which the statistics hardly ever changes.
However, in many database environments, the information changes frequently and we want to offer internet customers updated statistics at the click of a mouse.
We can meet these requirements via making use of Microsoft’s Active Server Pages (ASP) technology to create a dynamic server-generated HTML page that hyperlinks to our database.
When a person requests records from an ASP page, the web server reads the commands contained in the ASP, accesses the underlying database hence, and then creates an HTML page that consists of the requested facts and returns that to the consumer.
One of the limitations of dynamic web pages is that they can not be used to distribute reports like we did in our static net web page educational. They can most effective be used to display tables, queries, and forms. In this situation, allow’s create an up to the moment product catalog for our net customers. For the purposes of our example,
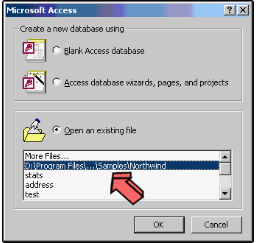
we will over again be using the Northwind pattern database and Microsoft Access 2000. If you haven’t used this sample database inside the past, there are easy installation instructions positioned on this site. Select it from the menu proven under and click OK to continue.
Dynamic Web Pages,Open the item you wish to publish
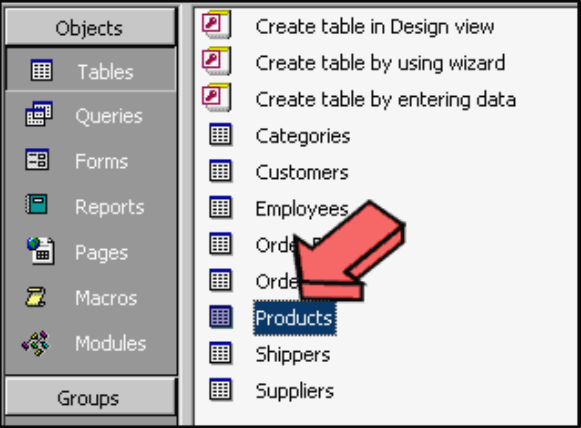
When you spot the database predominant menu, select the Tables submenu. Double-click on the Products entry in the table (as proven inside the determine underneath).
Dynamic Web Pages,Begin the export process
Pull down the File menu and choose the Export option.
Dynamic Web Pages,Create a Filename
At this point, you need to provide a name to your record. We’ll name ours Products. Also, you must use the record browser to find the course to publishing your record.
This will depend on your net server. The default course for IIS is Inetpubwwwroot. Once you have finished this step click the Save All button. The Microsoft ASP Output Options conversation box allows you to specify the information of your ASPs.
First, you may pick a template to offer formatting. Some pattern templates are stored within the listing Program FilesMicrosoft OfficeTemplates1033. We’ll use the “Simple Layout.Htm” in this example. The subsequent entry is the Data Source Name. It’s important to consider the value you input right here — it defines the connection used by the server to get admission to the database.
You can use any name right here; we’ll installation the connection in a few minutes. Let’s name our Data Source “Northwind.” The final segment of our conversation box permits us to specify the URL and timeout values for the ASP.
The URL is the method by means of which our ASP may be accessed over the Internet. You must enter a value here that corresponds to the file call and direction you chose in step 5. If you placed the document inside the wwwroot directory,
the URL fee is “http://yourhost.Com/Products.Asp”, wherein yourhost is the call of your system (i.E. Databases.Lifewire.Com or www.Foo.Com). The timeout value permits you to specify how long a connection could be left open for an idle person. Five mins is a great starting point.
Dynamic Web Pages,Save the file
Click the OK button and your ASP record can be stored to the course you particular. If you try to get admission to the page now, you will receive an ODBC errors message.
This is due to the fact we have yet to outline the information source and the web server cannot discover the database. Read on and we’ll get the web page up and going for walks!
Dynamic Web Pages,Open the ODBC Data Source Control Panel
The method to try this differs slightly based totally upon your operating gadget. For all working structures,
click on Start, Settings and then Control Panel. If you are the usage of Windows 95 or 98, double-click the ODBC (32-bit) icon.
In Windows NT, pick out the ODBC icon. If you are using Windows 2000, double-click on Administrative Tools and then double-click on the Data Sources (ODBC) icon.
Add a new Data Source
First, click on the System DSN tab at the top of the control panel dialog box. Next, click on the “Add” button to begin the process of configuring a new Data Source.
Choose the Driver
Select the Microsoft Access driver appropriate for your language and then click the Finish button to continue.
Configure the Data Source
In the resulting dialog box, enter the Data Source Name. It is imperative that you input it exactly as you probably did in Step 6 or the hyperlink may not feature properly. You may input an outline of the Data Source right here for destiny reference.
Select the Database
Click at the “Select” button after which use the report navigation window to browse to the database report you desire to get entry to.
If you put it up with the default installation, the path have to be Program FilesMicrosoft OfficeSamplesNorthwind.Mdb.
Click the OK button within the navigation window after which click on the OK button within the ODBC setup window. Finally, click on the OK button inside the Data Source Administration window. Use your browser to affirm that your Active Server Page works well. You need to see something just like the output beneath.