Emulation Currently Requires, Some customers are encountering the “x86 emulation presently requires hardware acceleration!” errors when looking to release the AVD in Android Studio.
Typically, the difficulty happens in some moments after the person attempts to bring together an application using Android Virtual Device. The problem isn’t unique to a sure Android Studio build as it’s suggested to occur with newer and older builds.
The error isn’t always exceptional to a sure Windows model as there are reviews of it occurring on Windows 7, Windows eight and Windows 10.
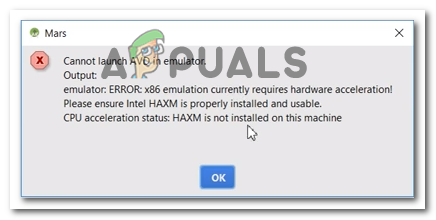
What is causing the “x86 emulation currently requires hardware acceleration!”?
We investigated this particular issue by means of searching at various person reviews and the repair techniques that some affected customers carried out to get the difficulty resolved.
Based on what we amassed, there are a few not unusual situations on the way to trigger this particular error message:
- Intel/AMD Virtualization era isn’t always enabled from BIOS – This blunders might get thrown because your CPU is averted from using the integrated hardware virtualization technologies by way of a BIOS putting. In this situation, the answer is to access your BIOS settings and enable the hardware virtualization era.
- The Intel HAXM module isn’t always established in Android Studio – This is one of the most commonplace reasons why this mistake happens. The set up of Intel HAXM is performed in steps ( downloading the module through the SDK supervisor and walking the set up executable).
x86 emulation
- A warfare between Avast’s virtualization and Android Studio’s AVD – The difficulty also can arise because of a well-known conflict among the built-in virtualization generation and Avast’s hardware-assisted virtualization. This 3rd celebration characteristic is likewise acknowledged to struggle with some of other applications.
- Windows Hypervisor Platform is disabled for AMD CPU – Newer AMD CPUs all have hardware virtualization competencies. But in order for the virtualization function to work, you’ll need to make sure that the Windows Hypervisor Platform is enabled from the Windows Features screen.
- Machine’s CPU does no longer guide hardware virtualization – This situation is probably relevant to older CPU fashions. If hardware virtualization isn’t always supported by the ready CPU, you’ll not be able to remedy this mistake message except you update your contemporary CPU with a newer model.
If you’re currently struggling to solve the “x86 emulation presently calls for hardware acceleration!” mistakes, this text will offer you with an expansion of established troubleshooting steps. Down below, you’ll find out several methods that other users struggling to remedy the identical difficulty have used to repair or evade the difficulty.
To keep most efficiency, we encourage you to observe the methods below within the order that they’re presented. You must sooner or later come upon a fix this is powerful for your precise situation.
Method 1: Installing the Intel HAXM module
Before having access to the BIOS settings, permit’s verify if the issue isn’t always definitely prompted by way of the missing of the Intel x86 Emulator Accelerator (HAXM installer). Without this module, AVD will not be capable of bring together programs that use hardware virtualization even if the generation is enabled for your pc.
Several users encountering the identical blunders have reported that the difficulty went away for proper once they downloaded the lacking module through SDK Manager and mounted it thru the HAXM installer. Follow the stairs underneath for entire grade by grade commands:
01. In Android Studio, open SDK Manager by using going to Tools > Android > SDK Manager.
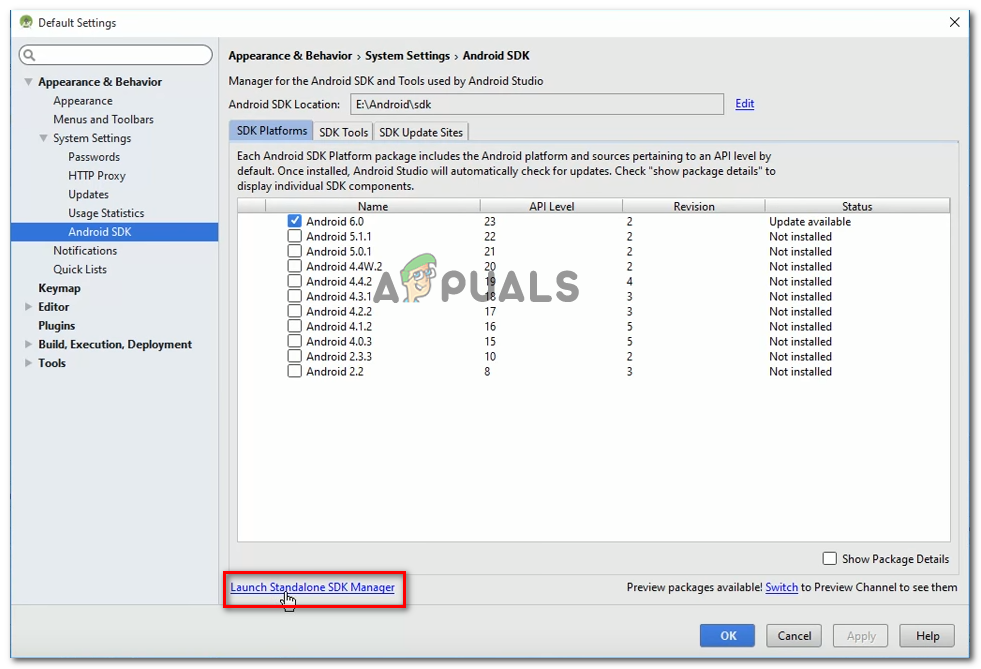
Note: You also can go to File > Settings and click on on Android SDK (under System Settings). Then, in reality click on Launch Standalone SDK Manager to open the built-in set up software.
02. Expand the Extras menu and check the box associated with Intel X86 Emulator Accelerator (HAXM). Then, truly click on Install Packages and look ahead to the manner to complete.
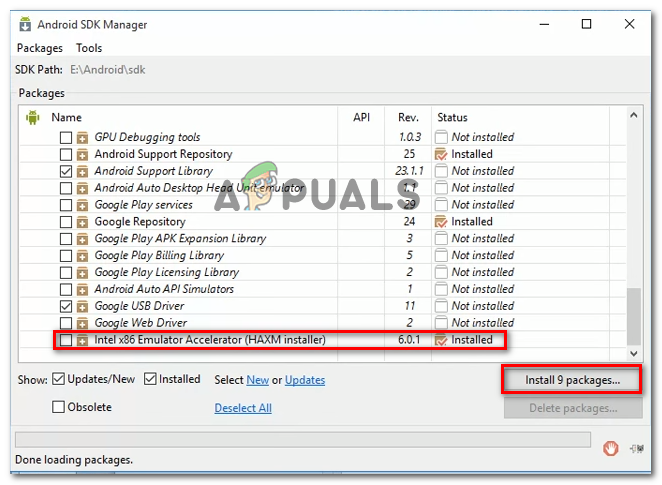
03. Now that the HAXM installer is downloaded, we want to take the stairs appropriated to put in it. To do that, navigate to the following region and double-click on intelhaxm-android.Exe to put in it:
C:\users\%USERNAME%\AppData\Local\Android\sdk\extras\intel\Hardware_Accelerated_Execution_Manager\
04. Follow the on-display activates to install the Intel HAXM and wait for the manner to complete.
05. Restart Android Studio, run the utility once more and see if the issue has been resolved.
If you’re nonetheless encountering the “x86 emulation currently requires hardware acceleration!” error, circulate down to the next underneath.
Method 2: Disabling Hardware-assisted virtualization from Avast
If you’re using Avast as a further safety layer, the error is most probable because of a conflict due to one of its protection capabilities. As plenty of users have reported, the hardware-assisted virtualization of Avast is thought to battle with Android Studio’s AVD, which finally ends up producing the “x86 emulation presently calls for hardware acceleration!” error.
If this state of affairs is relevant to you (you have Avast mounted) comply with the commands under to disable hardware-assisted virtualization from the Settings menu of the security suite:
01. Open Avast and get admission to the Settings menu,
02. Inside the Settings menu, go to the Troubleshooting tab and ensure that the boxes associated with Enable hardware-assisted virtualization and Use nested virtualization wherein available are Unchecked.
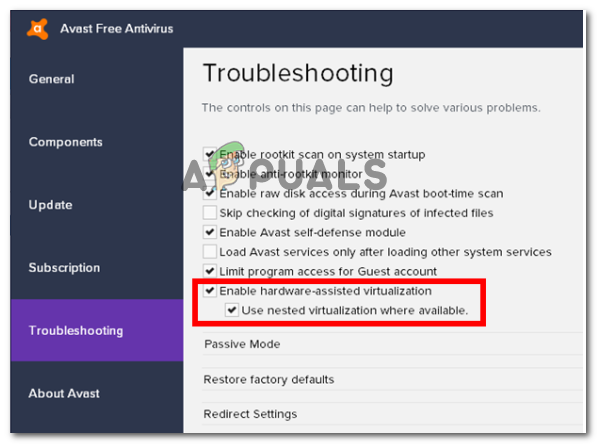
03. Restart your pc and see if the conflict has been removed at the following startup. Run the application interior Android studio and see if the mistake has been resolved.
If you’re still seeing the “x86 emulation presently calls for hardware acceleration!” error while walking the AVD, move down to the subsequent method beneath.
Method 3: Enabling Hardware Virtualization from BIOS/UEFI settings
If the first method didn’t enable you to solve the mistake message, it’s probably that the mistake message is happening due to the fact hardware virtualization is disabled out of your BIOS/UEFI settings. Hardware virtualization ought to be enabled with the aid of default in ordinary occasions, but manual intervention, BIOS Updates, and even some 3rd celebration software might disable this generation.
Keep in thoughts that the technique of permitting hardware virtualization might be one-of-a-kind depending on your BIOS/UEFI settings and your motherboard and CPU producer.
However, step one would be to go into your BIOS or UEFI Settings. If you have got the legacy placing menu (BIOS). You’ll want to press the Setup key at some point of the initial booting sequence. The unique setup key should seem on the preliminary display, but in case you don’t spot it. You may look for it on-line by means of the usage of the search word “motherboard model + setup key“.
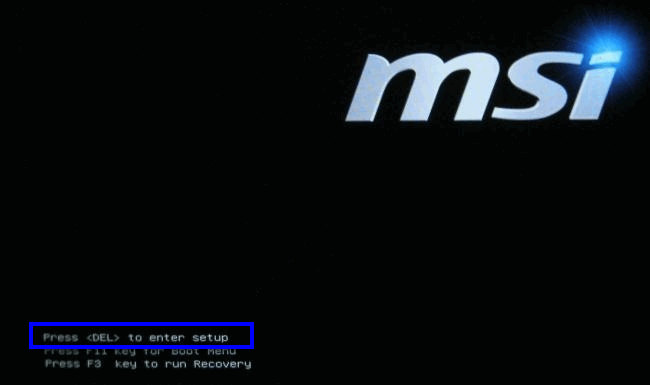
Note: You also can pass about it blindly and press the most commonplace Setup keys for the duration of the initial booting series. Typically, the setup secret is one of the F keys (F2, F4, F6, F8, F10). Or the Del key (on Dell computers).
Emulation Currently Requires, BIOS/UEFI settings
If your computer makes use of the more moderen UEFI model. You’ll first want to get right of entry to the Advanced Startup menu. To do this, press Windows key + R to open up a Run conversation box. Then kind “ms-settings:recuperation” and press Enter to open the Recovery menu of the Settings app. Once you get there, honestly click on on the Restart now button under Advanced startup.
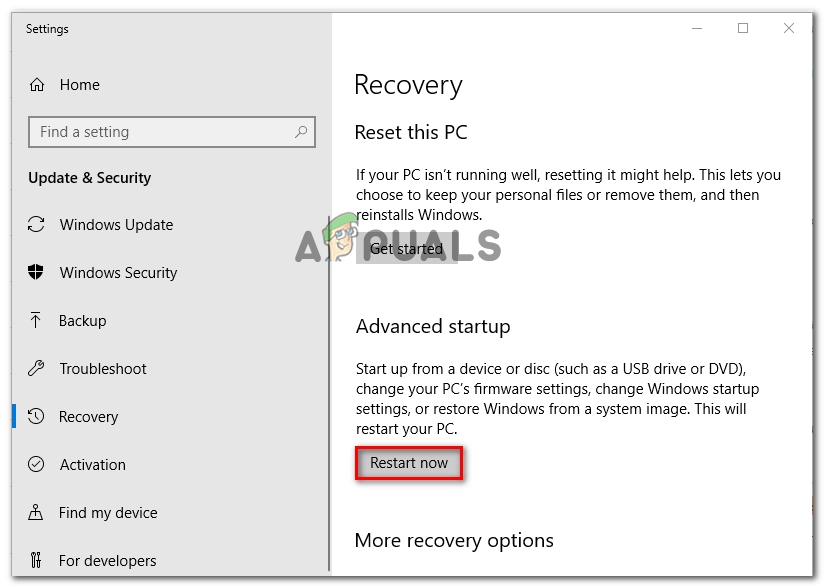
After a while, your pc will restart without delay into the Advanced alternatives menu.
Once you get there, navigate to Advanced Options menu and click on on UEFI Firmware Settings.
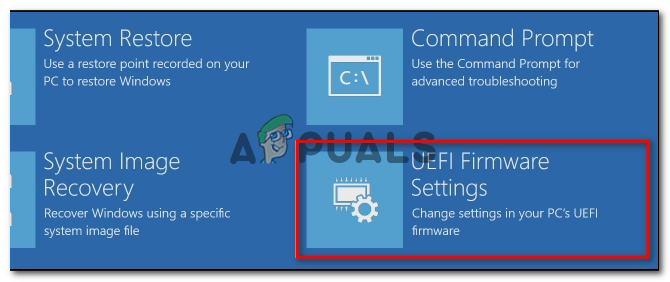
Once you’ve won entry on your BIOS or UEFI settings, start seeking out the hardware virtualization alternative. Depending in your BIOS/UEFI model, you’ll locate this setting listed below distinctive names. You can generally discover it listed as both Virtualization era (VTx/VTd), Intel Virtualization Technology or AMD-V Virtualization. Chances are the option can be located underneath Chipset, Processor, Advanced CPU Configuration or some thing comparable.
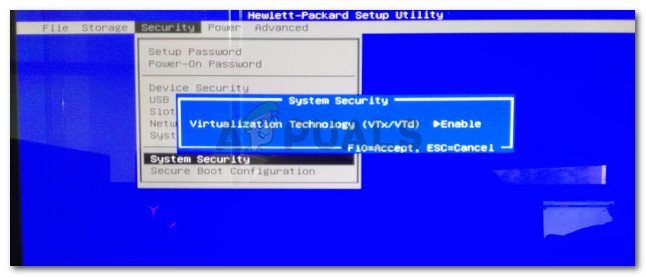
Once you manipulate to permit hardware virtualization, store the BIOS/UEFI modifications. Restart your pc and spot if the error is resolved at the following startup.
Method 4: Emulation Currently Requires, Enabling Windows Hypervisor Platform (if applicable)
If you’re encountering the issue on an AMD CPU with virtualization technology (more recent CPU fashions consisting of Ryzen). The difficulty might be occured due to the fact Windows Hypervisor Platform isn’t always enabled on your device.
Emulation Currently Requires, But understand that with a view to allow this option, you’ll want to make sure that you have Windows 10 construct 1803 or older.
The Windows Hypervisor Platform may be enabled through the Turn Windows Feature On or Off display screen. Here’s a short manual on the way to do that:
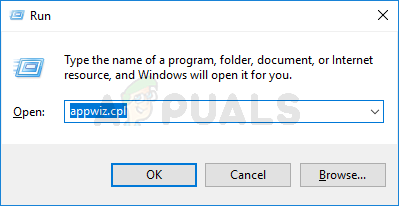
01. Press Windows key + R to open up a Run dialog container. Then, kind “appwiz.Cpl” and press Enter to open the Programs & capabilities display screen.