
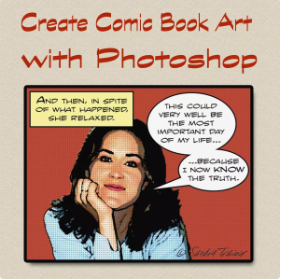
Create Comic Book In this educational, Photoshop is used to transform a picture into comedian e book artwork in the fashion of Roy Lichtenstein. I will work with Levels and Filters, pick a color from the Color Picker and have it fill a particular vicinity, plus work with the Quick Selection device, Rectangle device, Ellipse tool, Clone Stamp tool and Brush tool. I’ll additionally create a custom pattern that mimics Benday dots, which are the small dots from time to time seen in older comic books due to the printing technique used. And, I’ll create a narrative box and speech bubble, which might be the photos that keep talk.
Create Comic Book Turn a Photo into Comic Book Art in the Style of Roy Lichtenstein
Create Comic Book Although I’m using Photoshop CS6 for the screenshots in this educational, you should be able to comply with along with any pretty latest model. To follow along, right click on at the picture above to store a exercise record to your pc, then open the document in Photoshop. Choose File > Save As, and within the conversation container kind in a new call, select the folder you want to preserve the file in, choose Photoshop for the layout, and click on Save.
Create Comic Book Adjust Levels
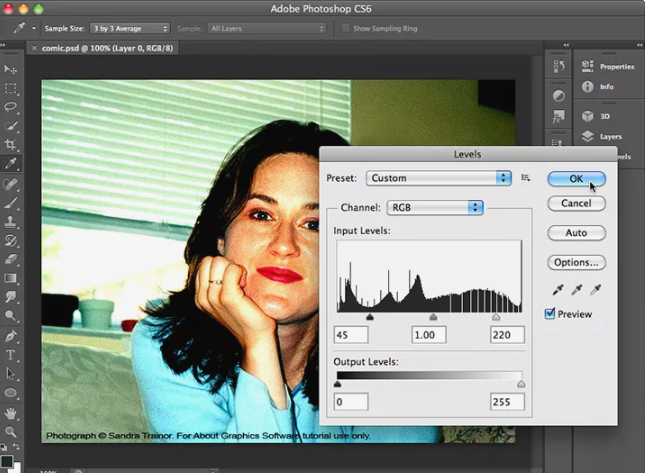
Create Comic Book For this academic, I’m using a picture that has a pleasant assessment of darks and lighting fixtures. To growth the assessment even more, I will choose Image > Adjustments > Levels, and type in forty five, 1.00, and 220 for the Input Levels. Click on the Preview box to give it a test mark and to signify that I want to see how my photograph will appearance earlier than I commit to it. Since I like the way it appears I’ll click on OK.
Add Filters
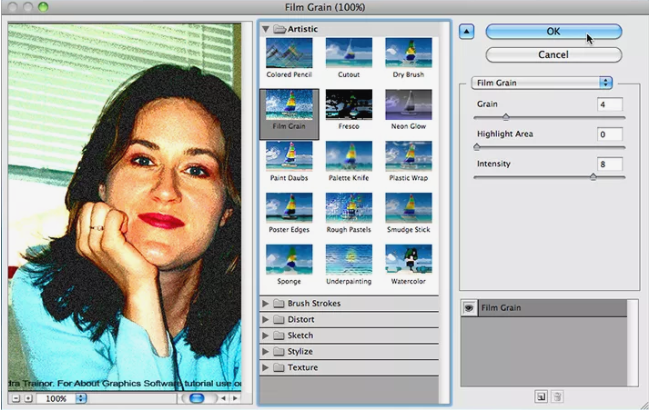
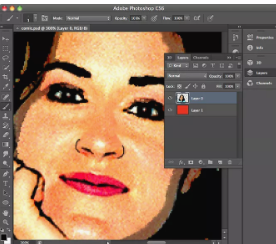
Create Comic Book I will visit Filter > Filter Gallery, and click on the Artistic folder, then click on Film Grain. I need to exchange the values by means of transferring the sliders. I’ll make the Grain 4, the Highlight Area 0, and the Intensity 8, then click OK. This could have the photo seem like it turned into printed on the kind of paper you discover in comedian books.
To add any other filter out, I will once more pick Filter > Filter Gallery and within the Artistic folder I will click on Poster Edges. I’ll flow the sliders to set the Edge Thickness to 10, the Edge Intensity to three, and the Posterization to 0, then click OK. This will make the picture look extra like a drawing.
Create Comic Book Make a Selection
I will select the Quick Selection tool from the Tools panel, then click and drag to “paint” the location surrounding the situation or person in the image.
To boom or lower the dimensions of the Quick Selection device, I can press the proper or left brackets on my keyboard. The proper bracket will boom its size and the left will decrease it. If I make a mistake, I can keep down the Option key (Mac) or the Alt key (Windows) as I move over a place that I want to deselect or subtract from my selection.
Delete Area and Move Subject
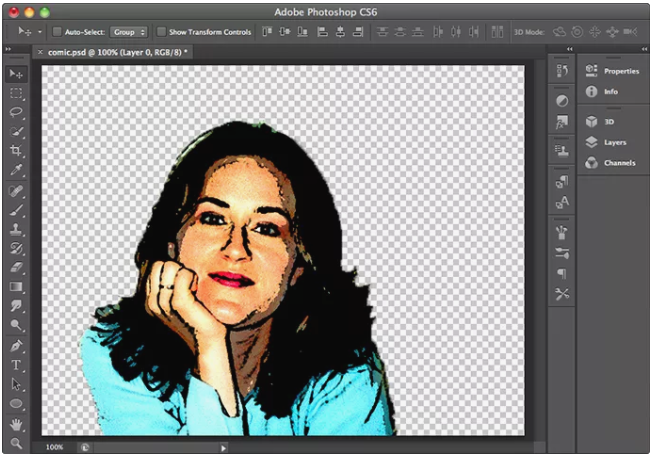
With the location surrounding the concern nonetheless selected, I’ll press Delete on my keyboard. To deselect, I will click off the canvas vicinity.
I will pick the Move device from the Tools panel and use it to click and drag the subject barely down and to the left. This will conceal the final copyright textual content and make greater room for the speech bubble that I plan to feature later on.
Choose a Color
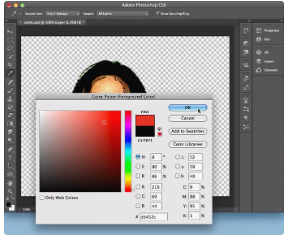
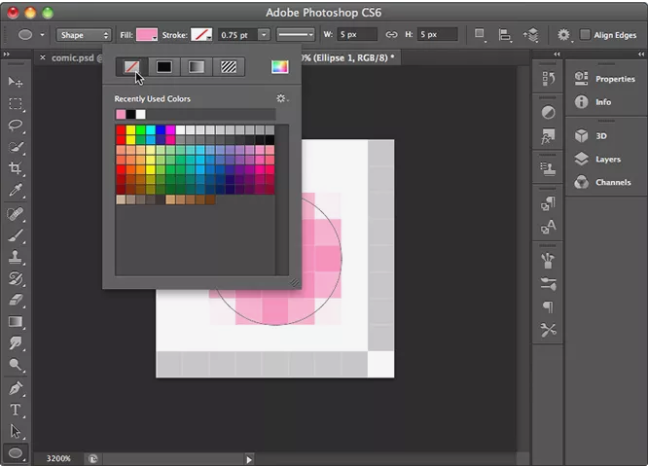
I need to select a foreground shade using the Color Picker. To achieve this, I will click on the foreground Fill field within the Tools panel, then within the Color Picker I’ll move the arrows at the Color Slider to a pink location, then click on a brilliant pink area in the Color Field and click OK.
Apply a Fill Color
I will choose Window > Layers, and in the Layers panel I’ll click on on the Create a New Layer button. I’ll then click on on the brand new layer and drag it beneath the other layer. With the brand new layer selected, I’ll select the Rectangle Marquee device from the Tools panel, then click on and drag over the whole canvas to make a spread.
I will pick Edit > Fill, and in the Fill dialog container I’ll select Foreground Color. I’ll make sure that the Mode is Normal and the Opacity a hundred%, then click on OK. This will make the chosen place pink.
Set Clone Stamp Options
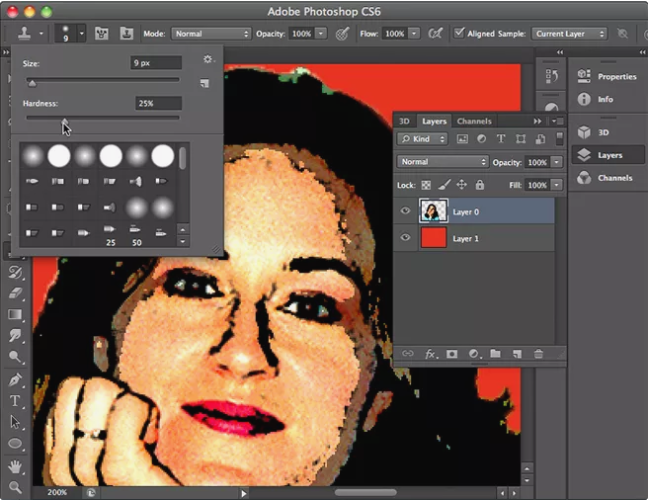
I need to clean up the photo by eliminating a number of the black specks and heavy strains. In the Layers panel, I will pick out the layer that holds the item, then pick out View > Zoom in. In the Tools panel, I’ll choose the Clone Stamp device, then click on on the Preset picker within the Options bar. I’ll alternate the Size to nine and the Hardness to twenty-five%.
While working, I may also every so often find it vital to exchange the scale of the tool. I can both go back to the Preset picker for this, or press the proper or left brackets
Clean Up the Image
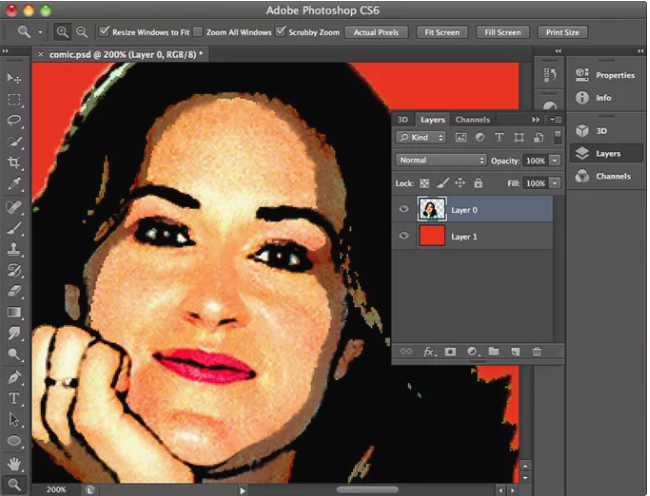
I will hold down the Options key (Mac) or the Alt key (Windows) as I click on an area that holds the color or pixels that I need to have in vicinity of the undesirable speck. I’ll then launch the Options key or Alt key and click on at the speck. I also can click and drag over the larger areas that I want replaced, inclusive of the heavy traces at the subject’s nostril. I’ll maintain to replace the specks and contours that do not seem to belong, as I take into account that my intention is to make the picture look like comedian ebook art.
Add Missing Outlines
I want to use the Brush tool to feature a lacking outline alongside situation’s shoulder and upper arm. You may not be lacking this define on your photo, considering your choice when deleting the vicinity surrounding the challenge may additionally had been different than mine. Just appearance to see what outlines are lacking, if any, and add them.
To add an define, I will click on at the D key to repair the default hues and pick out the Brush tool from the Tools panel. In the Preset picker I’ll set the Brush length to 3 and the Hardness to a hundred%. I’ll then click and drag wherein I want to create an outline. If I do not like how my define seems, I can simply choose Edit > Undo Brush Tool, and strive once more.
Add Thin Lines
In the Tools panel I will pick out the Zoom tool and click on or near the situation’s nostril for a better view of the place. I’ll then select the brush device, set the brush length to at least one, and click on and drag to make a brief, curved line on the bottom left aspect of the nostril, then another on the opposite facet. This will assist to indicate the nose, which is all that’s wanted here.
To zoom out, I can both click at the photograph with the Zoom tool even as urgent the Options key (Mac) or Alt key (Windows), or pick out View > Fit on Screen.
Create a New Document
Some older comedian books have substantial Benday Dots, which might be small dots made from two or more colorings that can be used within the printing system to create a third coloration. In order to imitate this appearance, I can both upload a halftone filter, or create and observe a custom pattern.
I will use a custom sample. But, if you’re familiar with Photoshop and interested by creating a halftone filter out, create a new layer in the Layers panel, pick the Gradient device from the Tools panel, pick a Black, White preset in the Options bar, click on the Linear Gradient button, and click on and drag across the entire canvas to create a gradient. Then, choose Filter > Pixelate > Color Halftone, make the Radius 4, type in 50 for Channel 1, make the remaining channels 0, and click on OK. In the Layers panel, trade the Blending Mode from Normal to Overlay. Again, I won’t be doing any of this, because I will instead be the usage of a custom sample.
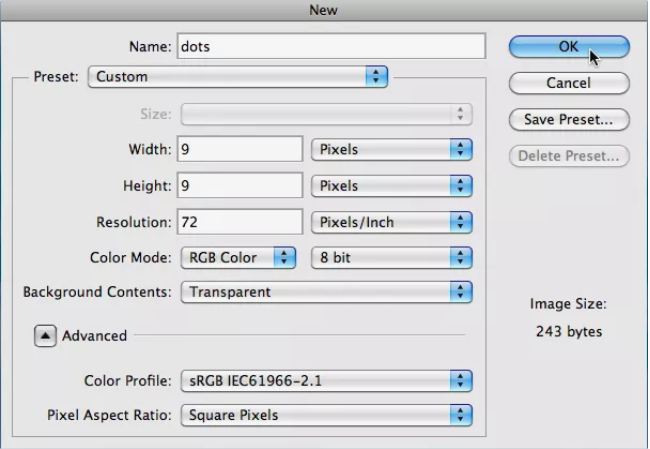
In order to make a custom sample, I first want to create a brand new record. I will pick out File > New, and within the dialog field I’ll type inside the call “dots” and make the Width and Height 9×9 pixels, the Resolution 72 pixels according to inch, and the Color Mode RGB Color and 8 bit. I’ll then select Transparent and click on OK. A very small canvas will seem. To view it large, I will choose View > Fit on Screen.
Create and Define Custom Pattern
Some older comedian books have substantial Benday Dots, which might be small dots made from two or more colorings that can be used within the printing system to create a third coloration. In order to imitate this appearance, I can both upload a halftone filter, or create and observe a custom pattern.
I will use a custom sample. But, if you’re familiar with Photoshop and interested by creating a halftone filter out, create a new layer in the Layers panel, pick the Gradient device from the Tools panel, pick a Black, White preset in the Options bar, click on the Linear Gradient button, and click on and drag across the entire canvas to create a gradient. Then, choose Filter > Pixelate > Color Halftone, make the Radius 4, type in 50 for Channel 1, make the remaining channels 0, and click on OK. In the Layers panel, trade the Blending Mode from Normal to Overlay. Again, I won’t be doing any of this, because I will instead be the usage of a custom sample.
In order to make a custom sample, I first want to create a brand new record. I will pick out File > New, and within the dialog field I’ll type inside the call “dots” and make the Width and Height 9×9 pixels, the Resolution 72 pixels according to inch, and the Color Mode RGB Color and 8 bit. I’ll then select Transparent and click on OK. A very small canvas will seem. To view it large, I will choose View > Fit on Screen.
Create a New Layer
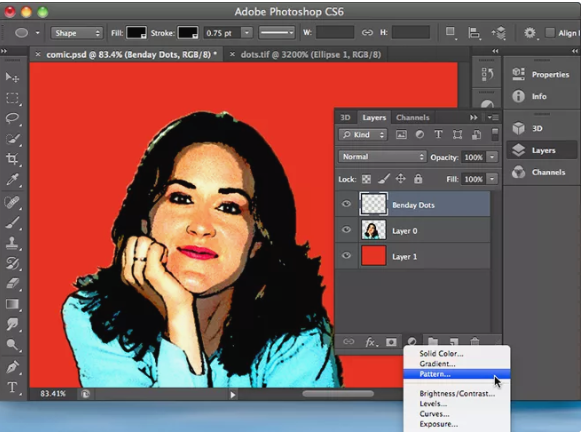
In the Layers panel I will click on at the Create a New Layer icon, then double click on at the call of the brand new later and rename it, “Benday Dots.”
Next, I will click on at the Create New Fill or Adjustment Layer button at the lowest of the Layers panel and choose Pattern.
Choose and Scale Pattern
Comics inform a tale the usage of a series of panels (pics and text within borders). I may not create panels or inform a full tale, however I will upload a narrative field and speech bubble.
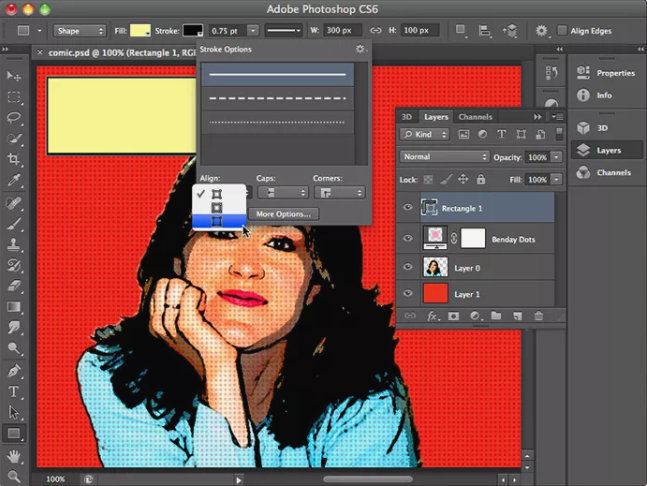
To make a story box, I will choose the Rectangle tool from the Tools panel and click and drag to create a rectangle within the higher left facet of my canvas. In the Options bar I’ll exchange the width to three hundred pixels, and the peak to one hundred pixels. Also within the Options bar, I’ll click on on the Shape Fill box and on a Pastel Yellow swatch, then click on on the Shape Stroke container and on a black swatch. I’ll set the Shape Stroke width to 0.Seventy five points, then click on at the Stroke Type to choose a solid line and make the stroke align outside the rectangle.
Create a Speech Bubble
I will use the Ellipse device and Pen device to make a speech bubble. With the Ellipse tool, I’ll click and drag to make an ellipse on the right facet of the canvas. In the Options bar I’ll exchange the width to 255 pixels and a height to a hundred and eighty pixels. I’ll additionally make the Fill white, the Stroke black, set the stroke width to 0.75, make the stroke kind solid, and align the stroke out of doors the ellipse. I’ll then make a second ellipse with the identical Fill and Stroke, handiest I want to make it smaller, with a width of 200 pixels and a peak of one hundred twenty pixels.
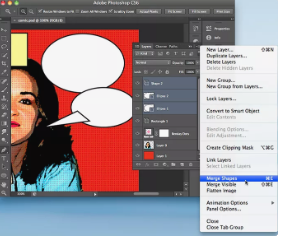
Next, I’ll pick the Pen tool from the Tools panel and use it to make a triangle that overlaps the bottom ellipse and points toward the concern’s mouth. If you are unusual with the Pen device, simply click to make points wherein you would love the corners of your triangle to be, in an effort to create lines. Make your remaining point in which your first point become made, with a view to connect the traces and form a form. The triangle need to have the same Fill and Stroke that I gave to each ellipse.
I will preserve down the Shift key as I click on in the Layers panel on the layers for the 2 ovals and triangle. I’ll then click on the small arrow within the higher proper corner to expose the Layers panel menu and select Merge Shapes.
If you’ll instead no longer draw your own speech bubble, you could down load a unfastened custom form set of cartoon and comic ebook fashion speech bubbles from this web page: • Add Speech Balloons and Text Bubbles to Your Photos
Add Text
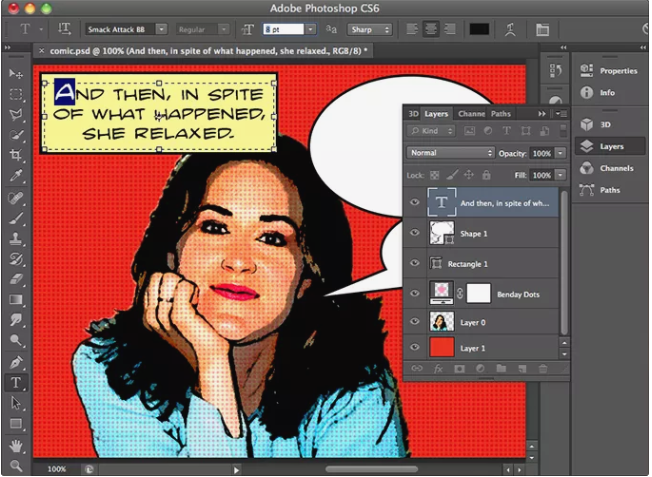
I’m now equipped to place text inside my narrative box and speech bubble. Blambot has a wide range of comedian fonts that you can set up into your computer to be used, a lot of that are unfastened. And, they provide smooth to comply with instructions on the way to set up their fonts. For this academic, I will use Smack Attack from Blambot’s Dialogue Fonts.
I will select the Type device from the Tools panel, and in the Options bar I will pick the Smack Attack font, type in a font length of 5 factors, pick to have my textual content centered, and appearance to the Text Color box to make sure that it is black. If it is no longer black, I can click on on it to open the Color Picker, click on a black vicinity in the Color Field, then click OK. Now, I can click on and drag inside the borders of my narrative container to create a text box where I will kind in a sentence. If your textual content is not seen, check the Layers panel to make sure that the layer in your textual content is above the rest.
In comic books, certain letters or phrases are made large or bold. To make the primary letter inside the sentence large, I will ensure that the Type device is chosen in the Tools panel then click on and drag over the letter to spotlight it. I’ll trade the font size in the Options bar to eight factors, then press escape on my keyboard to deselect the text field.
Make Adjustments
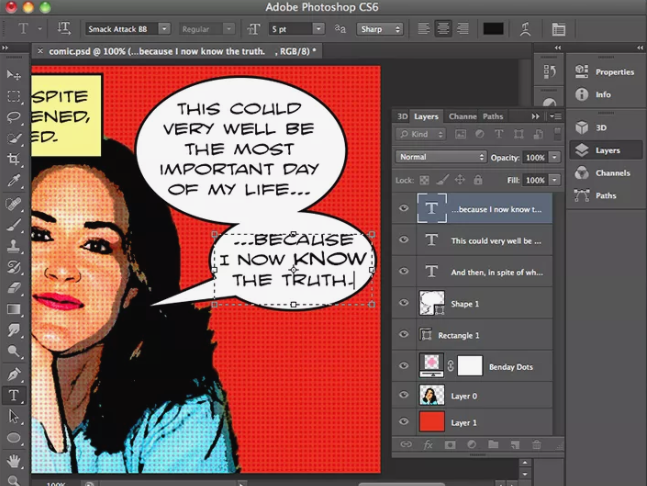
I will upload text to the speech bubble within the equal way that I added text to the narrative box.
If your text doesn’t fit within the narrative field or speech bubble you may both adjust the dimensions of the font or adjust the dimensions of the narrative field or speech bubble. Just pick out the layer you need to paintings on within the Layers panel and make your adjustments in the Options bar. Be certain, however, to select the Type tool in the Tools panel whilst making changes in your highlighted textual content, and choose one of the shape tools whilst making modifications to the narrative container or speech bubble. When I’m pleased with how the entirety appears, will pick out File > Save, and don’t forget it completed. And, I can follow the strategies defined in this tutorial to any future task, be it a customized greeting card, invitations, framed art, or maybe a full comedian e book.