
iPod to Your Mac,It’s true, you can replica your track out of your iPod for your Mac, essentially turning your iPod into an emergency backup of any of the media documents you have stored on your iPod.
There are few matters that Mac users dread greater than the sudden lack of statistics, whether or not it’s from a failed hard power or the unintended deletion of files. No remember the way you lose your files, you’ll be glad you’ve been appearing everyday backups.
iPod to Your Mac,What? You don’t have any backups, and you just by chance deleted some of your favored tunes and films from your Mac? Well, all might not be misplaced, at least not if you’ve been maintaining your iPod synced along with your computing device iTunes library.
If so, your iPod can serve as your backup. By following these commands, you ought to be able to reproduction your music, films, and motion pictures from your iPod on your Mac, and then add them back to your iTunes library.
A short observe earlier than we begin: If you are using iTunes 7 or later, discuss with Restore Your iTunes Music Library through Copying the Music From Your iPod.
If you are the use of an older model of iTunes, read on for the manual technique of transferring content material from your iPod returned for your Mac.
What You Need
- An iPod with your content intact.
- A Mac in fully operational condition.
- An iPod syncing cable.
Prevent iTunes From Syncing

iPod to Your Mac,Before you join your iPod for your Mac, you should save you iTunes from syncing along with your iPod. If it does, it’d delete all of the data for your iPod.
Why? Because at this point, your iTunes library is missing a few or all the songs or different files for your iPod. If you sync your iPod with iTunes, you may end up with an iPod this is lacking the equal files that your iTunes library is lacking.
Warning: The following instrcutions for disabling iTunes syncing is for versions of iTune earlier than iTunes 7. Do now not use the method define beneath unless you’re using an older version of iTunes.
You can discover greater approximately the various variations of iTunes and the way syncing is disabled at: Recover Your iTunes Music Library From Your iPod.
Disable Syncing
- Press and preserve the Command + Option keys whilst you plug in your iPod. Don’t launch the Command + Option keys till you spot your iPod display in iTunes. 2. Confirm that your iPod is established in iTunes and on your Mac’s laptop.
iPod Not Showing Up?
1.Click on a blank location of your computing device, and pick Preferences from the Finder menu. 2. Select the General tab. 3. Make sure there’s a checkmark inside the box categorised CDs, DVDs, and iPods. 4.Select the Sidebar tab. 5.Locate the Devices segment of the list, and ensure there’s a checkmark in the container categorized CDs, DVDs, and iPods.
iPod Still Not on the Desktop?
- Launch Terminal, located at /Applications/Utilities.
- At the Terminal set off, input the subsequent: diskutil list
- after which press go back or enter.
- Look for the call of your iPod beneath the NAME column.
- Once you find your iPod name, test to the proper and find the disk range, placed underneath the IDENTIFIER column. Make a be aware of the disk name; it have to be some thing like disk with a number after it, such as disk3.
- In the Terminal window, input the following on the Terminal prompt:
- diskutil mount disk# where disk# is the disk name determined in the Identifier column, as referred to above. An example might be:
diskutil mount disk3
8. Press enter or return. Your iPod should now be installed to your Mac’s laptop.
02.View Your iPods Hidden Folders
Once you mount your iPod on your Mac’s laptop, you would fairly anticipate which will use the Finder to browse via its files.
But in case you double-click the iPod icon on your desktop, you’ll see just three folders indexed: Calendars, Contacts, and Notes. Where are the song files?
Apple chose to hide the folders that incorporate an iPod’s media documents, however you could without problems make these hidden folders seen via the use of Terminal, the command line interface blanketed with OS X.
Terminal Is Your Friend
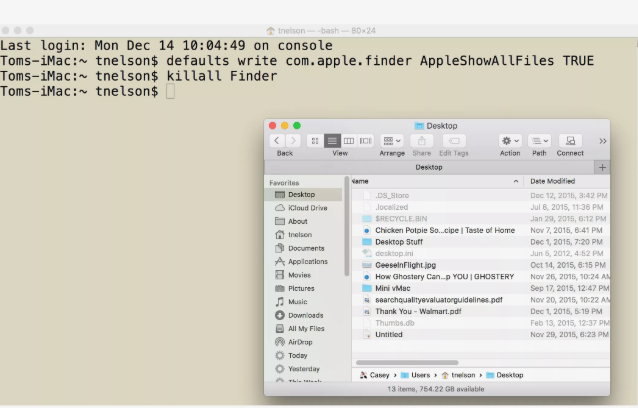
1.Launch Terminal, positioned at /Applications/Utilities/. 2.Type or replica/paste the subsequent commands. Press the go back key once you enter each line.
defaults write com.apple.finder AppleShowAllFiles TRUE killall Finder The two strains you enter into Terminal will allow the Finder to display all the hidden documents on your Mac. The first line tells the Finder to show all documents, irrespective of how the hidden flag is set.
The second line stops and restarts the Finder, so the modifications can take impact. You may see your laptop disappear and reappear whilst you execute these commands; this is normal.
3. Locate the Media Files on Your iPod
Now which you’ve informed the Finder to display all hidden files, you can use it to discover your media files and duplicate them for your Mac.
Where’s the Music?
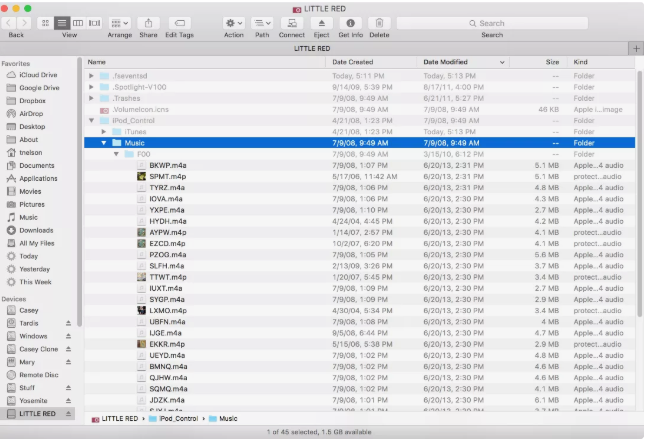
- Double-click the iPod icon on your desktop or click the iPod’s name in a Finder window’s sidebar.
- Open the iPod Control folder.
- Open the Music folder.
The Music folder consists of your tune in addition to any film or video files you copied in your iPod. You can be amazed to find out that the folders and files in the Music folder aren’t named in any without problems discernable manner.
The folders represent your diverse playlists; the files in each folder are the media files, music, audio books, podcasts, or movies related to that particular playlist.
Fortunately, even though the document names do not contain any recognizable data, the inner ID3 tags are all intact.
As a end result, any utility that could examine ID3 tags can kind the documents out for you. (Not to fear; iTunes can examine ID3 tags, so you want appearance no similarly than your personal computer.)
Copy the iPod’s Data to Your Mac
Now which you understand in which your iPod store’s media files, you may copy them lower back to your Mac.
The easiest way to do this is to apply the Finder to tug and drop the documents to the appropriate location. I advise copying them to a brand new folder in your computing device.
Use the Finder to Copy Files
- Right-click a blank area of your desktopand select ‘New Folder’ from the pop-up menu.
- Name the new folder iPod Recovered,or any other name that strikes your fancy.
- Drag the Music folder from your iPodto the newly created folder on your Mac.
The Finder will start the report copying technique. This might also take some time, depending on the quantity of statistics on the iPod.
Go have espresso (or lunch, if you have heaps of files). When you return, proceed to the subsequent step.
4. Add the Recovered Music Back to iTunes
At this factor, you have correctly recovered your iPod’s media documents and copied them to a folder to your Mac.
The next step is to apply the Add to Library command in iTunes to feature the documents to iTunes.
Configure iTunes Preferences
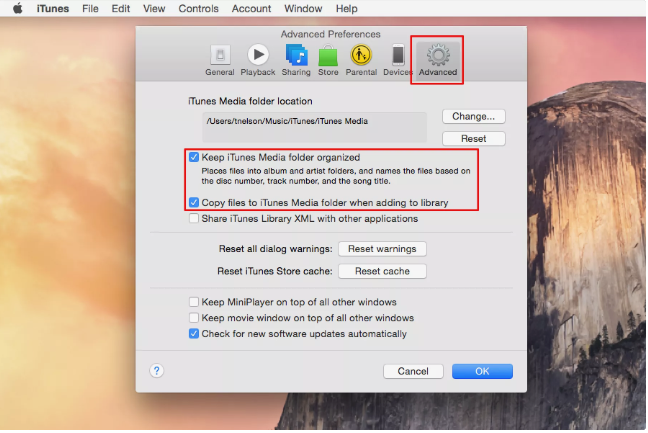
- Open iTunes Preferences by selecting ‘Preferences’ from the iTunes menu.
- Select the ‘Advanced’ tab.
- Place a check mark next to ‘Keep iTunes Music folder organized.’
- Place a check mark next to ‘Copy files to iTunes Music folder when adding to library.’
- Click the ‘OK’ button.
Add to Library
- Select ‘Add to Library’ from the iTunes File menu.
- Browse to the folder that contains your recovered iPod music.
- Click the ‘Open’ button.
ITunes will copy the documents to its library; it’ll also examine the ID3 tags to set each song’s name, artist, album genre, etc.
You might also run into one abnormal little quirk, relying on which iPod you’ve got and which model of iTunes you are using. Occasionally while the Add to Library command is used on recovered iPod files, iTunes might not be able to see the media files in the song folder that you copied out of your iPod, even though you may see them simply first-rate in the Finder.
To work round this hassle, truly create a new folder on your computer, then replica the character song files from the iPod Recovered folder to the new folder.
For example, inner your iPod Recovered folder (or anything you chose to call it) may be a sequence of folders known as F00, F01, F02, etc. Inside the F series of folders are your media documents, with names like BBOV.Aif, BXMX.M4a, etc.
Copy the BBOV.Aif, BXMX.M4a, and other media files to the new folder in your computing device, after which use the Add to Library command in iTunes to feature them in your iTunes library.
Send Those Formerly Hidden Files Back Into Hiding
During the recovery manner, you made all the hidden documents and folders for your Mac seen. Now each time you use the Finder, you notice all kinds of strange-searching entries.
You recovered the previously hidden documents which you wished, so you can ship them all back into hiding.
Abracadabra! They’re Gone
- Launch Terminal, located at /Applications/Utilities/.
- Type or copy/paste the following commands.Press the return key after you enter each line.
defaults write com.apple.finder AppleShowAllFiles FALSE killall Finder That’s all there may be to manually convalescing media files out of your iPod. Keep in mind that you’ll be wanting to authorize any song to procure from the iTunes Store earlier than you may play it.
This restoration system maintains Apple’s FairPlay Digital Rights Management system intact.
Enjoy your track!