
In android, Switch is a two-kingdom user interface detail that is used to display ON (Checked) or OFF (Unchecked) states as a button with thumb slider. By using thumb, the person may also drag back and forth to pick an choice either ON or OFF.
The Switch detail is useful for the users to trade the settings among two states either ON or OFF. We can add a Switch to our software format by way of the use of Switch item.
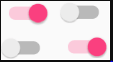
Following is the pictorial illustration of the use of Switch in android programs.
By default, the android Switch can be in OFF (Unchecked) nation. We can alternate the default kingdom of Switch by means of the usage of android:checked attribute.
In case, if we want to change the country of Switch to ON (Checked), then we need to set android:checked = “actual” in our XML layout report.
In android, we can create Switch manage in two approaches either in XML format file or create it in Activity document programmatically.
Create Switch in XML Layout File
Following is the pattern manner to outline Switch control in XML format document in android application.
If you examine above code snippet, right here we described Switch manage and putting Switch country ON using android:checked attribute and textOff / textOn attributes are used to set the textual content to symbolize Switch country in xml format document.
Create Switch Control in Activity File
In android, we will create Switch manage programmatically in activity file primarily based on our necessities.
Following is the instance of creating Switch manage dynamically in hobby file.
RelativeLayout layout = (RelativeLayout)findViewById(R.id.r_layout); Switch sb = new Switch(this); sb.setTextOff(“OFF”); sb.setTextOn(“ON”); sb.setChecked(true); layout.addView(sb);
This is how we are able to outline Switch in XML format file or programmatically in interest document primarily based on our requirements.
Handle Switch Click Events
Generally, on every occasion the person clicks on Switch, we can stumble on whether or not the Switch is in ON or OFF nation and we will deal with Switch click occasion in interest record using setOnCheckedChangeListener like as proven below.
Switch sw = (Switch) findViewById(R.id.switch1); sw.setOnCheckedChangeListener(new CompoundButton.OnCheckedChangeListener() { public void onCheckedChanged(CompoundButton buttonView, boolean isChecked) { if (isChecked) { // The toggle is enabled } else { // The toggle is disabled } } });
This is how we will manage Switch click activities in android packages based totally on our necessities.
Android Switch Control Attributes
Following are the a number of commonly used attributes related to Switch manage in android packages.
| Attribute | Description |
|---|---|
| android:id | It is used to uniquely identify the control |
| android:checked | It is used to specify the current state of switch control |
| android:gravity | It is used to specify how to align the text like left, right, center, top, etc. |
| android:text | It is used to set the text. |
| android:textOn | It is used to set the text when toggle button is in ON / Checked state. |
| android:textOff | It is used to set the text when toggle button is in OFF / Unchecked state. |
| android:textColor | It is used to change the color of text. |
| android:textSize | It is used to specify the size of text. |
| android:textStyle | It is used to change the style (bold, italic, bolditalic) of text. |
| android:background | It is used to set the background color for toggle button control. |
| android:padding | It is used to set the padding from left, right, top and bottom. |
| android:drawableBottom | It’s a drawable to be drawn to the below of text. |
| android:drawableRight | It’s a drawable to be drawn to the right of text. |
| android:drawableLeft | It’s a drawable to be drawn to the left of text. |
Android Switch Control Example
Following is the instance of defining a two Switch controls and one Button manage in RelativeLayout to get the kingdom of Switch controls when we click on Button manipulate in android utility.
Create a brand new android utility the use of android studio and give names as SwitchExample. In case if you aren’t aware of creating an app in android studio take a look at this newsletter Android Hello World App.
Now open an activity_main.Xml record from reslayout course and write the code like as shown beneath
activity_main.xml
If you have a look at above code we defined a Switch controls and one Button manage in RelativeLayout to get the kingdom of Switch controls whilst we click on on Button manage in XML format report.
Once we’re finished with creation of layout with required controls, we need to load the XML layout aid from our activity onCreate() callback approach, for that open primary pastime record MainActivity.Java from javacom.Tutlane.Switchexample course and write the code like as shown below.
MainActivity.java
package com.tutlane.switchexample; import android.support.v7.app.AppCompatActivity; import android.os.Bundle; import android.view.View; import android.widget.Button; import android.widget.Switch; import android.widget.Toast; public class MainActivity extends AppCompatActivity { private Switch sw1,sw2; private Button btnGet; @Override protected void onCreate(Bundle savedInstanceState) { super.onCreate(savedInstanceState); setContentView(R.layout.activity_main); sw1 = (Switch)findViewById(R.id.switch1); sw2 = (Switch)findViewById(R.id.switch2); btnGet = (Button)findViewById(R.id.getBtn); btnGet.setOnClickListener(new View.OnClickListener() { @Override public void onClick(View v) { String str1, str2; if (sw1.isChecked()) str1 = sw1.getTextOn().toString(); else str1 = sw1.getTextOff().toString(); if (sw2.isChecked()) str2 = sw2.getTextOn().toString(); else str2 = sw2.getTextOff().toString(); Toast.makeText(getApplicationContext(), “Switch1 – ” + str1 + ” \n” + “Switch2 – ” + str2,Toast.LENGTH_SHORT).show(); } }); } }
If you look at above code we’re calling our format using setContentView technique in the shape of R.Layout.Layout_file_name in our activity file. Here our xml file name is activity_main.Xml so we used document call activity_main and we are seeking to get the country of two Switch controls on Button click.
Generally, at some point of the launch of our interest, onCreate() callback method may be known as via android framework to get the desired format for an interest.
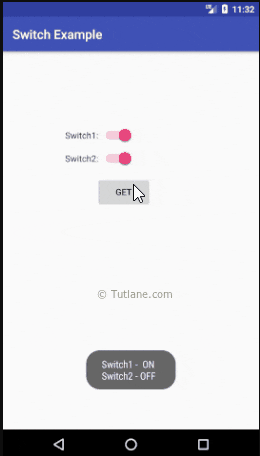
Output of Android Switch Example
When we run above example the usage of android digital device (AVD) we are able to get a end result like as proven below.
This is how we will use Switch manipulate in android applications to switch the settings among states either ON or OFF based totally on our requirements.