
An Ultimate Guide to Setting Up FTP Server,In a day in which massive faraway storage is alternatively common, it can be odd to speak about sharing files the usage of FTP (File Transfer Protocol).
However, it’s miles still used for document exchange wherein safety does now not constitute an important consideration and for public downloads of documents, for example.
It’s for this reason that mastering a way to configure a FTP server and permit nameless downloads (now not requiring authentication) is still a relevant topic.
In this text we can provide an explanation for the way to installation a FTP server to allow connections on passive mode where the consumer initiates each channels of conversation to the server (one for commands and the alternative for the real transmission of files, also referred to as the manipulate and information channels, respectively).
You can study greater approximately passive and lively modes (which we can no longer cover here) in Active FTP vs. Passive FTP, a Definitive Explanation.
That stated, allow’s begin!
An Ultimate Guide to Setting Up FTP Server,Setting up a FTP Server in Linux
To set up FTP in our server we will install the following packages:
# yum install vsftpd ftp         [CentOS]
# aptitude install vsftpd ftp    [Ubuntu]
# zypper install vsftpd ftp      [openSUSE]
The vsftpd bundle is an implementation of a FTP server. The call of the package stands for Very Secure FTP Daemon.
On the opposite hand, ftp is the purchaser application with a purpose to be used to get admission to the server.
Keep in thoughts that during the examination, you will be given simplest one VPS where you’ll need to put in both consumer and server, so that is exactly the same method that we can comply with in this article.
An Ultimate Guide to Setting Up FTP Server,In CentOS and openSUSE, you’ll be required to start and permit the vsftpd carrier:
# systemctl start vsftpd && systemctl enable vsftpdIn Ubuntu, vsftpd should be started and set to start on subsequent boots automatically after the installation. If not, you can start it manually with:
$ sudo service vsftpd startOnce vsftpd is installed and running, we can proceed to configure our FTP server.
Up FTP Server ,Configuring the FTP Server in Linux
At any point, you may discuss with guy vsftpd.Conf for similarly configuration alternatives. We will set the maximum not unusual alternatives and point out their reason in this guide.
As with another configuration report, it is critical to make a backup copy of the authentic before making modifications:
# cp /etc/vsftpd/vsftpd.conf /etc/vsftpd/vsftpd.conf.origThen open /and so on/vsftpd/vsftpd.Conf (the main configuration document) and edit the subsequent alternatives as indicated:
- Make certain you allow nameless get admission to to the server (we can use the /storage/ftp listing for this case – that’s wherein we will store documents for anonymous users to get right of entry to) without password:
anonymous_enable=YES
no_anon_password=YES
anon_root=/storage/ftp/
If you omit the remaining setting, the ftp directory will default to /var/ftp (the home directory of the committed ftp user that turned into created throughout installation).
- To allow study-only get admission to (thus disabling document uploads to the server), set the subsequent variable to NO:
write_enable=NOImportant: Only use steps #3 and #4 if you choose to disable the nameless logins.
- Likewise, you can want to also permit neighborhood users to login with their machine credentials to the FTP server. Later on this article we will show you a way to restrict them to their respective home directories to store and retrieve documents the use of FTP:
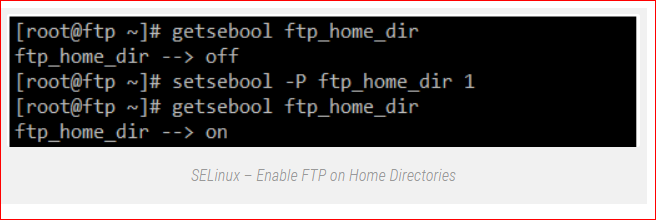
local_enable=YESIf SELinux is in imposing mode, you’ll additionally need to set the ftp_home_dir flag to on in order that FTP is permitted to write and read documents to and from their home directories:
# getsebool ftp_home_dirIf not, you can enable it permanently with:
# setsebool -P ftp_home_dir 1The expected output is shown below:
In order to restrict authenticated system users to their home directories, we will use
chroot_local_user=YES
chroot_list_enable=YES
chroot_list_file=/etc/vsftpd/chroot_list
With the above chroot settings and an empty /and so forth/vsftpd/chroot_list file (which YOU need to create), you may limit ALL system customers to their home directories.
Important: Please observe this still requires which you ensure that none of them has write permissions to the top listing.
If you need to permit a selected person (or more) outdoor their home directories, insert the usernames in /and so on/vsftpd/chroot_list, one in keeping with line.
- In addition, the following settings will can help you limit the to be had bandwidth for nameless logins (10 KB) and authenticated customers (20 KB) in bytes according to second, and restriction the number of simultaneous connections according to IP address to five:
anon_max_rate=10240
local_max_rate=20480
max_per_ip=5- We will restriction the facts channel to TCP ports 15000 through 15500 in the server. Note that is an arbitrary desire and you could use a extraordinary range in case you want.
Add the following traces to /and so forth/vsftpd/vsftpd.Conf if they’re no longer already present:
pasv_enable=YES
pasv_max_port=15500
pasv_min_port=15000- Finally, you can set a welcome message to be shown each time a consumer get right of entry to the server. A little statistics with out further information will do:
ftpd_banner=This is a test FTP server brought to you by Tecmint.com- 8. Now don’t forget to restart the service in order to apply the new configuration:
# systemctl restart vsftpd      [CentOS]
$ sudo service vsftpd restart [Ubuntu]- 9. Allow FTP traffic through the firewall (for firewalld):
An Ultimate Guide to Setting Up FTP Server,Ultimate Guide Setting ,On FirewallD
# firewall-cmd --add-service=ftp
# firewall-cmd --add-service=ftp --permanent
# firewall-cmd --add-port=15000-15500/tcp
# firewall-cmd --add-port=15000-15500/tcp --permanent
An Ultimate Guide to Setting Up FTP Server,On IPTables
# iptables --append INPUT --protocol tcp --destination-port 21 -m state --state NEW,ESTABLISHED --jump ACCEPT
# iptables --append INPUT --protocol tcp --destination-port 15000:15500  -m state --state ESTABLISHED,RELATED --jump ACCEPT
Regardless of the distribution, we will want to load the ip_conntrack_ftp module:
# modprobe ip_conntrack_ftp And make it continual across boots. On CentOS and openSUSE this means adding the module name to the IPTABLES_MODULES in /and so on/sysconfig/iptables-config like so:
IPTABLES_MODULES="ip_conntrack_ftp"While in Ubuntu you’ll want to add the module name (with out the modprobe command) at the lowest of /and so on/modules:
$ sudo echo "ip_conntrack_ftp" >> /etc/modules- Last however no longer least, ensure the server is listening on IPv4 or IPv6 sockets (however now not each!). We will use IPv4 right here:
listen=YESWe will now check the newly hooked up and configured FTP server.
Testing the FTP Server in Linux
Ultimate Guide Setting,We will create a everyday PDF document (in this case, the PDF version of the vsftpd.Conf manpage) in /storage/ftp.
Note that you could need to put in the ghostcript package (which presents ps2pdf) separately, or use some other document of your preference:
# man -t vsftpd.conf | ps2pdf - /storage/ftp/vstpd.conf.pdfTo test, we can use both an internet browser (through going to ftp://Your_IP_here) and the usage of the command line customer (ftp). Let’s see what takes place whilst we input that FTP cope with in our browser:
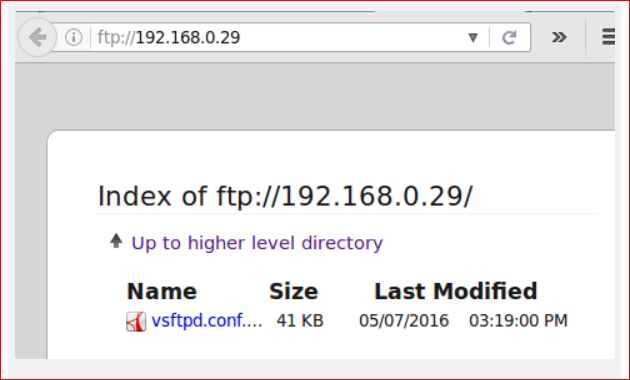
As you may see, the PDF document we stored earlier in /garage/ftp is to be had to be able to down load.
On the command line, kind:
# ftp localhostAnd enter anonymous as the consumer call. You must not be prompted on your password:
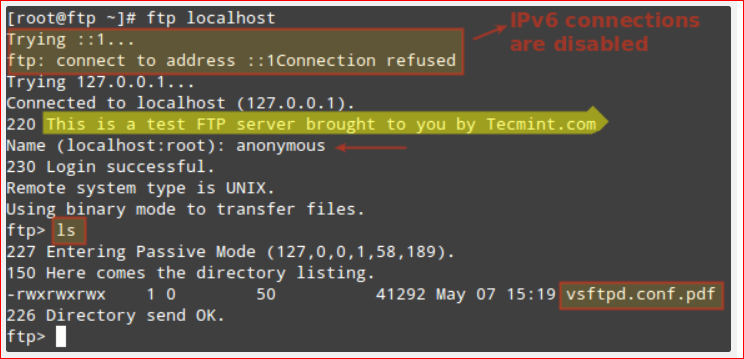
To retrieve documents the use of the command line, use the get command accompanied through the filename, like so:
# get vsftpd.conf.pdfand you’re good to go.
An Ultimate Guide to Setting Up FTP Server ,Summary
In this manual we have defined how to properly set up a FTP and use it to permit nameless logins.
You can also comply with the instructions given to disable such logins and simplest permit local customers to authenticate the use of their gadget credentials (not illustrated in this text because it isn’t required at the exam).
If you run into any problems, please share with us the output of the subsequent command, to be able to stripe the configuration file from commented and empty traces, and we can be more than happy to take a glance:
# grep -Eiv '(^$|^#)' /etc/vsftpd/vsftpd.confMine is as under (observe that there are different configuration directives that we did not cover in this newsletter as they are set by default, so no change turned into required at our facet):
local_enable=NO
write_enable=NO
local_umask=022
dirmessage_enable=YES
xferlog_enable=YES
connect_from_port_20=YES
xferlog_std_format=YES
ftpd_banner=This is a test FTP server brought to you by Tecmint.com
listen=YES
listen_ipv6=NO
pam_service_name=vsftpd
userlist_enable=YES
tcp_wrappers=YES
anon_max_rate=10240
local_max_rate=20480
max_per_ip=5
anon_root=/storage/ftp
no_anon_password=YES
allow_writeable_chroot=YES
pasv_enable=YES
pasv_min_port=15000
pasv_max_port=15500
Particularly, this directive
xferlog_enable=YESWill enable the switch log in /var/log/xferlog. Make certain you appearance in that document while troubleshooting.
Additionally, experience unfastened to drop us a word the usage of the remark form under when you have questions or any remarks approximately this article